Comparison Between Text Editor and Word Processor
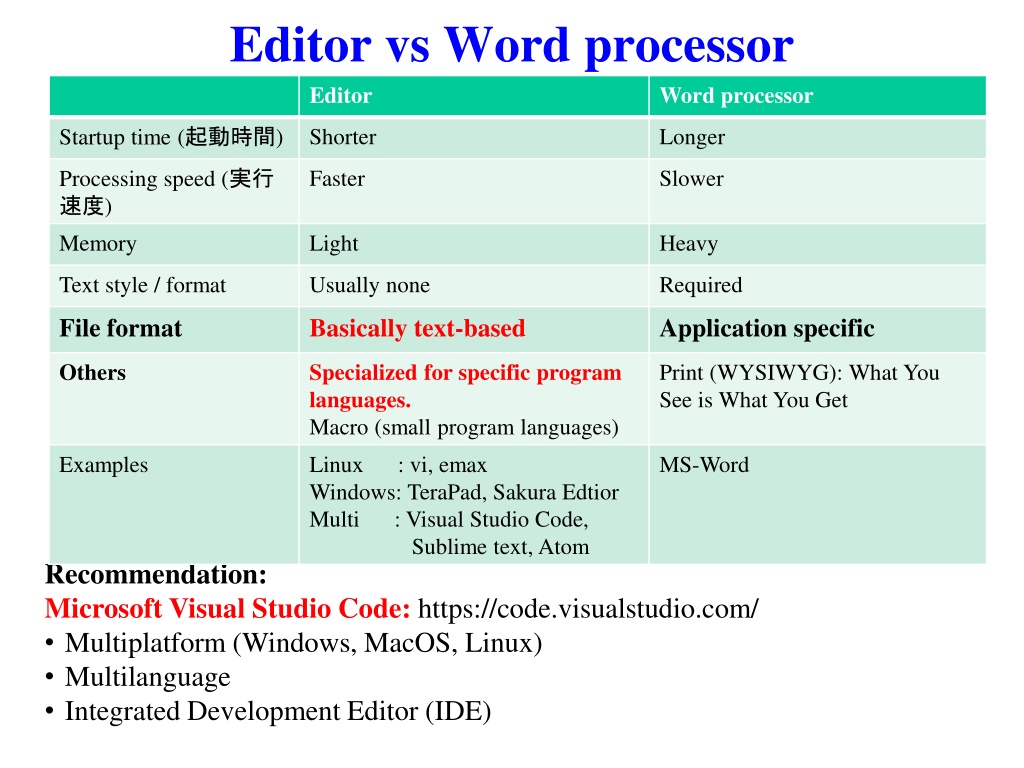
In this comparison, the differences between a text editor and a word processor are highlighted in terms of startup time, processing speed, memory usage, text style/format, file format, and application specificity. Both general and specialized examples are given with guidance on installing Visual Studio Code and expanding its functions for Python. Recommendations for color themes, icon themes, and auto-selection of character sets in files are also included.

Download Presentation

Please find below an Image/Link to download the presentation.
The content on the website is provided AS IS for your information and personal use only. It may not be sold, licensed, or shared on other websites without obtaining consent from the author. Download presentation by click this link. If you encounter any issues during the download, it is possible that the publisher has removed the file from their server.
E N D
Presentation Transcript
Editor vs Word processor Editor Word processor Shorter Longer Startup time ( ) Faster Slower Processing speed ( ) Memory Light Heavy Text style / format Usually none Required File format Basically text-based Application specific Others Specialized for specific program languages. Macro (small program languages) Print (WYSIWYG): What You See is What You Get Examples Linux : vi, emax Windows: TeraPad, Sakura Edtior Multi : Visual Studio Code, Sublime text, Atom MS-Word Recommendation: Microsoft Visual Studio Code: https://code.visualstudio.com/ Multiplatform (Windows, MacOS, Linux) Multilanguage Integrated Development Editor (IDE)
How to install Visual Code Studio 1. Download from https://code.visualstudio.com/ 2. Run installer
VS Code: Expansion functions for python [Japanese page] Visual Studio Code Python https://docs.microsoft.com/ja-jp/learn/modules/python-install-vscode/ 2. Search python 3. Click Install Read a python script. Keywords are marked by color 1. Click the bottom ion on the left pane
As you like: Color theme expansion 3. Choose your favorite color theme 2. Choose Color Theme 1. Click Left-bottom icon
Other recommended expansions Material Icon Theme: Change the icons in the explorer view zenkaku: Highlighten Zenkaku spaces
As you like:Auto selection of character set in files 3. Input Encoding in the Top Textbox and ENTER 4. Check here for auto guess encoding 2. Choose Configure 5. Change these if you want to change default encoding / end-of-line (Eol) code For Default installation: python.pythonpath python.condapath python.defaultInterpreterPath C:\Users\[User Name]\anaconda3\python.exe C:\Users\[User Name]\anaconda3\Scripts C:\Users\[User Name]\anaconda3\python.exe 1. Click left-bottom icon For your own environment [ENV] python.pythonpath python.condapath python.defaultInterpreterPath C:\Users\[User Name]\anaconda3\envs\[ENV]\python.exe C:\Users\[User Name]\anaconda3\envs\[ENV]\python.exe C:\Users\[User Name]\anaconda3\Scripts
Select python.exe 2. Choose your python interpreter Python 3.8.XXX ( base : conda ) 1. Click left python in the bottom Status Bar
If needed: Specify VSC python.*path variables 3. Input python.pythonpath in the Top Textbox and ENTER 2. Choose Configure 4. Confirm your python.exe path or modify 5. Similarly input python.condapath, python.defaultInterpreterPath For Default installation: python.pythonpath python.condapath python.defaultInterpreterPath C:\Users\[User Name]\anaconda3\python.exe C:\Users\[User Name]\anaconda3\Scripts C:\Users\[User Name]\anaconda3\python.exe 1. Click left-bottom icon For your own environment [ENV] python.pythonpath python.condapath python.defaultInterpreterPath C:\Users\[User Name]\anaconda3\envs\[ENV]\python.exe C:\Users\[User Name]\anaconda3\envs\[ENV]\python.exe C:\Users\[User Name]\anaconda3\Scripts
If needed: PATH Variable NOTE: VCS + Anaconda often fails load numpy mkl modules and DLLs Better to specify the Library and DLL paths to the PATH variable 1. Run Windows Explorer 1. Left click mouse button 3. Click System configuration 2. Choose Property 4. Click Environment Variables
If needed: PATH Variable If you can t run a python script using numpy from VSC: 6. Add C:\Users\[User Name]\anaconda3 C:\Users\[User Name]\anaconda3\Library C:\Users\[User Name]\anaconda3\Library\bin or these three paths on your installation 5. Double click Path 7. Move them to top by Up button on right
If needed: Specify paths of other python modules 6. Add your library paths. Multiple paths are given with the separator ; E.g., d:\Programs\python\lib for T. Kamiya s library 1. Double click PYTHONPATH
Verify your VSC properly works 1. Open python script or folder: File => Open Folder => Open [data-COE] 2. Open test.py 3. Click to run Suceeded
If needed: Debug VisualStudioCode Python Qiita https://qiita.com/ryt-t5/items/4f15c5b069ad3e6910e8
If needed: CSV module 3. Read a CSV file and click Edit csv 2. Click Install f 1. Click the bottom ion on the left pane
: VSC (code.exe) : conda call [ENV] conda vsc.bat: call conda activate [ENV] code vsc.bat:
_CONDA_EXE d:/anaconda3 _CONDA_EXE d:/anaconda3\ \Scripts _CONDA_ROOT d:/anaconda3 _CONDA_ROOT d:/anaconda3 CONDA_DEFAULT_ENV 2.7 CONDA_DEFAULT_ENV 2.7 CONDA_EXE D: CONDA_EXE D:\ \anaconda3 CONDA_PREFIX D: CONDA_PREFIX D:\ \anaconda3 CONDA_PREFIX_1 d: CONDA_PREFIX_1 d:\ \anaconda3 CONDA_PROMPT_MODIFIER (2.7) CONDA_PROMPT_MODIFIER (2.7) CONDA_PYTHON_EXE D: CONDA_PYTHON_EXE D:\ \anaconda3 CONDA_SHLVL 2 CONDA_SHLVL 2 PYTHONPATH d: PYTHONPATH d:\ \Programs Scripts\ \conda.exe conda.exe anaconda3\ \Scripts anaconda3\ \envs anaconda3 Scripts\ \conda.exe conda.exe envs\ \2.7 2.7 anaconda3\ \python.exe python.exe Programs\ \python python\ \lib lib PATH: PATH: D: D:\ \anaconda3 anaconda3\ \envs D: D:\ \anaconda3 anaconda3\ \envs D: D:\ \anaconda3 anaconda3\ \envs D: D:\ \anaconda3 anaconda3\ \envs D: D:\ \anaconda3 anaconda3\ \envs D: D:\ \anaconda3 anaconda3\ \envs D: D:\ \anaconda3 anaconda3\ \condabin; envs\ \2.7; envs\ \2.7 envs\ \2.7 envs\ \2.7 envs\ \2.7 envs\ \2.7 condabin; 2.7; 2.7\ \Library Library\ \mingw 2.7\ \Library Library\ \usr 2.7\ \Library Library\ \bin; 2.7\ \Scripts; Scripts; 2.7\ \bin; bin; mingw- -w64 usr\ \bin; bin; bin; w64\ \bin; bin; PATH: PATH: Base D: D:\ \anaconda3 anaconda3\ \condabin; D: D:\ \Anaconda3; Anaconda3; d: d:\ \Anaconda3 Anaconda3\ \Library; D: D:\ \Anaconda3 Anaconda3\ \Library Base condabin; Library; Library\ \bin; bin;
: Bin ( ) 3. Read a binary file and click HEX 1. Click the bottom ion on the left pane f 2. Click Install