Enhance Your Presentations: Mastering Callouts and Screen Shots
Elevate your presentation game by learning to effectively use callouts and screen shots in PowerPoint. Discover how to incorporate callouts to highlight key information and grab audience attention, and seamlessly insert screen shots to enhance your visual content. Follow step-by-step instructions to improve the visual appeal and clarity of your presentations.

Download Presentation

Please find below an Image/Link to download the presentation.
The content on the website is provided AS IS for your information and personal use only. It may not be sold, licensed, or shared on other websites without obtaining consent from the author. Download presentation by click this link. If you encounter any issues during the download, it is possible that the publisher has removed the file from their server.
E N D
Presentation Transcript
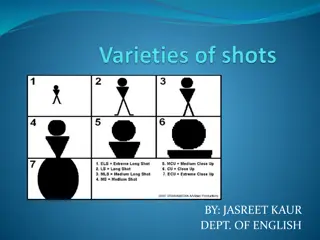
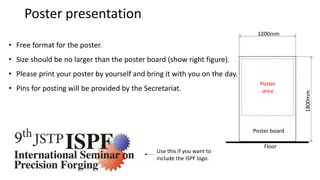
How to use callouts and do screen-shots
This will show your name, check and see if it is your name first before doing any work. Signing in You need to sign in to your student account and type in PowerPoint in the search bar Type in PowerPoint here, right click the app, and click pin to taskbar Click here to open up the windows tab
Callouts Go to your PowerPoint and on the right side, there should be text boxes and callouts, you can use these throughout your presentation (it s mandatory)!! Go to Insert-> shapes-> callouts. Use the ones that are most appealing to you. To type in the callout, go to Insert->text box. Then click in the box and begin typing. Or you can just click in the callout and begin typing. This is called a callout, you can use more if you click the down button on the side
Screen-shots This is the print screen- shot button, you click it, go back to your PowerPoint, and click ctrl+v on the keyboard to get your picture You can also put pictures on your PowerPoint, these are mandatory as well