How to Customize Reports in FootPrints Executive Dashboard
Accessing the Executive Dashboard in FootPrints allows you to view and customize canned reports for your needs. Learn how to edit metrics, apply filters, and save changes for a personalized experience. Add new tabs to create additional dashboards with unique settings.

Download Presentation

Please find below an Image/Link to download the presentation.
The content on the website is provided AS IS for your information and personal use only. It may not be sold, licensed, or shared on other websites without obtaining consent from the author.If you encounter any issues during the download, it is possible that the publisher has removed the file from their server.
You are allowed to download the files provided on this website for personal or commercial use, subject to the condition that they are used lawfully. All files are the property of their respective owners.
The content on the website is provided AS IS for your information and personal use only. It may not be sold, licensed, or shared on other websites without obtaining consent from the author.
E N D
Presentation Transcript
After logging in to FootPrints, click on Reports and select Executive Dashboard
This will bring up a screen with some canned reports. These can be edited to suit your needs by clicking the pencil icon or removed if not needed by clicking the trash can icon.
After clicking the pencil icon to edit, you will see this screen for selecting your metrics for the Statistics style report. If you wish to filter your results, click Edit Optional Filters
These are the Filter Options available for each type of report. After selecting your filters (or none) click done
After you make your changes, click Save .
This is the edit screen for the Watchlist style component. You can add up to ten configurations.
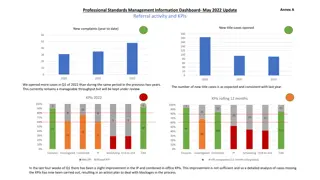
The edit screen in the Resolution style component. The resulting bar graph:
The edit screen in the Activity style component. Resulting Graph:
The edit screen in the SLA style component. Table Result:
If you want to add another dashboard, click Add a New Tab at the top.
On the new tab, you have the option to change the tab settings. There are 3 selections for each report style. Activated All Created
Watchlists: You would click the +Add to include your selection on the new tab.
Once you click +Add, it will show 1 Added to this tab beside your selection. After making your selections, click Show Dashboard
You would then click the pencil icon to edit the settings, click Save when you are done.
The results will be shown on the dashboard. To make changes to the components shown, click Change Dashboard
If you need help, you can click the Help icon in the upper right hand corner of the screen for context sensitive information.
Contact Information If you have any questions about the Executive Dashboard, please send them to support.footprints@maine.gov


")