Zoom Best Practices and Security Guidelines
Learn how to enhance the security of your Zoom meetings by enabling essential security settings like passwords, waiting rooms, and user authentication. Discover tips for managing chat settings, screen sharing options, and meeting registration to ensure a safe and productive virtual meeting environment.

Download Presentation

Please find below an Image/Link to download the presentation.
The content on the website is provided AS IS for your information and personal use only. It may not be sold, licensed, or shared on other websites without obtaining consent from the author. Download presentation by click this link. If you encounter any issues during the download, it is possible that the publisher has removed the file from their server.
E N D
Presentation Transcript
Zoom Best Practices and Security Timothy Skidmore Academic Technologist
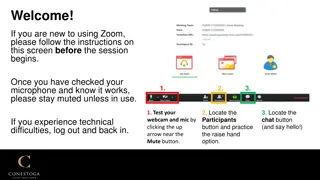
Enable Security Settings When scheduling your Zoom meetings to keep unwanted attendees out ensure you set your security settings. 1. Make sure your set a password or code for your meeting. This can be an automatically generated password or one you choose. 2. You also have several security option available on zoom.us. Once you login on the left-hand menu select settings.
Security Settings Waiting rooms are the first options in your settings. If you choose to have a waiting room, you may turn on the toggle switches you would like. Note if you do not turn on you can enable this during a meeting by selecting the security icon on the menu bar.
Security Settings Your next area deals with password settings. Here you can change the password settings for your meetings. Note if you turn off the embed passcode attendees will have to enter the passcode manually before joining the meeting.
Authenticated User Settings If you choose authenticated users, you have several options You can choose to have only individuals with a Dine College email that is associated with their zoom account Note students or staff will have to sign up for zoom with their college email to be able to join.
Chat settings In your settings you can set up your chat options. Here you have the option to change the default chat choices. You can set this to no one, host and co-host only, everyone, or everyone and anyone. You also have the option to allow saving the chat.
Screen Sharing Setting your screen sharing options By default, your screen sharing in on and only the host can share. This prevents any unwanted sharing from occurring during the meeting. You can change this during the meeting. Annotation is a useful tool if working with individuals but can also be used as a disruptive tool. If you would like this to be enabled, you must monitor and if anything disruptive is done, stop share as quickly as possible.
Meeting Registration When scheduling you can require attendees to register for the meeting. This can ensure that only registered individuals will receive the link.
Security Settings During Meeting If you meeting is unsecured or not you have several options by clicking on the security icon on the menu bar. Here you can lock meeting, enable waiting room, hide profile pictures. Allow participants to share screen, chat, rename/unmute themselves start video or share whiteboards. You can also suspend participant activities.
Security During Meeting If a participant is being disruptive during the meeting first suspend all participant activities, then select the participant icon. Once the participant menu opens select the name and move your cursor to the end and click on the three dots. Here you can remove or mute the individuals. Note in your settings individuals removed can either be allowed back or not. If allowed back, make sure waiting room is enabled and chat with the person.