Service Portal User Guide for Providers
Learn how to login to the service portal, navigate the site, manage your caseload, and create caseload groups effectively. Access important features like the service log, supervision log, reports, and resources to streamline your service provision process. Follow step-by-step instructions and utilize the available tools for efficient service documentation and student management.
Download Presentation
Please find below an Image/Link to download the presentation.
The content on the website is provided AS IS for your information and personal use only. It may not be sold, licensed, or shared on other websites without obtaining consent from the author. Download presentation by click this link. If you encounter any issues during the download, it is possible that the publisher has removed the file from their server.

Presentation Transcript
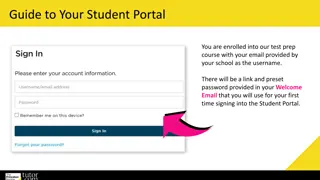
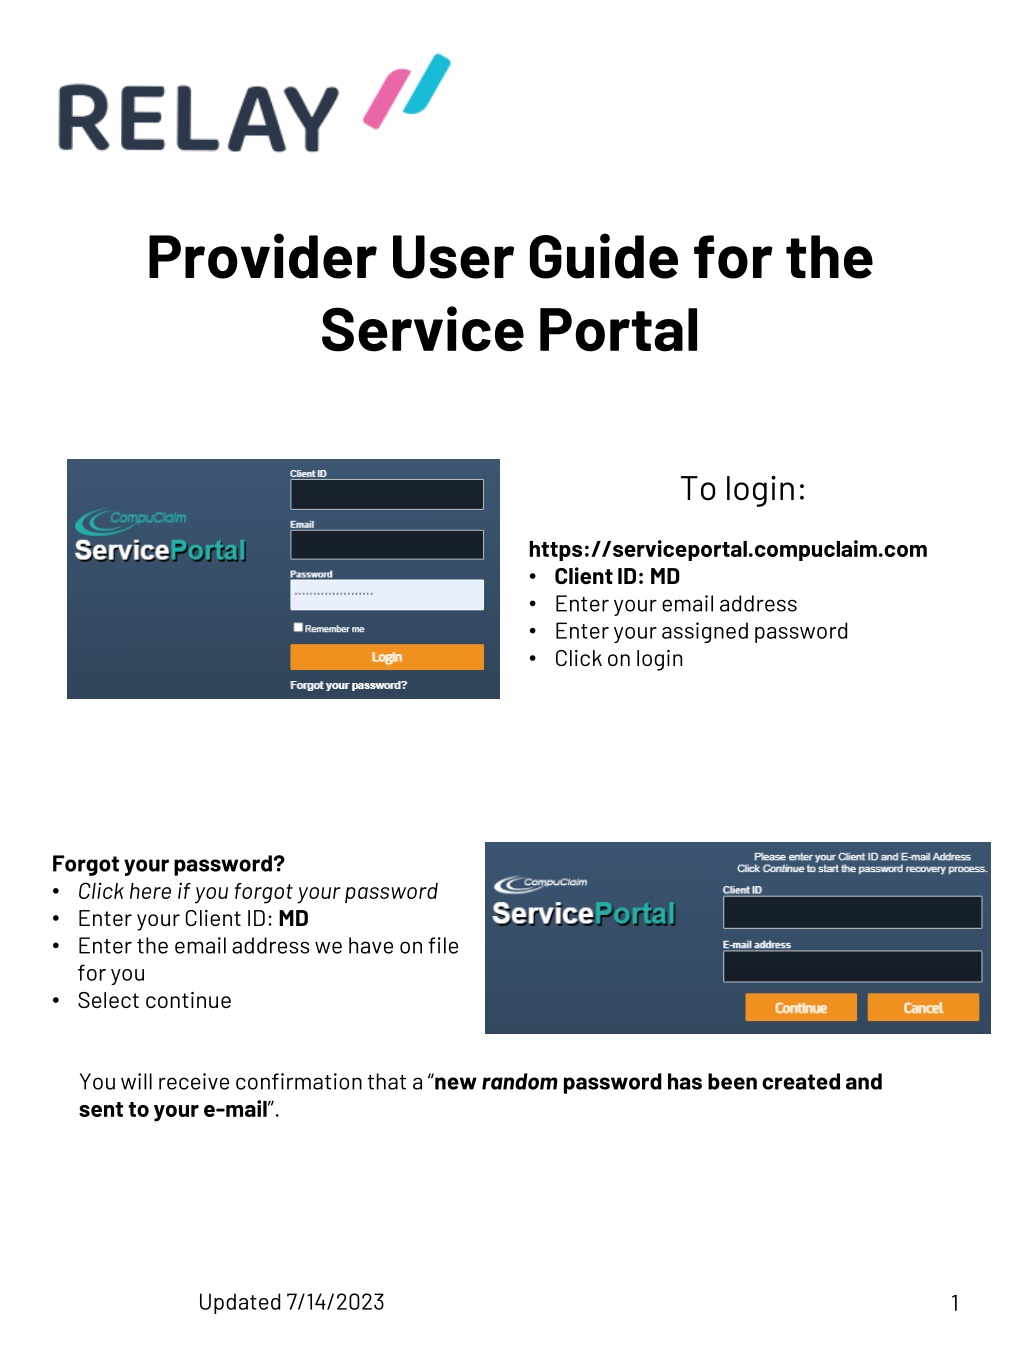
Provider User Guide for the Service Portal To login: https://serviceportal.compuclaim.com Client ID: MD Enter your email address Enter your assigned password Click on login Forgot your password? Click here if you forgot your password Enter your Client ID: MD Enter the email address we have on file for you Select continue You will receive confirmation that a new random password has been created and sent to your e-mail . Updated 7/14/2023 1
Navigating the Site The top right corner of the Service Portal displays the Navigational Links that are available continuously throughout the system. My account: To change password Log out: Ends session Home: Returns you to home page. Wizards: This is how you will log eligible services. Service Log by Student Wizard Where services are entered for students on your caseload. Users may select one student, multiple or all students. You must choose at least one student. Edit Student Service Logs You can edit all service logs as long as status is pending. You can change service documentation, add or delete comments or change time. You can also delete services if needed. Supervision Log Use this wizard if you need to complete supervision logs. Supervisors have been assigned to supervise providers and are required to view and approve students service logs before they can be submitted for reimbursement. Reports: Live Reports can be saved or printed Logging Summary Detailed Student Report Monthly Student Log. Manage Caseload: Providers can easily add/remove students to and from their caseload. Help : Training Videos and answers to frequent questions. Guides and Resources: Guides and Resources is an easy to use, centralized location for important SBCH program related documents that are frequently used by related services providers. 2
Managing Your Caseload Click the Manage Caseload link to view available students in district to add to your caseload. Students in the portal are a district choice. You may see the entire student population or only students in Special Education. New students or students in the identification phase may not appear immediately. If you cannot find a student as your district administrator/ Medicaid coordinator for assistance. Search for students by entering a few letters of the last and or first name. To add a student, click on the Add button to the left. To remove a student from your caseload, click on the Remove button to the left. Use the only show students on my caseload box to quickly see the students you have previously selected. You will notice the Only show active students button is selected by default. This will allow you to only search for students currently active within the district. If you unselect this button, you will be able to find students who may have left district and are no longer active. 3
Creating Caseload Groups You have the ability set permanent groups within your caseload. Use this feature when you work with the same students on a routine basis. To add a student to a group the student must be on your caseload. Access this feature through the Service Log by Student Wizard page 1 2 3 4
Creating Caseload Groups Click on the Create a Group button on the Service Log by Student Wizard page. Create your group names by clicking New . Once you have named your group click update below. See #1 in the diagram. Add students to your group. See #2 in the diagram. Choose the group name. Choose your students by placing a check mark in the box to the left of the student name. Click Close in bottom right corner of the open drop down box. Click Select . Your students should appear in the small box below. Click Save Group Review your groups. See #3 in the diagram Find your group name in the box My Student Groups . There might be multiple pages, look for the numbers and arrows below the box if needed. Click on the small box to the left of the group name to expand the group. Use the delete button to remove any students as needed. To log services, select your desired group from the small drop down on the Service log by Student Wizard. Once your students display click the next button and move on to the calendar. Select your date or dates and proceed. 5
Logging Services Click Wizards in the navigation bar Select Service Log by Student Wizard Select one or more students by placing a checkmark in the box for the student(s) you want to enter logs for. Click Next to move on to the calendar. 6
The calendar will display the current month. You may navigate to previous months using the drop down or the arrows above the calendar. Select the day you wish to log by placing a check mark in the small box on the day you wish to document. You may also select multiple days. Select all the days within the month you wish to document. Weekends are not available for documentation. If you have selected multiple students that you wish to document as a group you mustplace a check mark in the Group Service box near the student name. You may select multiple days for multiple students. Once you have selected the day or days you wish to document click Next . If you have only chosen one student / one day you will be given the option of what to enter. Indicate the log you wish to document. Select Service Log for direct service. You may use the additional options to document non-billable services if desired. 7
Service Log Page Confirm the student. Confirm the date. You may change if needed by clicking on the Service Date field. From the Service Type dropdown, select the service you provided. The page will change as you select different services. Complete the required fields. Enter the start time. Enter the end time. Select an option from the Progress Report drop down if required. Enter Comments: Comments should include a description of the event, observations and outcomes from the session. Comments are typically a SOAP note in nature. Select the Areas Covered/Assessed. You must select one but may select all that apply. Select Save Service Log NOTE: The Service Portal is an electronic logging tool. How you use it is up to you and the district you work for. You may use it as a record keeping location in addition to a Medicaid billing tool. However, Medicaid is only concerned with the billable pieces and required documentation to support those services. Entering student absences is not required by Medicaid. 8
Suggestions for Logging- Do what works for you Below are options on how you can enter information into the Service Portal. Start each process by clicking on Wizards in the navigation bar. Select Service Log by Student Wizard to proceed. One Student- One day You may want to log just one student at a time. As you create logs on this student the prefill from last service log button comes in handy. By click the button all of the previous information except the comments is automatically populated. Enter a comment to complete the log. Multiple students - one day Select all of the students you serviced on one day. On the calendar place a check mark in the group service box. Select a day and click next. You will now be taken through all of the students you selected in alphabetical order. Be sure to pay close attention to the student and the service delivered. You can also use this feature if you wish to log a non-billable note such as early dismissal or delay opening. One Student , One Month of services Select your student. On the calendar select all of the days you provided service. Click next and begin the process. If you have selected 3 services days in the month, you will have 3 logs to complete. As you complete your logs make sure the date and service are correct. Clicking save service log will move all information to the next log. You can edit any information along the way. Keep in mind as you change services you may be required to enter more information to complete a new log. You may place more than one entry on a day. This could be multiple services, non-billable notes or monthly progress. 9
Reports You have the ability to create reports for your personal use. These reports may be for a variety of reasons; audits, meetings, transfer of student to another provider, etc. Logging Summary- a great way to get an excel spreadsheet of your services over a longer period of time for multiple students. Detailed Student Report- This is a great option for when needing to discuss services with a coworker or parent. Monthly Student Log- This is an attendance grid of the student caseload you have indicated. You can print it out and use it as you see fit. Creating a Report Click on Reports in the navigation bar Select the report you wish to create Select the date range and student Click the Run Report Information will display below Export to PDF or XLS (Excel) for printing 10
Editing and Deleting logs You have the ability to edit and delete any logs that have not been submitted to Medicaid for billing. If a log has been submitted for billing it is visible on a report but longer editable. Quickly delete an entry during the logging process by clicking on the visible trash can. Editing a log Click on Wizards Select Edit Student Service Logs Enter some information to refine your search. Student name and date of service are useful. Click Search Logs will display below. Select edit or delete to modify a record If you can not find the log it is not available to you. It has been moved on for billing. If the log was an error, please contact the Medicaid Coordinator in your district. Deleting a log Click on Wizards Select Edit Student Service Logs Enter some information to refine your search. Student name and date of service are useful. Click Search Logs will display below. Click on delete. If you can not find the log it is not available to you. It has been moved on for billing. If the log was an error, please contact the Medicaid Coordinator in your district. 11
Supervision Wizard If you are a supervising clinician (OT, PT, Speech, BCBA) and have a COTA, PTA, SLPA, or BCaBCA/Behavior Tech assigned to you, you MUST approve their logs each month in the service portal. Login to the Service Portal Click on Wizards Click on Supervision Log Wizard Click on Enter Supervision Log . Place a check mark in the box down the left hand side. Placing a checkmark in the box located in the title bar will check all the logs.
Enter a short sentence in the comments box. I have reviewed and approved these entries. is sufficient. Click one of the buttons with save in it. Save and Return to List takes you back to the students with logs requiring supervision. Save and go to next student takes you to the next student in alphabetical order Save and continue will let you see the next page of logs on the current student.
Validating MDOnline Entries Services entered into MDOnline will be imported into the Relay system for the Medicaid billing process. Data imported from MD Online requires a provider to review and validate the service. Validating the service confirms the service delivered, confirms the service type and stamps the record with a provider s electronic signature. Click on Wizards Click on Validate MD Online Service Logs Services to be validated will be listed below. You may filter by student or date. 14
Click to open the record. This allows the provider to alter the entry as needed. It is important that the details of the entry are reviewed and corrected if necessary. Pay attention to the service type and comments that may indicate the student was absent or the service was non-billable. Clicking Save Service Log will close the record and move it forward for the next step. 15