Enhancing the Degree Works Experience with the Responsive Dashboard

The Degree Works Responsive Dashboard by Ellucian introduces a modernized tool for students and advisors, offering a mobile-friendly interface, intuitive plan building features, and support for both classic and responsive dashboards. Key components such as student search, advanced search, student header, additional features, collapsing blocks, and the what-if feature are highlighted in this new tool to improve the academic planning process.

Download Presentation

Please find below an Image/Link to download the presentation.
The content on the website is provided AS IS for your information and personal use only. It may not be sold, licensed, or shared on other websites without obtaining consent from the author. Download presentation by click this link. If you encounter any issues during the download, it is possible that the publisher has removed the file from their server.
E N D
Presentation Transcript
What is the Responsive Dashboard? The Degree Works Responsive Dashboard is a new tool from Ellucian designed to modernize the Degree Works experience for students and advisors. The Responsive Dashboard offers a mobile friendly site for students on the move. The Plans feature in the Responsive Dashboard offers a more intuitive interface for building and modifying student plans of study. WVU will continue to simultaneously support the Responsive and Classic dashboards while they are supported by Ellucian.
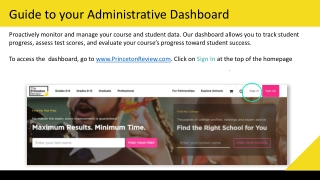
Homepage The Responsive Dashboard homepage contains a simple student search, as well as the pop-up menu for the Advanced Search. The Worksheet, Exceptions, and Plans tabs are persistent across all pages of the Responsive Dashboard. Responsive Dashboard URL: https://degreeworks.wvu.ed u/RDashboard
Advanced Search The Advanced Search remains similar to the Classic Dashboard. From this menu, Advisors are able to identify populations of students based on a variety of criteria.
Student Header Much of the information present in the student header of the Classic Dashboard will carry over to the Responsive Dashboard. However, some functionality is presently unavailable, such as URLs. As updates from Ellucian allow us to bring forward these customizations, we will implement them. Other information may also be located in a different location in the Responsive Dashboard.
Additional Features Several functions have been placed at the top of the Audit: The Printer Icon will pull up the PDF version of the audit for printing and preserving an audit. The Letter icon will display the students contact information. The Three Vertical Dots will bring up additional options for the GPA Calculators, Class History, and Notes.
Collapsing Blocks The Header of each block displays the same information as seen in the Classic Dashboard. One new function of the Responsive Dashboard is the ability to collapse blocks. Click the arrow in the top right corner of the block to collapse/reveal the block contents.
What-If The What-If Feature is located directly under the Student Header block The What-If allows students and advisors to simulate how a students audit will appear if they were to change their major, or add an additional credential, such as a Minor or Area of Emphasis. The Responsive Dashboard also adds a new feature allowing students and advisors to perform a What-If on specific courses.
Major Change What-If To perform a simulated major change on a student, select a catalog year and program from the drop down menu. If the student has any minor(s) or concentrations those can be added optionally. Once the information has been entered, click the Process button at the bottom of the page.
Future Coursework What-If If a student is not interested in changing their major, but instead wants to know how a future course may affect their audit, the Responsive Dashboard has the ability to do that. By checking the Use Current Curriculum button, a student can enter a Subject and Course Number. The What-If will take the courses entered and place them into the appropriate places in the audit. The Future Coursework can also be used in combination with the major change What-If. If the Use Current Curriculum is left unchecked, the Future Coursework is at the bottom of the list.
Adding Exceptions For those with Exceptions access, click on the Exceptions tab at the top of the page. Click the + symbol next to whichever requirement you wish to make an exception on. Select the Exception you want to make from the dropdown menu. Fill in the appropriate information Click Add Exception
Exceptions in the Audit The exception will appear in the audit as displayed below. Showing who made the exception, when the exception was added, the exception type, and the description entered. The Exception summary block at the bottom of the audit will show all exceptions that have been applied to the students audit. It also shows which block the audit has been applied to. Clicking on the highlighted description will navigate to that exception in the audit.
Removing Exceptions To remove an exception: Navigate back to the exceptions screen. Scroll to the exception you want to remove Click the Trash Can on the right side of the page
Plans To Create or View student Plans of Study, select the Plans tab from the header bar The Plan List displays any existing plan. Selecting the plan description will allow for viewing/editing of the plan. To create a new plan, select New plan.
Creating Plans New Terms can be added with the Add term button. Different requirements can be added to the plan by clicking the + next to the requirement you want to add.
Choice The Choice requirement can be used to give students options on which course to take for this requirement. In the Course search box, type in the Subject/Course number of the course you wish to add to the list of options. To create additional options, click the Add button. If you want to specify a number of credits or minimum grade, those can also be selected.
Course The Course option allows you to add a specific course to the Plan of Study. Select which Term you want to add the course to from the dropdown list. Enter the Subject/Course number into the Course requirement box and select the course from the list. Minimum grade , Campus , and Delivery are optional. Delivery refers to On Campus or Online.
GPA GPA allows you to set a minimum gpa needed for whichever term you apply the requirement to. Select the Term from the dropdown list. Select what kind of GPA you want to track: Overall, Term, Major. Enter the GPA value you want the student to achieve.
Placeholder The Placeholder requirement allows for more ambiguous requirements to be placed in the plan of study. These include things like Electives and GEF 4. Select the appropriate Term from the dropdown list. Select the type of course the placeholder is filling (i.e. Elective or GEF 4) Enter a description for this placeholder.
Moving requirements within a plan If you need to move a requirement within a plan, from the main screen, simply drag and drop the requirement into a different term.
Contact Information: Office of the University Registrar 304.293.5355 Registrar@mail.wvu.edu v5.0 Fall 2014