Effective Strategies for Creating a Informative Poster Presentation

Crafting an engaging poster presentation requires careful consideration of content and design elements. Start with a completed abstract, ensuring a clear flow of information with concise bullet points. Avoid common mistakes like overcrowding with text and prioritize readability with appropriate text size and font choices. Emphasize key sections such as Background, Methods, Results, and Discussion to guide readers efficiently through your project.
- Poster presentation
- Effective strategies
- Presentation design
- Research communication
- Visual communication

Download Presentation

Please find below an Image/Link to download the presentation.
The content on the website is provided AS IS for your information and personal use only. It may not be sold, licensed, or shared on other websites without obtaining consent from the author. Download presentation by click this link. If you encounter any issues during the download, it is possible that the publisher has removed the file from their server.
E N D
Presentation Transcript
HOW TO MAKE A POSTER PRESENTATION- WHATTO INCLUDEAND WHATTO AVOID LEANNE TORGERSEN, SENIORR DGIVER FORSKNINGSADMINISTRASJON AVDELING, H GSKOLEN I STFOLD
BEFORE DESIGNING YOUR POSTER Have your abstract completed first before starting your poster The Abstract- an excellent template to build your poster from Typical main parts in an abstract are: Background/Objectives, Methods, Results, Discussion/Conclusion A poster typically has a couple extra components to it Main parts in a poster include: Background, Objectives/Purpose, Methods, Results (Visuals = Graphs/Pictures/Tables), Discussion/Conclusion/Next Steps, References The biggest difference between the two (Abstract vs. Poster) The poster is detailed and concise (only the main bulleted points), and thus is easy for the reader to follow (in essence it needs to have a flow to it when telling your story- can I follow what you did?) While the abstract is a more concise version of a manuscript, it does allow for more explanation and elaboration of your point - what you have done and what you have learned
COMMON MISTAKESWHEN CREATINGA POSTER The most common problems are the posters are too wordy and/or have too much detail Biggest challenge for all- how to present in a clear and concise fashion of what you did A reader would prefer to read a brief summary of your project without spending large amounts of time reading through your poster (to understand what you did) Translation yes the reader will read it as long as it is not too long Another issue overwhelming to a reader (back to the point above) filling all the space. This results in the poster looking cluttered and frankly It is okay to have spaces between the sections (for example Methods At least 40% of your poster can be blank or have space between sections Helps with the natural flow of the poster Results)
THE SMALLER DETAILSWITHTHE DESIGN OFYOUR POSTER Text size should be large enough that someone can read it from around 1,5 - 2 meters away (but this will depend on the environment where you are presenting) Some suggest minimum of 24 font size text in the different sections (Background, Method, Results, Discussion) References can use a smaller font size (important to include, but they don t need to take up too much space) Choose a font style that is easy to read like Arial or Times New Roman Have the title of your project be interesting in order to capture the reader s interest Not uncommon for a reader to read just the title of a poster It is the quickest way to see if they want to read more
THE FLOW OFYOUR STORY AND LAYOUT CHOICES Your poster tells the reader about your project/story what you did from beginning to end You will present your story in a logical order or flow that: Starts from the top left (or center- this depends on layout) Goes from top to bottom And from left to right This flow of ideas, and moving from one section to the other, should be clear and logical to the reader How do you want that story to read? Portrait versus Landscape Layout Portrait Two Columns (tends to be preferred for academic posters) Landscape Three Columns (preferred layout for research/scientific posters)
THE MAIN PARTS OFA POSTER- PART 1 Title, Author(s), Institution, Contact Information (i.e. email address) Background Statement of the problem, what have you observed, identified need (rationale for doing the project) Objectives/Purpose What had you plan to do, the goal of conducting the research/project Methods How you implemented your plan, steps/procedure
THE MAIN PARTS OFA POSTER- PART 1I Results (Visuals = Graphs/Pictures/Tables) What you have found, more specific on details, what were your outcomes The measurements found: % improvement after implementation of a training module, increased self-efficacy of the students, improved outcomes Discussion/Conclusion Summary of what you have learned, what benefits do you interpret from your results to have on: students, society, academics (if applicable) I like to conclude with what I call the Next Steps. This is what I learned now and what I plan to do next (next step in your research, teaching, training) References
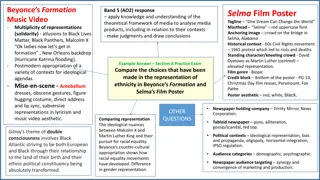
PICTURES AREWORTHA THOUSANDWORDS Include visuals in your poster and especially in the Results section Visuals can help the reader understand better what you did/what you found Charts and Graphs Examples: Pie Charts, Bar Charts, Area Charts, Line Charts, Scatterplots, Pyramid Charts, Histograms/Distribution Curves (if stats are needed), Pictographs Tables Demographic breakdowns Pre and post results Pictures Pictures of people in action doing the project (be careful with privacy rules/confidentiality) Anything that helps effectively get your point across
TEMPLATE OFA POSTER-WHERETO FIND OR HOWTO CREATE Templates and/or building your own Powerpoint- If creating your own Include the H gskolen logo - Designmanual - H gskolen i stfold (hiof.no) Templates available with H gskolen logo- Dokumentmaler For ansatte H gskolen i stfold (hiof.no) 3 column poster design Is available contact Hanne and Arild (Seksjon for pedagogisk utvikling og l ring/Section for Educational Development and Learning) A0 is the standard poster size If you printing a poster or anything larger thanA3/A4, then IT operations can help (just printing, not design) https://www.hiof.no/tjenester/it/kontakt/ If you need to print anything that is A3 or A4 in size, then (Halden) - Trykkeri/kopirom ved HI - H gskolen i stfold (hiof.no) Carrying case/tube- Staples
THANKYOU FOR YOURTIME I hope this helps and feel free to contact me should you ever have any questions References Home - Poster Presentations - Research Guides at UCLA Library Make a Good Poster | Undergraduate Research and Independent Projects (stanford.edu) PhD Posters Ten Simple Rules for a Good Poster Presentation - PMC (nih.gov)