Guide to Viewing Award Profiles in Core-CT Financials
"This detailed job aid provides step-by-step instructions with screenshots on how to view an Award Profile for an awarded grant in Core-CT Financials. The guide covers navigation, updating dates, accessing contract and proposal details, managing project status, activities, locations, attachments, and project teams. A comprehensive resource for efficiently managing grant information."

Download Presentation

Please find below an Image/Link to download the presentation.
The content on the website is provided AS IS for your information and personal use only. It may not be sold, licensed, or shared on other websites without obtaining consent from the author. Download presentation by click this link. If you encounter any issues during the download, it is possible that the publisher has removed the file from their server.
E N D
Presentation Transcript
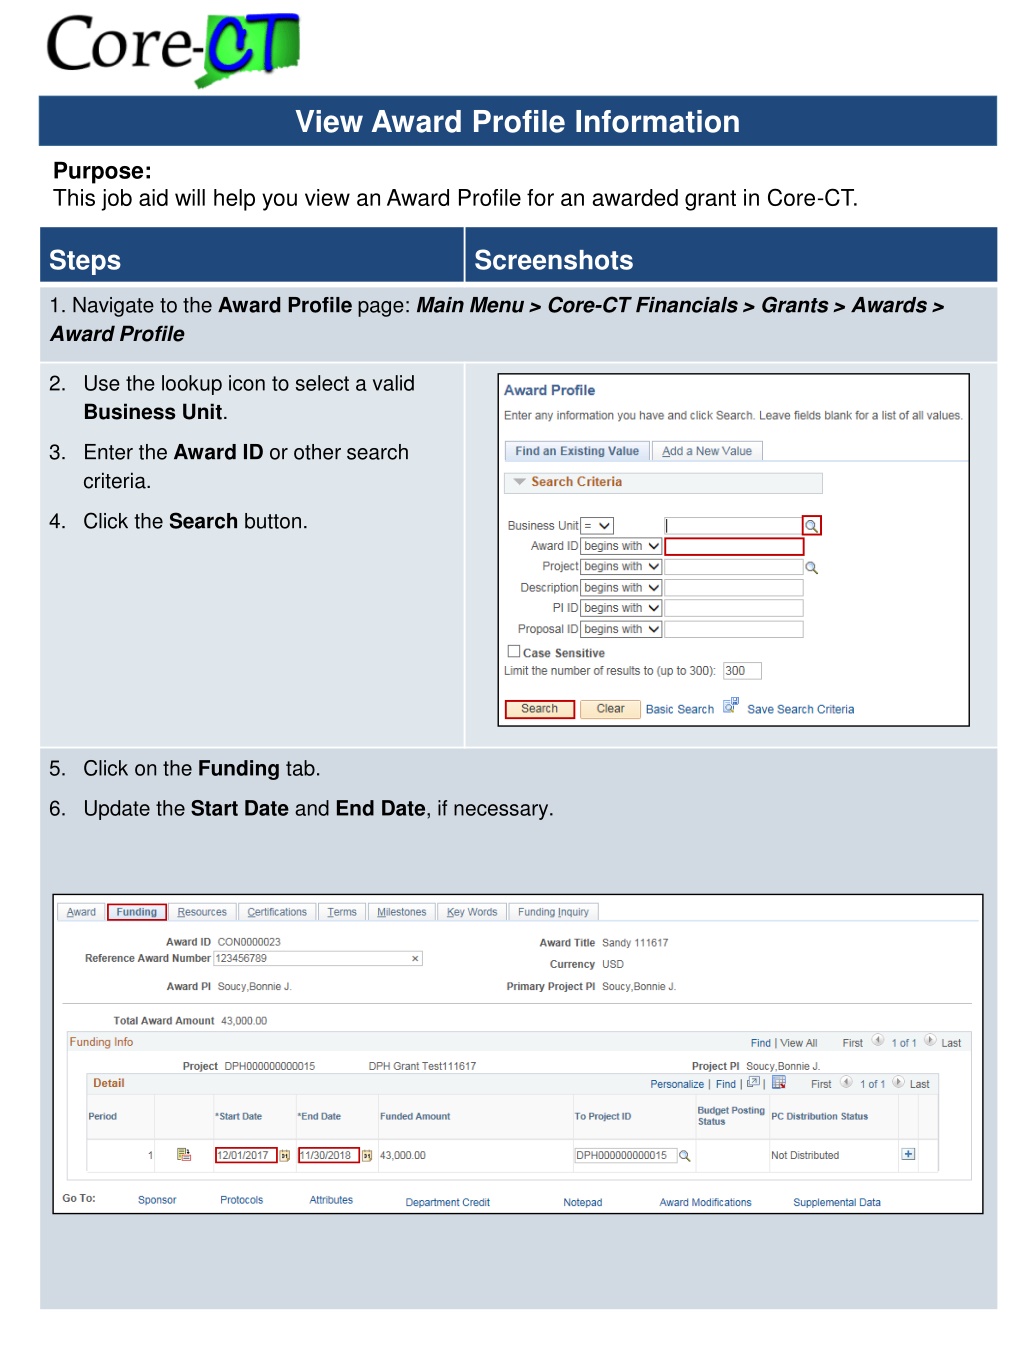
View Award Profile Information Purpose: This job aid will help you view an Award Profile for an awarded grant in Core-CT. Steps Screenshots 1. Navigate to the Award Profile page: Main Menu > Core-CT Financials > Grants > Awards > Award Profile 2. Use the lookup icon to select a valid Business Unit. 3. Enter the Award ID or other search criteria. 4. Click the Search button. 5. Click on the Funding tab. 6. Update the Start Date and End Date, if necessary.
View Award Profile Information Steps Screenshots 7. Click on the Award tab. 8. Optional: Click on the View Contract hyperlink to view the contract. 9. Optional: Click on the View Proposal hyperlink to view the proposal. 10. Click on the Project ID hyperlink. 11. Use the lookup icon to select a Project Type.
View Award Profile Information Steps Screenshots 12. Click the OK button in the popup message. 13. Click the Save button. 14. Click on the Project Status hyperlink. 15. Optional: Update the Effective Date to change when the Project will be open to start billing. 16. Click the lookup icon to select a Status. 17. Click the Save button. 18. Click the Return to Project General hyperlink.
View Award Profile Information Steps Screenshots 19. Click on the Project Activities hyperlink. 20. Update the Project Activity Start Dates and End Dates, if necessary. 21. Click the Save button. 22. Click on the Return to Project General hyperlink.
View Award Profile Information Steps Screenshots 23. Click the Add to My Projects button. 24. Click the OK button in the popup message. 25. Click on the Location tab. 26. Click on the + button to add a new effective dated location to the project. 27. Use the lookup icon to select a new Location Code. 28. Update the Effective Date. 29. Click the Save button. 30. Click on the > tab.
View Award Profile Information Steps Screenshots 31. Click the Attachments tab. 32. Click on the paperclip icon to add an attachment. 33. Click the Save button. 34. Click the Project Team hyperlink. 35. Click the Add Team Member button.
View Award Profile Information Steps Screenshots 36. Use the lookup icon to select the Employee ID. 37. Enter the Email ID. 38. Use the lookup icon to select the Project Role. 39. Click the Save button. 40. Click the Return to Project Team Summary hyperlink. 41. Click the Save button. 42. Click the Return to Project General hyperlink.