Guide to Using PSCEZPRINT for Printing Services
Discover how to efficiently utilize PSCEZPRINT for all your printing needs at prairiestate.edu. Learn how to log in, register, enter your department budget code, order duplication items, upload files, customize printing options, and finalize your orders. Follow step-by-step instructions with images for a seamless printing experience.
Download Presentation

Please find below an Image/Link to download the presentation.
The content on the website is provided AS IS for your information and personal use only. It may not be sold, licensed, or shared on other websites without obtaining consent from the author.If you encounter any issues during the download, it is possible that the publisher has removed the file from their server.
You are allowed to download the files provided on this website for personal or commercial use, subject to the condition that they are used lawfully. All files are the property of their respective owners.
The content on the website is provided AS IS for your information and personal use only. It may not be sold, licensed, or shared on other websites without obtaining consent from the author.
E N D
Presentation Transcript
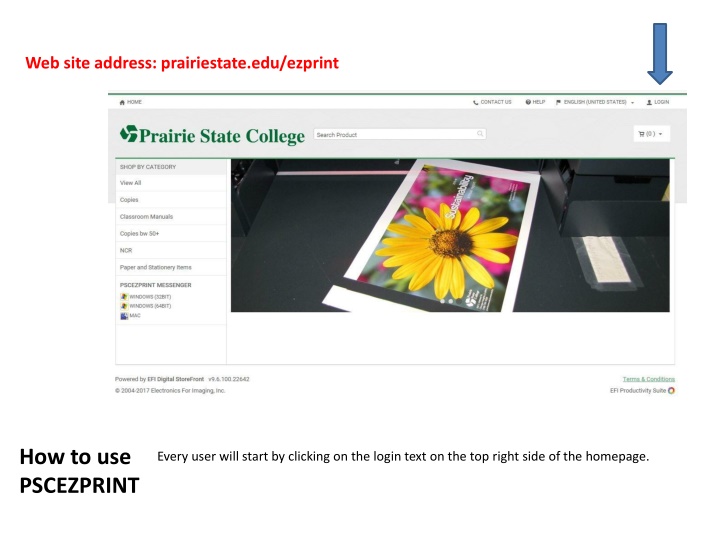
Web site address: prairiestate.edu/ezprint How to use PSCEZPRINT Every user will start by clicking on the login text on the top right side of the homepage.
After clicking on login, this screen will come up. If you know your user name and password, simply sign in. If you are new to EZPRINT, click on Register.
You must enter your 17-digit department printing budget code on this page. You can email pmaurer@prairiestate.edu, phambrick@prairiestate.edu or kclifford@prairiestate.edu to request it, or come to the Duplication/Mailroom Center to view the list. When you enter the budget code, it must be in this format: 00-000000-00000-0000 Budget code
Once you have logged in or registered, this is the starting page for ordering your duplication items. We placed the most requested items on the home page. If you don t see what you need here, look on the navigation bar on the left and click on the word copies for more choices. Click on the order now button for the product (8.5 x 11 copies, etc.) to begin your request.
1 1. Start here by clicking add files.
1. After clicking add files, this is the next screen you will see. If you click upload files, then you will be able to browse for your file and upload. 2. If you have hardcopy, choose other and it will look exactly as the old version.
1 This shows how many copies you need and how many pages will be copied. 2 This is where you can change items particular to you copy job, stapling, cutting, etc. 4 3 This is where any special instructions can be listed. 1. Once you have uploaded your file or chosen hardcopy, this screen will come back up. This is now where you select the particulars for your job. 2. Choose paper orientation, paper color, stapling, hole punching, etc. Many selections are defaulted to the most requested items. 3. There also is a box on the bottom where you can list any special instructions. 4. Once you have selected all your options, you are now ready to add to cart.
Once you have clicked the add to cart button, this screen will pop-up. Just to make sure that you have chosen the exact options that you want, etc. Click on I Agree to proceed.
After clicking the I Agree button, this is the page that pops-up. If you are done ordering, you need to choose the shopping cart icon to go to checkout.
1 2 1. This is the next screen. On this screen choose the date you would like your item to be completed. 2. Then choose PROCEED TO CHECKOUT.
1 1. Choose to have your job placed in your mailbox or in the cabinet. 2. Enter any special delivery instructions in this box. 2 3. You can choose to continue shopping or 4. PROCEED TO PAYMENT. 3 4
Your account number should automatically populate here. If not, you will need to enter it or if you need to change it, you would do that here as well. Type in your department name, e.g. English, Math, Physical Science, etc. It is now time to PLACE MY ORDER.
This is your order confirmation page. You have successfully submitted your duplication request. All hardcopy requests must be submitted with this page attached. We will not be accepting any work in the basket without this page attached. There is a computer and printer available on the front counter in the Duplication/Mailroom Center.
You will receive an email confirmation that your order has been successfully placed. You will receive another email when your order has been printed and is available in your mailbox or the cabinet.
On the top of every page you will see the little head icon and your name. If you click the drop-down, you will find links to Order History, My Profile, Saved Files, Saved Jobs, Downloads and Logout.
If you need assistance with anything pertaining to EZPRINT, please contact Karen Clifford in the Duplication/Mail Room Center at kclifford@prairiestate.edu or stop by the Duplication/Mail Room Center and we will be happy to help you.
