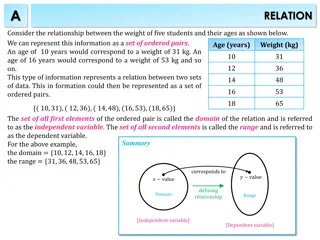
Understanding Lenses: Types, Functions, and Rules

Delve into the world of lenses, exploring how they manipulate light rays using refraction. Discover the two main types of lenses - converging and diverging, and learn about their unique properties and focal points. Gain insights into the rules governing convex and concave lenses, and unlock the secrets of how they shape light rays to form images.

Download Presentation

Please find below an Image/Link to download the presentation.
The content on the website is provided AS IS for your information and personal use only. It may not be sold, licensed, or shared on other websites without obtaining consent from the author. Download presentation by click this link. If you encounter any issues during the download, it is possible that the publisher has removed the file from their server.
E N D
Presentation Transcript
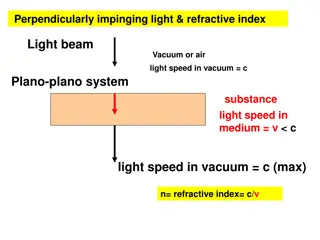
Lenses and Images We saw in our work on Refraction that light rays entering a dense medium from a less dense medium will be bent towards a normal Lenses use the phenomenon of refraction to change the direction of light rays There are TWO types of lens, and each has its own set of uses determined by the way in which it affects the path of light rays.
Lenses and Images The ones you are most likely to come into contact with are the Bi versions of CONVERGING and DIVERGING lenses. CONVERGING lenses will direct light rays inwards to a set point, we will name this soon. DIVERGING lenses will direct light rays outwards.
Lenses and Images CONVERGING (CONVEX) lenses will bring light rays together at the FOCAL POINT on the OPPOSITE SIDE to their entrance along the PRINCIPAL AXIS.
Lenses and Images As you might have guessed, in the case of the CONVEX lens shown there will be a focal point on BOTH sides of the lens, at exactly ONE focal length from the centre point of the lens either side. There are THREE rules to remember when dealing with CONVEX lenses: 1. A light ray passing along the principal axis and entering the lens on one side will pass through the focal point on the other. 2. A light ray passing through the focal point and entering the lens on one side will emerge parallel to the principal axis on the other side (essentially the reverse of step 1) 3. A light ray passing through the centre of the lens will continue unaffected as it emerges from the other side.
Lenses and Images 1. A light ray passing along the principal axis and entering the lens on one side will pass through the focal point on the other. 2. A light ray passing through the centre of the lens will continue unaffected as it emerges from the other side. 3. A light ray passing through the focal point and entering the lens on one side will emerge parallel to the principal axis on the other side (essentially the reverse of step 1)
Lenses and Images In the case of a BICONCAVE (DIVERGING) lens the principal focus is a point on each side of the lens where divergent rays, if backtraced, appear to have come from. As you might have guessed, there are rules with regard to CONCAVE lenses which are essentially modifications of the rules for CONVEX lenses.
Lenses and Images 1. A light ray passing along the principal axis and entering the lens on one side will refract and travel along a path in line with the nearside principal focus 2. As with CONVEX lenses, an incident ray passing through the centre of the lens will carry on unaltered and in the same direction. 3. An incident ray passing through the lens in the direction of the far side principal focus will refract to a path parallel to the principal axis (again, effectively the reverse of rule 1).
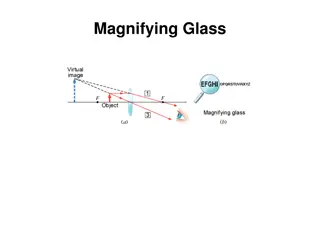
Images Images can be REAL or VIRTUAL and there is one simple way to differentiate between them. This is an important statement that may be useful when answering questions on this subject: REAL IMAGES can be captured or projected onto a SCREEN VIRTUAL IMAGES can t !! Let s take a look at some examples to try to make sense of this. First of all we will look at a REAL IMAGE produced with a CONVEX lens: Can you think of an example (that we use every day) of this type of projection?
Images Images projected onto the RETINA through the IRIS and LENS appear INVERTED, it is the BRAIN that basically sets it the right way up ! Images should be described by 3 features: 1. REAL or VIRTUAL 2. INVERTED (or not) 3. LARGER or SMALLER than the object
Images There is nowhere that you can place a screen to project a VIRTUAL image as they are diverging rays which only appear to be coming from where you see them, the don t come together and so cannot be projected onto a screen.
Hot Spot 1 Q1.What type of lens does the human eye have? The human eye has a biconvex lens which projects an inverted image onto the retina. Q2. What is meant by the expression focal point of a lens? The focal point is the point where either parallel rays along an axis pass through the lens and converge on the other side, or where a parallel ray will have passed through from the other side. Q3. Is a biconcave lens converging or diverging? A biconcave lens is diverging Q4. What are the two types of image that a lens can produce? These are REAL and VIRTUAL images. Q5. By what three points should an image be described? REAL/VIRTUAL LARGER/SMALLER INVERTED (OR NOT)
Predicting The Image - Ray Diagrams We have seen that images produced by lenses can be real, virtual, inverted, upright, larger or smaller than the source. Ray Diagrams help to show what sort of image a lens will produce, by using straight lines to mark out the paths of light and resulting images. Lens Centre Principal Axis F2 F1 F1 F2 Focal Points Focal Points
Predicting The Image - Ray Diagrams EXERCISE 1 : Draw light rays from the tip of the object and the base of the object. Show their path through the lens and use this information to predict the location of the real image on the right. 2F 1F 1F 2F
Predicting The Image - Ray Diagrams In this example, an object lying beyond 2F (two focal lengths) will produce an image which is REAL, INVERTED and SMALLER than the source. 2F 1F 1F 2F
Predicting The Image - Ray Diagrams EXERCISE 2 : Draw light rays from the tip of the object and the base of the object. Show their path through the lens and use this information to predict the location of the real image on the right. 2F 1F 1F 2F
Predicting The Image - Ray Diagrams In this example, an object lying AT 2F (two focal lengths) will produce an image which is REAL, INVERTED and IDENTICAL IN SIZE to the source AT 2F. 2F 1F 1F 2F
Predicting The Image - Ray Diagrams EXERCISE 3 : Draw light rays from the tip of the object and the base of the object. Show their path through the lens and use this information to predict the location of the real image on the right. 2F 1F 1F 2F
Predicting The Image - Ray Diagrams In this example, an object lying between 2F (two focal lengths) and 1F (one focal length) will produce an image which is REAL, INVERTED and LARGER than the source. 2F 1F 1F 2F
Predicting The Image - Ray Diagrams EXERCISE 4 : Draw light rays from the tip of the object and the base of the object. Show their path through the lens and use this information to predict the location of the real image on the right. 2F 1F 1F 2F
Predicting The Image - Ray Diagrams In this example, an object lying AT 1F (one focal length) will NOT produce an image as the light rays emerge parallel. 2F 1F 1F 2F
Predicting The Image - Ray Diagrams In this example, which now shows a CONCAVE lens, there will NEVER be a time when the image is on the opposite side to the object, so a concave lens can only form VIRTUAL images. 2F 1F 1F 2F