State of Wisconsin Document Upload and Appointment Scheduling Guide

This comprehensive guide provides step-by-step instructions on how to upload documents for the State of Wisconsin, login to DaySmart Appointments, create interview schedule links for various regions and agencies, obtain the 4-digit schedule ID number, and includes instructions for creating schedule links. With detailed images and clear instructions, this guide aims to assist users in navigating document uploads and appointment scheduling efficiently.

Download Presentation

Please find below an Image/Link to download the presentation.
The content on the website is provided AS IS for your information and personal use only. It may not be sold, licensed, or shared on other websites without obtaining consent from the author. Download presentation by click this link. If you encounter any issues during the download, it is possible that the publisher has removed the file from their server.
E N D
Presentation Transcript
State of Wisconsin Document Upload Guide
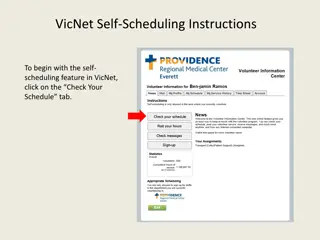
How to login to DaySmart Appointments Go to www.DaySmartAppointments.com Click on Login at the top of the page Enter your login and password. Passwords are case sensitive. If you forget your password, use the Forgot password link in the login box and you will receive an email with password reset instructions LOGIN
How to Create a Link to an Interview Schedule State of Wisconsin Enterprise HR https://booknow.appointment-plus.com/b94cplcy/?&e_id=#### Region 1-DOA https://book.appointment-plus.com/b951dtz0/?&e_id=#### Region 1-DPM https://booknow.appointment-plus.com/b951xp42/?&e_id=#### Region 2-DOC https://booknow.appointment-plus.com/b95287ky/?&e_id=#### Region 3-DATCP https://booknow.appointment-plus.com/b952d39c/?&e_id=#### Region-3 DCF https://booknow.appointment-plus.com/b952hsse/?&e_id=#### Region 3-DNR https://booknow.appointment-plus.com/b952mvhg/?&e_id=#### Region 3-DWD https://booknow.appointment-plus.com/b952rk6x/?&e_id=#### 1. These are the starting Agency links.
How to Create a Link to an Interview Schedule Region 4-DHS https://booknow.appointment-plus.com/b953h2mq/?&e_id=#### Region 4-DVA https://booknow.appointment-plus.com/b953lsbs/?&e_id=#### Region 4-DOR https://booknow.appointment-plus.com/b953qv10/?&e_id=#### DMA https://booknow.appointment-plus.com/b9541jk2/?&e_id=#### DOJ https://booknow.appointment-plus.com/b9546z94/?&e_id=#### OSPD https://booknow.appointment-plus.com/b95cxsyx/?&e_id=#### WHS https://booknow.appointment-plus.com/b95cnntk/?&e_id=#### WTS https://booknow.appointment-plus.com/b95csjxm/?&e_id=#### 1. These are the starting Agency links.
How to Get the 4-Digit Schedule ID Number 1. Hover Over the Schedule Name. 2. The Schedule ID Number is at the bottom of the screen: employee_id=####.
How to Get the 4-Digit Schedule ID Number 1. Replace the #### with the employee_id code. 2. For ex: https://booknow.appointment-plus.com/b94cplcy/?&e_id=5579
Instructions for Creating Schedule Links https://apptplus.zendesk.com/hc/en-us/articles/215148823-Custom- Customer-View-Links