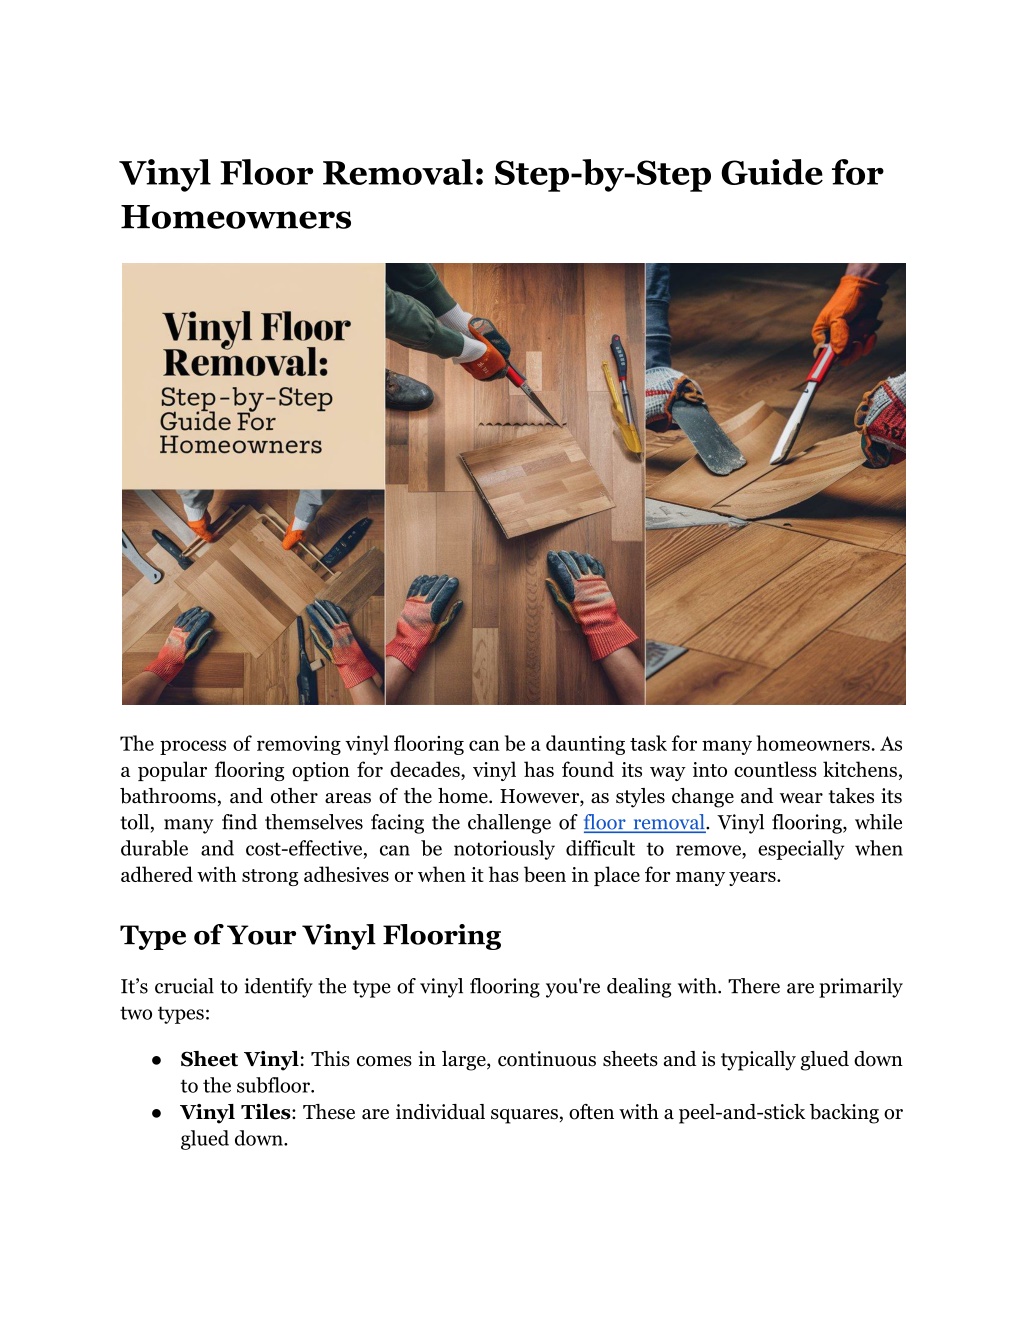
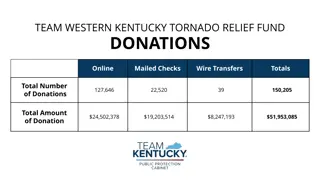
Vinyl Floor Removal_ Step-by-Step Guide for Homeowners
Learn how to remove vinyl flooring from your home in this step-by-step guide. Discover the tools needed, safety precautions, and tips for a successful removal project.

Download Presentation

Please find below an Image/Link to download the presentation.
The content on the website is provided AS IS for your information and personal use only. It may not be sold, licensed, or shared on other websites without obtaining consent from the author. Download presentation by click this link. If you encounter any issues during the download, it is possible that the publisher has removed the file from their server.
E N D
Presentation Transcript
Vinyl Floor Removal: Step-by-Step Guide for Homeowners The process of removing vinyl flooring can be a daunting task for many homeowners. As a popular flooring option for decades, vinyl has found its way into countless kitchens, bathrooms, and other areas of the home. However, as styles change and wear takes its toll, many find themselves facing the challenge of floor removal. Vinyl flooring, while durable and cost-effective, can be notoriously difficult to remove, especially when adhered with strong adhesives or when it has been in place for many years. Type of Your Vinyl Flooring It s crucial to identify the type of vinyl flooring you're dealing with. There are primarily two types: Sheet Vinyl: This comes in large, continuous sheets and is typically glued down to the subfloor. Vinyl Tiles: These are individual squares, often with a peel-and-stick backing or glued down.
Identifying your flooring type will help determine the best removal approach. Sheet vinyl can be more challenging to remove due to its size, while tiles might come up more easily but leave more adhesive residue. Tools and Materials Needed Gathering the right tools is essential for efficient vinyl floor removal. Here's what you'll need: Heavy-duty utility knife Pry bar or floor scraper Heat gun (for stubborn adhesives) Heavy-duty gloves Safety goggles Dust mask Knee pads Trash bags or a large container for debris Read More Articles: What You Need to Know About 26-Bit vs. 37-Bit Proximity Cards? Step-by-Step Removal Process 1. Prepare the Room Proper preparation is crucial for efficient vinyl floor removal: Clear the space: Remove all furniture, appliances, and d cor from the room. This provides unobstructed access to the entire floor and prevents damage to your belongings. Remove baseboards: Carefully pry off baseboards using a pry bar or putty knife. Number them if you plan to reinstall, and store them safely. Take off door thresholds: Unscrew and remove any metal or wooden thresholds between rooms. Ventilation is key: Open all windows and doors to ensure good air circulation. This helps dissipate any fumes from adhesives and reduces dust accumulation. Cover vents: Use plastic sheeting to cover air vents, preventing dust from entering your HVAC system. Set up a debris station: Place a large garbage can or several trash bags near the work area for easy disposal of vinyl pieces.
2. Score the Vinyl For sheet vinyl, scoring is an essential step: Use a sharp utility knife: Ensure your blade is new and sharp for clean cuts. Create manageable sections: Score the vinyl into strips about 6-12 inches wide. This makes removal more manageable and prevents large, unwieldy pieces. Apply firm pressure: Press hard enough to cut through the vinyl but not into the subfloor. Work in a grid pattern: For large rooms, consider scoring in both directions to create smaller squares. For vinyl tiles, scoring may not be necessary, but it can help with stubborn pieces. 3. Start Lifting Begin the actual removal process: Choose a starting point: Begin at a corner or along an edge where the vinyl meets the wall. Use proper tools: A pry bar, floor scraper, or putty knife can help lift the edge of the vinyl. Apply steady pressure: Work the tool under the vinyl and slowly lift upward. Be patient: If the vinyl resists, don't force it. This might indicate stronger adhesive that needs additional treatment. Work in sections: Remove one strip or section at a time, rolling it up as you go for easier disposal. Watch for subfloor damage: If you notice the subfloor coming up with the vinyl, stop and reassess your technique. 4. Remove Adhesive After the vinyl is gone, you'll likely face adhesive residue: Assess the adhesive type: Different adhesives may require different removal methods. Heat gun method: For stubborn, hardened adhesive, use a heat gun to soften it. Move the gun slowly over small sections, then immediately scrape with a putty knife or floor scraper. Chemical removers: For extensive residue, consider a commercial adhesive remover. Apply according to manufacturer instructions and allow it to sit for the recommended time.
Natural solutions: For less tenacious adhesives, a mixture of hot water and dish soap can help. Apply with a mop, let it sit for 15-20 minutes, then scrape. Mechanical removal: For large areas, consider renting a floor buffer with a scraping attachment. 5. Clean the Subfloor Thorough cleaning prepares the subfloor for new flooring: Remove all debris: Use a broom and dustpan to sweep up larger pieces. Vacuum thoroughly: A shop vac is ideal for removing fine dust and small particles. Damp cleaning: Use a damp (not wet) mop or cloth to wipe down the entire floor, removing any remaining dust or residue. Allow to dry completely: Ensure the subfloor is entirely dry before proceeding with repairs or new flooring installation. 6. Inspect and Repair Final steps before new flooring can be installed: Visual inspection: Carefully examine the entire subfloor for any signs of damage, such as cracks, soft spots, or unevenness. Minor repairs: Fill small cracks or holes with wood filler or floor leveling compound. Major issues: For significant damage, consult a professional. You may need to replace sections of the subfloor. Level check: Use a long level to check for any high or low spots that might affect new flooring installation. Final cleaning: After repairs, give the floor one last thorough cleaning to ensure a clean surface for your new flooring. Dealing with Challenges Sometimes, vinyl floor removal can present unexpected challenges. Here are some common issues and how to address them: Asbestos Concerns: Older vinyl flooring (installed before the 1980s) may contain asbestos. If you suspect your flooring might contain asbestos: Do not attempt to remove it yourself. Contact a professional floor removal company for testing and safe removal.
Stubborn Adhesive: For particularly stubborn adhesive: Use a commercial adhesive remover. Apply the remover according to manufacturer instructions. Allow it to sit for the recommended time before scraping. Damaged Subfloor: If you discover a damaged subfloor during removal: Assess the extent of the damage. For minor issues, patch and repair as needed. For extensive damage, consider replacing sections of the subfloor. Read More Articles: Understanding the Security Features of HID Proximity Cards? Comparison: DIY vs. Professional Removal Here's a simple comparison table to help you decide between DIY and professional removal: Aspect DIY Removal Professional Removal Cost Lower initial cost Higher time-saving cost, but Time Investment More time-consuming Quicker completion Skill Required Moderate needed DIY skills Expertise guaranteed Equipment Need to buy or rent tools Professionals tools bring all Risk of Mistakes Higher damage risk of subfloor Lower risk of damage Takeaway Tackling vinyl floor removal is undoubtedly a challenging task, but with the right approach, tools, and knowledge, it's a project that many homeowners can successfully undertake. This process not only saves money but also provides a sense of accomplishment and a deeper understanding of your home's structure.
At Tear It Up, we specialize in efficient and safe removal of all types of flooring, including vinyl floor removal, hardwood floor removal, and more. We bring expertise, top-of-the-line equipment, and a commitment to quality to every job. We pride ourselves on our attention to detail, clean work environments, and customer satisfaction. Let us take the stress out of your flooring project contact Tear It Up today for a consultation and witness how professional floor removal can uplift your home renovation journey. Site Article: Vinyl Floor Removal: Step-by-Step Guide for Homeowners


![Homeowner's Guide to Accessory Dwelling Units (ADUs) in [Jurisdiction]](/thumb/179471/homeowner-s-guide-to-accessory-dwelling-units-adus-in-jurisdiction.jpg)