Camera Calibration and Post-Processing Guide
Enhance your camera calibration and post-processing skills with this comprehensive guide. Ensure proper settings and follow step-by-step instructions for accurate results. From unrolling rotation curves to solving motion, this guide covers it all. Utilize tools like auto masking, wand wave data collection, and marker editing for precise calibration and reconstructions. Make the most of studio activities and post-processing tabs to streamline your workflow. Whether it's setting origin points or calibrating floor planes, this guide has you covered for optimal camera setup and data processing.

Uploaded on Oct 04, 2024 | 0 Views
Download Presentation

Please find below an Image/Link to download the presentation.
The content on the website is provided AS IS for your information and personal use only. It may not be sold, licensed, or shared on other websites without obtaining consent from the author. Download presentation by click this link. If you encounter any issues during the download, it is possible that the publisher has removed the file from their server.
E N D
Presentation Transcript
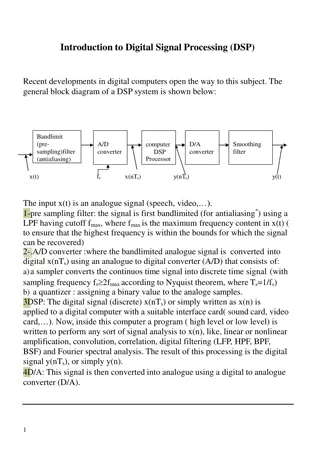
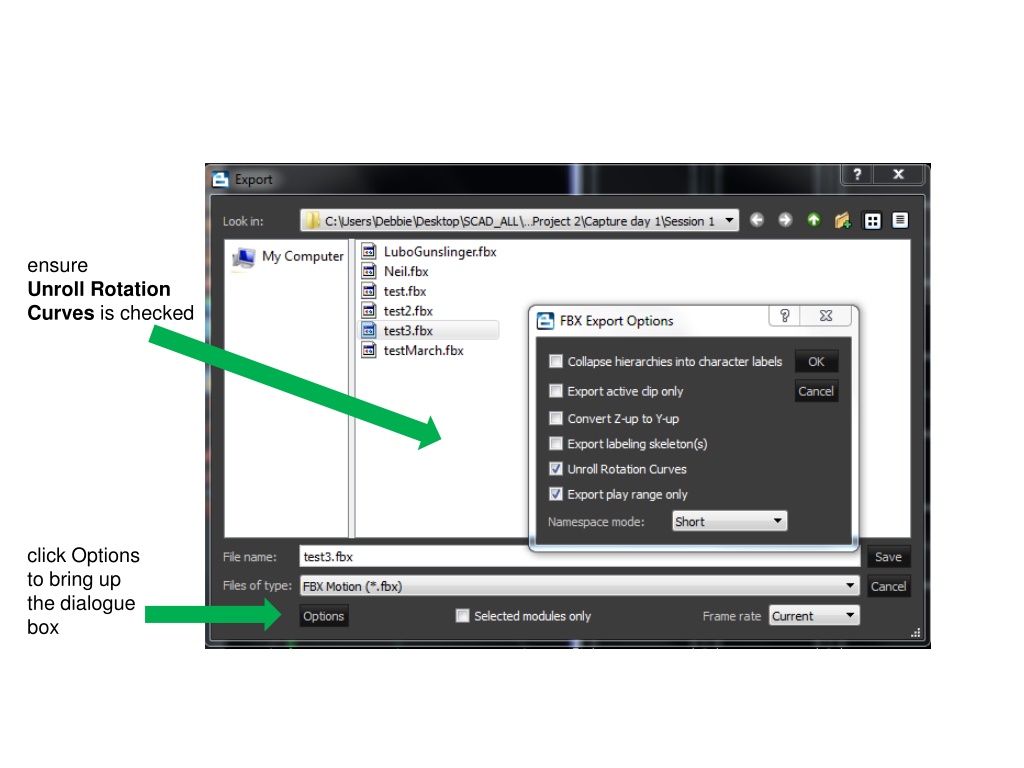
ensure Unroll Rotation Curves is checked click Options to bring up the dialogue box
Wand wave data being collected After the wand wave the cameras will appear in a circular form (it is not until you Set Origin that they look correct ) Calibration Steps Auto Masking (clean) Wand Wave (gather data) Set Origin (cameras orient) Calibrate Floor Plane (slight adjustment Save Calibration status window where overall error indicator will appear cameras not in a circle? Ignore number, start again
Studio Activities Tab layout for camera calibration layout for capture layout for ROM capture/process streaming circle fit - calibrate cameras, solve or reconstruct -capture connect the cameras gearbox will go red when connected
Post Processing Tab Reconstruct Auto Label Solve Motion new feature steps processed frame per frame
Editors Tab useful when streaming (Server Active/Stream Offline Data) script writing (hsl)
Studio Activities tab be sure this is set to Automatic Circle Fit Camera Layout
Post Processing tab 1. Reconstruct 2. Auto Label 3. Solve Motion
Left Hand from Above (no fingers) In the Selection Filter check none and then Marker Use the Marker Editing Editor with a marker selected Find Gap or Swap Markers LOWR_LeftForeArm LOHAND_LeftHand LIWR_LeftForeArm LIHAND_LeftHand
Left Hand from Above with fingers LPNK3 LIDX3 LOHAND_LeftHand LIHAND_LeftHand LOWR_LeftForeArm LTHM3 LIWR_LeftForeArm
Front View Back View
After Swap Markers are repaired along with labeling After Swap Bones are aligned properly After Calibrate TIP: use ALT to select After Calibrate
Reconstruct Create Labeling Setup Label ROM Calibrate (remember to check settings) After Reconstruct Hint: 3.5 adjust marker size After Create Labeling Setup After Label ROM After Calibrate (grey areas indicate covariance errors)
This only applies if you are using the Post (Axiom) Processing In reconstruction settings you can set Minimum Cameras to Start Trajectory to 2 (default is 2) and Store Ray Contributions to False. In Axiom Labeling Settings Joint Ranges Slack default is 1, DO NOT go over 1.5, but 1.2 might be for a very flexible actor. The lower value will be more accurate. Booting quality leave as is zero will be doing best for system Under Solving Settings: Turn Extrapolate finger data on to True


")


")