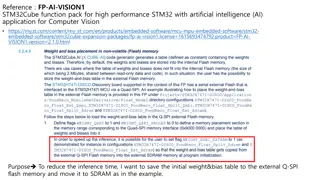
Introduction to Flash: Basics and Editions

Flash is a versatile tool used by designers and developers to create presentations, applications, and multimedia content. It offers two editions - Flash Basic 8 and Flash Professional 8, catering to different user needs. Flash Basic 8 focuses on multimedia content creation, while Flash Professional 8 is designed for advanced web designers and application builders. This article provides an overview of Flash, its features, and how to open the software to begin working on projects.

Download Presentation

Please find below an Image/Link to download the presentation.
The content on the website is provided AS IS for your information and personal use only. It may not be sold, licensed, or shared on other websites without obtaining consent from the author. Download presentation by click this link. If you encounter any issues during the download, it is possible that the publisher has removed the file from their server.
E N D
Presentation Transcript
BY - Dr. B. Kumar ASSISTANT PROFESSOR DEPT. OF ANIMAL GENETICS AND BREEDING Bihar Veterinary College, Patna-14 BASU
Introduction to Flash and Flow Chart
Introduction to Flash Flash is used by designers and developers to create presentations, applications and other content. The Flash projects may include simple animations, video content, complex presentations and applications. In general, individual pieces of be basic animation. You can make media-rich Flash applications by including pictures, sound, video and special effects. Flash can be used to work with a variety of file types. But here mainly two types of files their are uses: 1. FLA files are the primary files you work with in Flash. These are the files that contain the basic media, timeline, and script information for a Flash document. 2. SWF files are the compressed versions of FLA files. These are the files that you display on a web page.
There are two editions of Flash. 1. Flash Basic 8 2. Flash Professional 8 1. Flash Basic 8 Flash Basic 8 is the perfect tool for the web designers, interactive media professionals or subject matter experts developing multimedia content. Emphasis is on creation, import and manipulation of many types of media (audio, video, bitmaps, vectors, text, and data).
2. Flash Professional 8 Macromedia designed Flash Professional 8 is for advanced web designers and application builders. It includes all the features of Flash Basic 8, along with several powerful new tools. It provides many new tools for optimizing the look and feel of the Flash files.
To Open Flash To begin your work in Flash, perform these steps: Click on Start button and select all Programs. Select Macromedia option. Click on Macromedia Flash 8. Thus, the Macromedia Flash 8 screen opens (as shown).
Thus, the Macromedia Flash 8 screen opens (as shown). You will notice that the Flash window is divided into three segments. They are: Open a Recent Item Create New Create from Template
Components of Flash document Window The different components of the Flash window are: The Stage The Stage is the rectangular area where you place graphic content, including vector art, text boxes, buttons, imported bitmap graphics or video clips and so on while creating Flash documents. The Stage in the Flash environment represents the rectangular space in Macromedia Flash Player or in a web browser window where your Flash document appears during playback. By default, the stage dimension is set to 550 x 400 pixels. You can zoom in and out to change the view of the Stage as you work.
Zooming To view the entire Stage on the screen or to view a particular area of your drawing at high magnification, you magnification level. depends on the resolution of your monitor and the document size. The minimum value for Zooming Out on the Stage is 8% and the maximum value for Zooming In on the Stage is 2000%. To magnify or reduce your view of the Stage, perform the following: Select the Zoom tool in the Tools panel. Click on Zoom In or Zoom Out button as per the need. Drag the tool on the stage and click. can The change magnification the
The Timeline The Timeline organizes and controls a document s content in layers and frames. It is a fixed window that is available on the top of every object in the workspace. The major components of the Timeline are layers, frames and the play head. Layers in a document are listed in a column on the left side Timeline. Frames contained in each layer appear in a row towards the right of the layer name.
The Timeline The Timeline header at the top of the Timeline indicates frame numbers. The play head indicates the current frame displayed on the Stage. When a Flash document starts playing, the play head moves from left to right through the Timeline. The Timeline status displayed at the bottom of the Timeline indicates the selected frame number, the current frame rate and the elapsed time to the current frame. You can insert, delete, select and move frames in the Timeline.
Moving the Play head The play head moves through the Timeline as a document plays to indicate the current frame displayed on the Stage. The Timeline header shows the frame numbers of the animation. To display a frame on the Stage, you move the play head to the frame in the Timeline. When you re working with a large number of frames that can t be displayed in the Timeline all at once, you can move the play head along the Timeline to easily display a specific frame.
Key frames It is a frame where you define a change to an object s properties for an animation viz. position, color and shape. You can easily change the length of a tweened animation by dragging a key frame in the Timeline. The order in which frames and key frames appear in the Timeline determines the order in which they are displayed in a Flash application. You can arrange key frames in the Timeline to edit the sequence of events in an animation.
Layers Layers are like transparent sheets or multiple film strips stacked on top of each other on the Stage. It helps you to organize the artwork in your document. You can draw and edit objects on one layer without affecting objects on another layer.
Tool Panel The tools panel contains a set of various tools to perform different tasks in the workspace. It is divided into four different sections viz. Tools, View, Color and Options (as shown).
Making a Simple Flash Document The first step is to create a new document in Flash. Perform these steps to create a new Flash document: Select and click on File from the Menu bar. Click New from the drop down list. The New Document window opens. In the New Document dialog box, Flash Document is selected by default. Click OK. In the Property inspector, the Size button displays the current Stage size setting as 550 x 400 pixels. The Background color of workspace is set in white (by default). You can change the color of the Stage by clicking the Background ( ) button and select an appropriate color. Thus, the stage is set to the desired color (as shown).
Drawing an Oval/a Circle After you ve created your document, you are ready to add some artwork for the document. To draw an oval/a circle on the Stage: Select the Oval tool from the Tools panel. Select Stroke Color and click on ( ) button. Select an appropriate color with the help of Color Picker and click. The stroke is set to the desired color. Similarly, select a color of your choice from the Fill Color Picker. Make sure that the fill color contrasts well with the Stage color. Select and click on Oval tool. Draw on oval on the Stage by selecting the Oval tool with the help of mouse. Release the mouse button. The selected shape is drawn on the workspace (stage). Click on Selection tool. Set the object at the proper place within the stage with the help of mouse. Thus, the desired shape is drawn and set in the stage (as shown).
Transforming an Object After drawing an object on the stage, you can transform the object as per the need. The system provides the following options. They are: Rotate 90o CW Rotate 90o CCW Flip Vertical Flip Horizontal To perform the above task, follow these steps: Select the object. Click on Modify button that is available on Menu bar. Select Transform from the drop down list and then rotate 90o CW (for example). The object is thus rotated to 90o clockwise.
Rotating an Object You can rotate an object to 360o. You can also skew the object along with the rotation. To perform the above task, follow these steps: Select the object. Click on Modify button that is available on Menu bar. Select Transform from the drop down list and then Rotate and Skew. You will notice that the object is selected with the outlines. Click on the corner and the pointer changes to a spinning arrow. Rotate the arrow either in clock-wise or anti-clock wise direction. You will notice that an outline of the object appears as you rotate. Finally, release the mouse button. Thus, the object has rotated accordingly
Saving a File in Flash After completion of your task, you can save your file. You can use the same file in future or edit the content of the file (if needed). To save a file in Macromedia Flash, follow these steps: Click on File button from the Menu bar. Select Save as from the drop down list. Enter the file name in the File name box (say, Sample 1). While saving the file, you will notice that the system shows the default file name with the extension as (Untitled 1 *fla) in the File name box. Finally, click on Save. Thus, your file is saved with the extension .fla that distinguishes it from the other files.
Animation in Flash Animation is the process of creating a continuous motion and shape change illusion by means of the rapid display of a sequence of static images. It can be recorded on either analogue media, such as a flip book, motion picture film, and video tape or on digital media.
Algorithm and Flow Chart An algorithm is defined as the sequence of instructions required to get the desired result. These instructions are written in simple English in different steps. In other words, an algorithm represents the logic of the processing to be performed. An algorithm is a sequence of steps written systematically in simple English. It helps to develop the fundamental logic of a problem. It also helps to solve mathematical problems. Let us take a simple example from daily life. You go to buy a textbook from a book store. An algorithm for this process is illustrated below with the help of diagrams in sequence.
Algorithm and Flow Chart Steps Let us follow these instructions in a sequence. Write an algorithm with reference to the pictures. Step 1: Start Step 2: Go to the book store Step 3: Ask for the required textbook Step 4: Take out the required book Step 5: Go to the cash counter Step 6: Pay money to the cashier Step 7: Stop
For Example- 1 : Write an algorithm to start your computer system after entering the Computer Lab. Step 1: Start Step 2: Switch on the main button Step 3: Put the UPS of Main switch on Step 4: Switch on the CPU button Step 5: Switch on Monitor/Visual Display Unit Step 6: Start your work as soon as the system is ready Step 7: Stop
For Example- 2 Example 3: Write an algorithm for adding two numbers and displaying the result. The different steps involved in adding two numbers are: Step 1: Start Step 2: Take the first number Step 3: Take the second number Step 4: Add the two numbers Step 5: Display the sum Step 6: Stop
Flow Chart A flow Chart is a pictorial representation of an algorithm that uses boxes of different shapes to denote different types of instructions. These boxes are connected with arrow marks to indicate the flow of operations in which the instructions are to be executed. Since a flow chart shows the flow of operations in pictorial form, any error in the logic of the procedure can be detected easily in a program. It is basically the plan to be followed when a program is written. It acts like a road map for a programmer and guides him to go from the starting point to the final point while writing a computer program.
Flow Chart :Example- 3 Example 3: Write an algorithm for adding two numbers and displaying the result. The different steps involved in adding two numbers are: Step 1: Start Step 2: Take the first number Step 3: Take the second number Step 4: Add the two numbers Step 5: Display the sum Step 6: Stop
Different Symbols Used in a Flow Chart A flow chart uses boxes of different shapes to denote different types of instructions. These symbols and their functions are discussed as followed: 1. Terminal Box 2. Input / Output Box 3. Process Box 4. Flow Lines 1. Terminal Box This box is used to indicate the beginning (START) and the end (STOP) of each flow chart. The box is oval or rectangular in shape with curved sides. A terminal box with the word START is used at the beginning of the flow chart and the word STOP is used at the end of the flow chart.
2. Input / Output Box This symbol is used to denote functions of an input / output device in the program. The shape of this box is a parallelogram. All the commands that require the computer to give/take data from the output / input devices are put into these boxes. Thus, the statements like INPUT, PRINT etc. are used in these boxes. 3. Process Box A process box is rectangular in shape. It is used a flow chart to represent arithmetic and data movement. Thus, assigning of all values and arithmetic operations like addition, subtraction, multiplication and division are shown in this box. 4. Flow Lines Flow lines with arrowheads are used to indicate the direction of flow of operation. Normally, the flow of arrows is from top to button and from left to right.


.")