Audacity Tutorial: Complete Guide on Recording and Editing Audio Tracks
Learn how to use Audacity with this comprehensive tutorial covering topics such as installation, user interface overview, importing and converting tracks, markers, and more. Discover how to utilize various features to enhance your audio recording and editing experience.

Download Presentation

Please find below an Image/Link to download the presentation.
The content on the website is provided AS IS for your information and personal use only. It may not be sold, licensed, or shared on other websites without obtaining consent from the author.If you encounter any issues during the download, it is possible that the publisher has removed the file from their server.
You are allowed to download the files provided on this website for personal or commercial use, subject to the condition that they are used lawfully. All files are the property of their respective owners.
The content on the website is provided AS IS for your information and personal use only. It may not be sold, licensed, or shared on other websites without obtaining consent from the author.
E N D
Presentation Transcript
2 MCL Contents 1.Intro 2.Tracks 3.Clips 4.Volume 5.Recording 6.Saving & Exporting 3 7 12 16 21 26
3 MCL 1. Intro
4 MCL 1.1. Overview Open-source: Free, established community Compatibility: Windows, Mac, Linux https://www.audacityteam.org/download/ Plugins: Support for more audio formats (M4A) https://support.audacityteam.org/basics/installing-ffmpeg Standard features: Recording, audio effects
5 MCL 1.2. Installation Windows 1.Open executable-file (*.exe) 2.Follow prompts of Setup Wizard macOS 1.(If applicable) Open package file (*.pkg) 2.Open disk-image file (*.dmg) 3.(In window) Drag Audacity icon to Applications shortcut
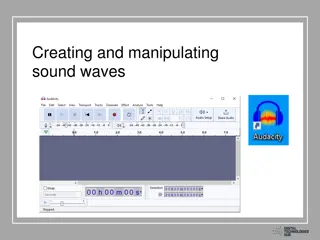
6 MCL 1.3. User Interface Menu bar: File, Effect, View menus Toolbar: Playback, recording, selection, zoom Audio Setup: Devices & settings Volume meters: Input levels & output levels Timeline Canvas: Tracks/lanes & clips within Track controls: Gain, pan, muting/soloing, conversion Info panel: Project rate, timestamps, playback speed
7 MCL 2. Tracks
8 MCL 2.1. Importing Tracks 1.File -> Import ... -> Audio Default: Imported files have separate tracks/lanes Tracks have separate control panels Track menu: Change visual/file settings Mute button: Mutes current track Solo button: Mutes all other tracks Gain: Increase/decrease to volume (dB) Pan: Shift audio left/right
9 MCL 2.2. Converting Tracks: Stereo to Mono Convert (one-sided) stereo track to mono track 1.Import track 2.Open track-settings menu (arrow next to name of track) 3.Select Split Stereo to Mono 4.Delete empty track: click X in control panel
10 MCL 2.3. Three Lines Marker: Black vertical line (at project start by default) Click body of track/clip or click Skip To buttons Skimmer: White vertical line Appears while project stopped Move cursor along timeline Playhead: Green triangle with black vertical line Appears while project playing or paused Click timeline or click Play button (plays from marker)
11 MCL 2.4. Playback Pause [P] Freezes/unfreezes playhead at position in timeline Play [spacebar] Plays from marker position Stop Clears playhead, enables editing (clip-selection)
12 MCL 3. Clips
13 MCL 3.1. Clip Selection Select by clip-head 1.Single-click head (section with title) Select by clip-body 1.Double-click body (section with waveforms) Select by control-panel 1.Click Select button to select entire track (all clips within)
14 MCL 3.2. Clip Arrangement Click & Drag (need sufficient space) 1.Click clip-head & hold 2.Drag clip left/right Cut & Paste (need sufficient space) 1.Select clip 2.Right-click clip & select Cut [Ctrl/Cmd + X] 3.Click track (set marker) 4.Right-click track & select Paste [Ctrl/Cmd + V]
15 MCL 3.3. Clip Trimming Split & Delete 1.Set marker 2.Right-click clip & select Split Clip 3.Select unwanted clip & press Backspace or Delete key Drag Edge 1.Point to edge (between clip-head & nearest waveform) 2.Look for double-arrow cursor 3.Click & drag edge inward
16 MCL 4. Volume
17 MCL 4.1. Monitoring Volume Watching volume level is important as listening Blue lines mark (local) peaks Ideal volume (peak values): Primary audio (speech): -12 dB to -6 dB Secondary audio (music): -24 dB to -18 dB
18 MCL 4.2. Editing Volume Normalize function (set volume to dB value) 1.Select clip 2.Open Effect -> Volume & Compression 3.Select Normalize function 4.(Window) Set Normalize peak amplitude to [-12] dB Track-wide adjustment (change by dB amount) 1.Click & drag slider in +/- scale of track control-panel
19 MCL 4.3. Fading Volume Fading functions 1.Select portion of clip (click & drag) 2.Open Effect menu 3.Select Fading 4.Select appropriate function (e.g. Fade In, Fade Out)
20 MCL 4.4. Reducing Background Noise Noise Reduction function 1.Select portion of clip with background noise (sample) 2.Open Effect -> Noise Removal and Repair 3.Select Noise Reduction function 4.(Window) Click Get Noise Profile 5.Repeat Steps 2 & 3 6.Adjust values (Noise reduction) & click Preview button 7.Click OK button
21 MCL 5. Recording
22 MCL 5.1. General Process 1.Click Audio Setup button (toolbar) 2.Select Recording Device -> desired input device 3.(If applicable) Select Recording Channels -> Stereo 4.Click Record Meter (mic icon) button 5.Select Start Monitoring & speak as intended/expected 6.Click Record button [R or Shift + R for new track/lane) 7.(Optional) Click Pause button to pause/resume 8.Click Stop button
23 MCL 5.2. Recording in Audacity with H4n Setup on H4n 1.(Recommended) Turn off H4n 2.Connect USB cable (Micro-USB port, left side) 3.Connect cable to computer 4.Select Audio I/F 5.Select Frequency -> 48kHz (44.1kHz possible on Mac) 6.Select Connect H4n appears on computer as H4
24 MCL (continued) Setup on Mac (macOS) 1.Open Applications -> Utilities -> Audio MIDI Setup Or use Spotlight Search to find Audio MIDI Setup 1.Select H4 (2 ins / 0 outs) in sidebar 2.Set Format drop-down to match setting of H4n 3.(H4n) 44.1kHZ = (Mac) 44,100 Hz 4.(H4n) 48kHZ = (Mac) 48,000 Hz Discrepancies result in abnormal (high/low) pitch
25 MCL (continued) Setup in Audacity 1.Select Audio Setup -> Recording Device -> Microphone (H4) 2.Audio Setup -> Recording Channels -> Stereo 3.Select Record Meter (icon) -> Start Monitoring 4.(H4n) Adjust Rec Level as needed 5.Click Record button to start recording 6.(Optional) Click Pause button to pause 7.Click Stop button to stop recording
26 MCL 6. Saving & Exporting
27 MCL 6.1. Saving & Exporting Saving (project file unique to Audacity) 1.Open File -> Save Project 2.Select either Save Project or Save Project As ... 3.Set location & name Exporting (standalone file in standard format) 1.Open File -> Export 2.Select Export as [format] 3.Set location & name
28 MCL Content by Tim Huynh This work is licensed under a Creative Commons Attribution-NonCommercial 4.0 International License.