Comprehensive Job Aid for Vaccine Administration Log in VASE+ System

This job aid provides detailed guidance on logging and editing registrant vaccination records in mpox vaccination clinics using the VASE+ system. It outlines the steps for Vaccine Administrators and Site Admins to access clinics, review health questionnaires, administer vaccines, and handle rescheduling. The aid includes images for visual reference and emphasizes accurate data entry for successful vaccination tracking.

Download Presentation

Please find below an Image/Link to download the presentation.
The content on the website is provided AS IS for your information and personal use only. It may not be sold, licensed, or shared on other websites without obtaining consent from the author. Download presentation by click this link. If you encounter any issues during the download, it is possible that the publisher has removed the file from their server.
E N D
Presentation Transcript
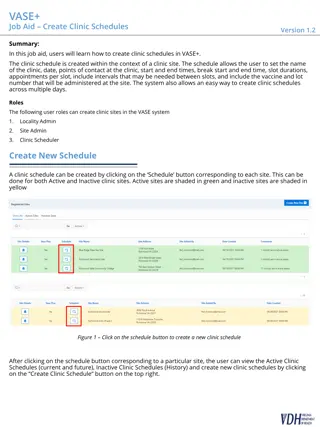
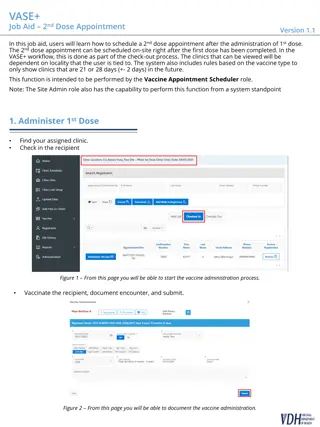
VASE+ Job Aid Log Vaccine Administration, mpox Version 1.0 In this job aid, users will learn how to log a registrant vaccination and make an edit if there has been a mistake in mpox vaccination clinics. This function applies to the Vaccine Administrator and Site Admin roles. Vaccinate Registrant To access a clinic, click on the clinic name from the active clinic listing in the home page. Figure 1 Select Clinic Either search for a registrant or select a registrant from the Checked In category in the Registrant List. Figure 2 Multi-Clinic View Vaccine Administrators can review and edit a registrant s health questionnaire using the Review button. A yellow review button denotes that the registrant is either a minor or has answered Yes or I don t know to a question on the health questionnaire. A registrant may also be rescheduled if the registrant is not able to receive the vaccine that day. To reschedule, click the R button next to the Review columns. This function can be viewed by the site admin but not the vaccine administrator.
VASE+ Job Aid Log Vaccine Administration, mpox Version 1.0 Figure 3 Review Button. After clicking Review, to edit a part of the registrant s file, click on the Edit button in the top right corner. Figure 4 Edit Health Questionnaire At the bottom of the Review page, the vaccine administrator can either close the page, returning the applicant to the Checked in bucket, or move on to the Administer Vaccine page with the green button. Figure 5 Move to Administer Vaccine Page
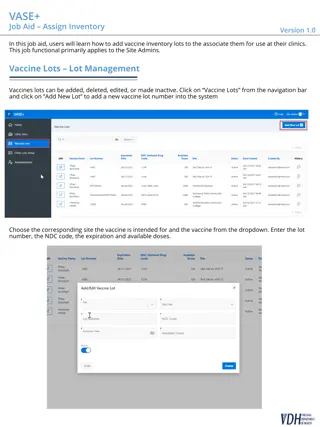
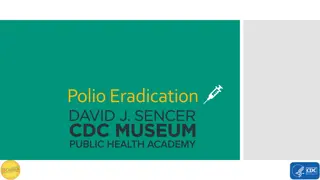
VASE+ Job Aid Log Vaccine Administration, mpox Version 1.0 The Vaccine Administration window will pop-up after clicking Administer Vaccine . The vaccination date will default to today s date and the following fields will auto populate: Manufacturer, Expiration Date, and Dose Number. In this window the vaccinator will enter the following information: Lot Number Vaccine Administered Vaccine Administrator Site of Injection Route of Administration Additional Details (If needed) Figure 6 These fields will auto populate Please note that the Route of Administration is what will determine the dose size for the JYNNEOS vaccine. Vaccines administered via the intradermal route should be 0.1 mL, while vaccines administered via the subcutaneous route should be 0.5 mL. Figure 7 Route of Administration determines dose size If there are multiple lots associated with the clinic, select the lot used from the drop-down menu under Lot Number . The manufacturer and expiration date will auto-populate after the lot number has been selected. If there is only one lot, the lot number will auto-populate in addition to manufacturer and expiration date. Figure 8 Vaccine lot drop down menu Once the lot has been selected and the other information Vaccine Administered (Yes/No), Vaccine Administrator (select from the drop down), and Site of Injection (Right Deltoid/Left Deltoid/Other) has been populated, click the Submit button to finish logging the vaccine.
VASE+ Job Aid Log Vaccine Administration, mpox Version 1.0 Upon successful completion of the Vaccine Administration form, the vaccinated registrant will automatically move to the Checked Out section of the clinic registrant list Figure 9 Checked Out Status If a mistake has been made, a Site Admin will need to work with the vaccine administrator and the registrant to fix their information. The Edit Vaccine option is only available the day of the appointment and after the vaccine information was originally entered. To edit the vaccine log information, the user must be on the Checked Out tab. Click on the Edit Vaccine button under the Edit Vaccine column for the registrant whose vaccine information needs to be edited. Figure 10 Edit Vaccine Button The vaccine administration screen will display and edits can be made and saved.