Energy-Aware Optimization of BEOL Interconnect Stack Geometry
This study focuses on optimizing Back-End-of-Line (BEOL) interconnect stack geometry in advanced nodes for improved performance and energy efficiency. It explores the motivations, background, and potential benefits of Design-Aware Manufacturing (DAM) and Manufacturing-Aware Design (MAD) methodologies. The research investigates the use of MAD and DAM to tune aspects of BEOL design during Placement and Routing (P&R) stages, aiming to enhance Quality of Results (QoR) evaluation in manufacturing processes. The work also delves into previous studies on SPICE simulation, physical modeling of RC, and optimality predictions for BEOL interconnects.
- BEOL interconnect
- Energy optimization
- Advanced nodes
- Manufacturing methodologies
- Performance analysis

Download Presentation

Please find below an Image/Link to download the presentation.
The content on the website is provided AS IS for your information and personal use only. It may not be sold, licensed, or shared on other websites without obtaining consent from the author. Download presentation by click this link. If you encounter any issues during the download, it is possible that the publisher has removed the file from their server.
E N D
Presentation Transcript
Performance- and Energy-Aware Optimization of BEOL Interconnect Stack Geometry in Advanced Nodes Kwangsoo Han, Andrew B. Kahng, Hyein Lee and Lutong Wang UCSD CSE and ECE Departments abk@ucsd.edu http://vlsicad.ucsd.edu 1
Outline Motivation and Background Path-/Stage-Based Analysis Block-Level Validation Potential Benefits of Design-Aware Manufacturing (DAM) and Manufacturing-Aware Design (MAD) Methodologies Conclusion and Future Work 2
Motivation and Background Distinct interconnects High perf CPU: wide, deep wires High density SoC: narrow, thin wires Scaling slows down High resistance at advanced nodes Slow improvement in low-k material BEOL geometry is (?) a key lever to achieve better PPA. [1] [1] C.-H. Jan, B. Uddalak, R. Brain, S.-J. Choi, G. Curello, G. Gupta and W. Hafez, A 22nm SoC Platform Technology Featuring 3-D Trigate and High-k/Metal Gate, Optimized for Ultra Low Power High Performance and High Density SoC Applications, Proc. IEDM, 2012, pp. 311-314. 3
Motivation and Background Flexible, multi-flavor cells Cell timing & power library (flexible, e.g., sizing, buffering, VT swapping) FEOL transistor modeling BEOL RC modeling Given BEOL stack (fixed) One fixed stack option Characterization Device-level Single-stage PD Block-level Multi-stage Q1: Does single-stage (AR, DC) analysis relate to a block-level design? Q2: How to find the optimal block-level (AR, DC)? Q3: Towards N7/N5, are there potential benefits of new MAD, DAM methodologies? 4
MAD and DAM Methodologies Manufacturing-aware design (MAD) Tune (AR, DC) for BEOL P during P&R Design-aware manufacturing (DAM) Tune (AR, DC) for BEOL R in manufacturing Design = placement and routing (P&R) Manufacturing = QoR evaluation using BEOL R Manufacturing BEOL P Post-route layout Design (P&R) BEOL R Manufacturing (QoR evaluation) Design 5
Previous Works Shah et al. [2] SPICE simulation of single-stage/size inverter Optimal (AR, DC) predicted using ITRS projection Ciofi et al. [3] Physical modeling of RC for various wire geometry Optimal power/delay dependent on driver and wirelength Our work: Single-stage SPICE simulation and P&R validation. Block-level analysis. Study of potential benefits from design-aware manufacturing (DAM) and manufacturing-aware design (MAD) methodologies. 6
Outline Motivation and Background Path-/Stage-Based Analysis Block-Level Validation Potential Benefits of Design-Aware Manufacturing (DAM) and Manufacturing-Aware Design (MAD) Methodologies Conclusion and Future Work 7
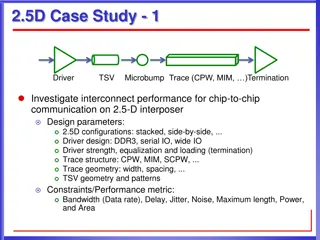
Single-Stage Sensitivity Study DC = 0.4 0.7, AR* = 1.50 2.25 Power and delay sensitivity on 4 factors Driving strength X1, X4, X8, X16 Wirelength Output load 5 m, 10 m, 15 m, 20 m 2fF, 3fF, 5fF, 10fF Input slew 50ps, 100ps Interconnect RC: 3 model Fig. 4. Circuit structure for SPICE simulation *: AR defined as height/half_pitch for consistency across multiple DCs. 8
Sensitivity to Driver Strength (b) BUF_X4 (a) BUF_X1 (c) BUF_X8 (d) BUF_X16 Delay-optimal power direction Power=CV2, lower (AR, DC) always preferred Delay-optimal power: lower-left upper-right 9
Other Sensitivity Studies Sensitivity to wirelength/output load Trade away C for improved R: delay-optimal power can afford high DC given larger wirelength/load Insensitive to input slew Well-correlated with single-stage analysis in P&R tool {DC}x{AR}x{wlen}x{load}x{driver}=1008 points Correlation: 99.26% 10
Outline Motivation and Background Path-/Stage-Based Analysis Block-Level Validation Q1: Does single-stage (AR, DC) analysis relate to a block-level design? Q2: How to find the optimal block-level (AR, DC)? Potential Benefits of Design-Aware Manufacturing (DAM) and Manufacturing-Aware Design (MAD) Methodologies Conclusion and Future Work 11
Block Level Validation (1) Q1: Does single-stage analysis relate to a block-level design? Tool s noise Different kinds of stages in a block-level design Our strategy Denoising: same P&R layout, apply different (AR, DC) Group cells based on driver strength Use only one group for entire P&R X1: (ideal) lower power (LP) X4: (ideal) high performance (HF) Experimental setup: Design# = {AES, LDPC} Clock period* (LP/HP) AES: 0.7/0.5ns LDPC: 1.3/0.8ns BEOL = {two 1X, two 1.5X, four 2.5X layers} Netlist/Liberty/LEF Default BEOL P&R Layout New BEOL (AR, DC) PEX/STA Results * = fastest achievable # OpenCores, https://opencores.org/ 12
Block Level Validation (1): LDPC, 1X layer Q1: Does single-stage (AR, DC) analysis relate to a block-level design? A: Yes. Delay-optimal power direction (a) X1 cell sensitivity study. (b) X4 cell sensitivity study. (d) Real design delay (TNS, LDPC, X4 cell) (c) Real design delay (TNS, LDPC, X1 cell) 13
Block Level Validation (2) Q2: How to find the optimal block-level (AR, DC)? A: A possible way is to find the wirelength distribution per driver type and per layer type.+ Wirelength driven by X4 cells is 2 18X longer than X1 cells Table. I Wirelength distribution per layer type (normalized) grouped by driver cells. Layer 1X 1.5X 2.5X Driver X1 X4 X1 X4 X1 X4 Design AES 15% 41% 6% 31% 2% 5% LDPC 11% 21% 3% 28% 2% 36% TNS contour maps follow X4 delay contours Fig. 13. Contour maps of TNS when varying (AR, DC) for (a) 1X, (b) 1.5X and (c) 2.5X layers, respectively. 14
Outline Motivation and Background Path-/Stage-Based Analysis Block-Level Validation Potential Benefits of Design-Aware Manufacturing (DAM) and Manufacturing-Aware Design (MAD) Methodologies Q3: Towards N7/N5, are there potential benefits of new DAM/MAD methodologies? Conclusion and Future Work 15
Potential Benefits of DAM & MAD Methodologies Design-aware manufacturing (DAM) Tuning (AR, DC) in manufacturing according to the characteristics of each design Manufacturing-aware design (MAD) Optimization (AR, DC) during physical implementation Default (AR, DC) Optimized (AR, DC) P&R Design-specific property P&R Layout Layout Optimized (AR, DC) Manufacturing Manufacturing MAD flow DAM flow 16
DAM & MAD Study: Experimental Setup #Stacks = 3x3x3x4=108, each w/ unique number BEOL P{stack}: stack used for P&R BEOL R{stack}: stack used for PEX/STA Layer type: two 1X, two 1.5X and four 2.5X layers DC = {0.5, 0.6, 0.7} for each layer type AR = {1.5, 1.75, 2, 2.25} uniform for all layers Design: LDPC (HP=0.8ns), both X1 and X4 cells BEOL P Post-route layout Design (P&R) BEOL R Manufacturing (QoR evaluation) Manufacturing Design 17
DAM & MAD Study: Experimental Results X-axis: P{stack} Y-axis: For a given P{stack}, TNS range using all R{stack}s (blue) For a given P{stack}, TNS using R{default} (red) DAM+MAD=60% difference in TNS P&R Stack P106 P107 P104 P90 P86 P55 P84 P47 P80 P98 P14 P48 P12 P36 P23 P10 P87 P69 P64 P17 P59 P21 P65 P58 P61 P16 P70 0 -1 -2 2.59ns, 40% -3 -4 40% TNS (ns) -5 -6 -7 3.87ns, 49% -8 TNS Min-Max Range TNS with Default Stack -9 18 -10
DAM & MAD Study: Experimental Results Y-axis: For a given P{stack}, power using all R{stack}s (orange) For a given P{stack}, power using R{default} (black) DAM+MAD=7% difference in power Weak correlation P&R Stack P104 P55 P82 P91 P60 P47 P74 P46 P98 P96 P68 P28 P76 P33 P36 P72 P37 P42 P87 P11 P29 P15 P17 P32 P52 P34 P86 P57 P22 P61 P30 P31 P18 P7 P4 P6 -3 5.9 -4 -5 5.7 Weak correlation of timing and power -6 5.5 -7 Power (mW) TNS (ns) -8 5.3 -9 -10 5.1 -11 4.9 -12 -13 4.7 -14 4.5 -15 TNS Min-Max Range Power Min-Max Range TNS with Default Stack Power with Default Stack 19
DAM & MAD Study: Experimental Results Q3: Towards N7/N5, are there potential benefits of new DAM/MAD methodologies? A: Possibly, yes. Up to 60%/7% difference in TNS/power One optimal design-specific stack for manufacturing may be preferred regardless of the BEOL stack assumed during P&R P&R Stack P106 P107 P104 P55 P84 P47 P90 P14 P48 P12 P36 P23 P10 P87 P69 P64 P17 P59 P21 P86 P65 P58 P61 P70 P80 P98 P16 5.3 Design-specific BEOL preference 5.2 5.1 Power (mW) 5 4.9 4.8 4.7 4.6 Power Min-Max Range Power with Default Stack 4.5 20
Outline Motivation and Background Path-/Stage-Based Analysis Block-Level Validation Potential Benefits of Design-Aware Manufacturing (DAM) and Manufacturing-Aware Design (MAD) Methodologies Conclusion and Future Work 21
Conclusion and Future Work Single-stage simulation & validation Block-level P&R validation Potential benefits of DAM and MAD methodologies Future work Co-optimization of the front-end with the back-end Airgap-aware BEOL stack optimization 22
THANK YOU! Research at UCSD is supported by the IMPACT+ / C-DEN center, Samsung, NXP, Qualcomm, ASML, Mentor Graphics and NSF. We thank Brian Cline of ARM for inviting us to write this paper, and Praveen Raghavan and Peter Debacker of IMEC for providing key enablements used in our study. 23
BACKUP 24
Single-Stage SPICE Simulation Sensitivity to driver strength X1: smaller AR/DC better timing/power Driver resistance dominates X4, 8,16: delay-optimal wire dimension changes Optimal delay prefers thicker than wider wires Fig. 5. Sensitivity of power and delay to driving strength: (a) BUF_X1 (b) BUF_X4 (c) BUF_X8 and (d) BUF_X16 25
Single-Stage SPICE Simulation Sensitivity to wirelength/output load Higher wirelength/load Higher DC Trade C for R 26
Single-Stage P&R Validation Manual routing 8 nets on 1X layer Modified pin access to avoid via impact 1008 data points {DC}x{AR}x{wirelength}x{load}x{driver}=7x4x3x3x4 Power/delay for middle nets Correlation: 99.26% 27
DAM & MAD Study: Experimental Setup #Stacks = 3x3x3x4=108, each w/ unique number P{stack index}: stack used for P&R (design) R{stack index}: stack used for PEX/STA (manufacturing) Layer type: two 1X, two 1.5X and four 2.5X layers DC = {0.5, 0.6, 0.7} for each layer type AR = {1.5, 1.75, 2, 2.25} uniform for all layers Design: LDPC (HP=0.8ns) both X1 and X4 cells Stack index 1X 1.5X 2.5X AR DC AR DC AR DC 1 1.50 0.5 1.50 0.5 1.50 0.5 4 2.25 0.5 2.25 0.5 2.25 0.5 8 1.75 0.5 1.75 0.6 1.75 0.6 25 1.50 0.5 1.50 0.7 1.50 0.5 55 2.00 0.6 2.00 0.6 2.00 0.6 108 2.25 0.7 2.25 0.7 2.25 0.7 28


")
: LDPC, 1X layer")
")