Mobile Application Development Chapter 5: Working with Android Media Player

Explore how to play and control audio files in Android using the MediaPlayer class. Learn about methods available in the MediaPlayer class and see a simple example of playing an audio file. Get insights into setting data sources, playback controls, looping, track selection, volume adjustments, and more. Follow a code example to play an audio file in an Android activity.

Download Presentation

Please find below an Image/Link to download the presentation.
The content on the website is provided AS IS for your information and personal use only. It may not be sold, licensed, or shared on other websites without obtaining consent from the author. Download presentation by click this link. If you encounter any issues during the download, it is possible that the publisher has removed the file from their server.
E N D
Presentation Transcript
MOBILE APPLICATION DEVELOPMENT Chapter 5
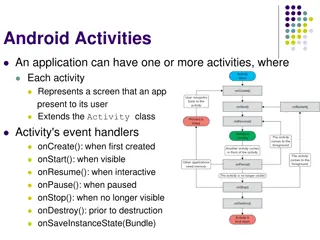
Android Media Player We can play and control the audio files in android by the help of MediaPlayer class. Here, we are going to see a simple example to play the audio file. In the next page, we will see the example to control the audio playback like start, stop, pause etc. MediaPlayer class The android.media.MediaPlayer class is used to control the audio or video files.
Methods of MediaPlayer class There are many methods of MediaPlayer class. Some of them are as follows:
Description Method public void setDataSource(String path) sets the data source (file path or http url) to use. public void prepare() prepares the player for playback synchronously. public void start() it starts or resumes the playback. public void stop() it stops the playback. public void pause() it pauses the playback. public boolean isPlaying() checks if media player is playing.
public void seekTo(int millis) seeks to specified time in miliseconds. public void setLooping(boolean looping) sets the player for looping or non- looping. public boolean isLooping() checks if the player is looping or non-looping. public void selectTrack(int index) it selects a track for the specified index. public int getCurrentPosition() returns the current playback position. public int getDuration() returns duration of the file. public void setVolume(float leftVolume,float rightVolume) sets the volume on this player.
Activity class Let's write the code of to play the audio file. Here, we are going to play maine.mp3 file located inside the sdcard/Music directory. File: MainActivity.java package com.example.audiomediaplayer1; import android.media.MediaPlayer; import android.net.Uri; import android.os.Bundle; import android.app.Activity; import android.view.Menu; import android.widget.MediaController; import android.widget.VideoView;
public class MainActivity extends Activity { @Override protected void onCreate(Bundle savedInstanceState) { super.onCreate(savedInstanceState); setContentView(R.layout.activity_main); MediaPlayer mp=new MediaPlayer(); try{ mp.setDataSource("/sdcard/Music/maine.mp3");//Write your location here mp.prepare(); mp.start(); }catch(Exception e){e.printStackTrace();} } @Override public boolean onCreateOptionsMenu(Menu menu) { // Inflate the menu; this adds items to the action bar if it is present. getMenuInflater().inflate(R.menu.activity_main, menu); return true; } }
Android MediaPlayer Example of controlling the audio activity_main.xml Drag three buttons from palette to start, stop and pause the audio play. Now the xml file will look like this:
MainActivity.java package com.example.audioplay; import android.media.MediaPlayer; import android.os.Bundle; import android.os.Environment; import android.app.Activity; import android.view.Menu; import android.view.View; import android.view.View.OnClickListener; import android.widget.Button; public class MainActivity extends Activity { Button start,pause,stop; @Override protected void onCreate(Bundle savedInstanceState) { super.onCreate(savedInstanceState); setContentView(R.layout.activity_main);
start=(Button)findViewById(R.id.button1); pause=(Button)findViewById(R.id.button2); stop=(Button)findViewById(R.id.button3); //creating media player final MediaPlayer mp=new MediaPlayer(); try{ //you can change the path, here path is external directory(e .g. sdcard) /Music/maine.mp3 mp.setDataSource(Environment.getExternalStorageDirectory().g etPath()+"/Music/maine.mp3"); mp.prepare(); }catch(Exception e){e.printStackTrace();} start.setOnClickListener(new OnClickListener() { @Override public void onClick(View v) { mp.start(); } });
pause.setOnClickListener(new OnClickListener() { @Override public void onClick(View v) { mp.pause(); } }); stop.setOnClickListener(new OnClickListener() { @Override public void onClick(View v) { mp.stop(); } }); } }
Android Video Player By the help of MediaController and VideoView classes, we can play the video files in android. MediaController class The android.widget.MediaController is a view that contains media controls like play/pause, previous, next, fast-forward, rewind etc. VideoView class The android.widget.VideoView class provides methods to play and control the video player. The commonly used methods of VideoView class are as follows:
Method Description public void setMediaController(MediaContro ller controller) sets the media controller to the video view. public void setVideoURI (Uri uri) sets the URI of the video file. public void start() starts the video view. public void stopPlayback() stops the playback. public void pause() pauses the playback. public void suspend() suspends the playback. public void resume() resumes the playback. seeks to specified time in miliseconds. public void seekTo(int millis)
activity_main.xml <RelativeLayout xmlns:androclass="http://schemas.android.co m/apk/res/android" xmlns:tools="http://schemas.android.com/tools" android:layout_width="match_parent" android:layout_height="match_parent" tools:context=".MainActivity" > <VideoView android:id="@+id/videoView1" android:layout_width="wrap_content" android:layout_height="wrap_content" android:layout_alignParentLeft="true" android:layout_centerVertical="true" /> </RelativeLayout>
Activity class Let's write the code of to play the video file. Here, we are going to play 1.mp4 file located inside the sdcard/media directory. package com.example.video1; import android.net.Uri; import android.os.Bundle; import android.app.Activity; import android.view.Menu; import android.widget.MediaController; import android.widget.VideoView; public class MainActivity extends Activity { @Override protected void onCreate(Bundle savedInstanceState) { super.onCreate(savedInstanceState); setContentView(R.layout.activity_main);
VideoView videoView =(VideoView)findViewById(R.id.videoView1); //Creating MediaController MediaController mediaController= new MediaController(this); mediaController.setAnchorView(videoView); //specify the location of media file Uri uri=Uri.parse(Environment.getExternalStorageDirectory().getPath ()+"/media/1.mp4"); //Setting MediaController and URI, then starting the videoView videoView.setMediaController(mediaController); videoView.setVideoURI(uri); videoView.requestFocus(); videoView.start(); } @Override public boolean onCreateOptionsMenu(Menu menu) { // Inflate the menu; this adds items to the action bar if it is present. getMenuInflater().inflate(R.menu.activity_main, menu); return true; } }
Android Media Recorder MediaRecorder class can be used to record audio and video files. After recording the media, we can create a sound file that can be played later. activity_main.xml Drag 2 buttons from the palette, one to start the recording and another stop the recording. Here, we are registering the view with the listener in xml file using android:onClick.
<RelativeLayout xmlns:androclass="http://schemas.android.com/apk/res/android" xmlns:tools="http://schemas.android.com/tools" android:layout_width="match_parent" android:layout_height="match_parent" android:paddingBottom="@dimen/activity_vertical_margin" android:paddingLeft="@dimen/activity_horizontal_margin" android:paddingRight="@dimen/activity_horizontal_margin" android:paddingTop="@dimen/activity_vertical_margin" tools:context=".MainActivity"> <Button android:id="@+id/button1" android:layout_width="wrap_content" android:layout_height="wrap_content" android:layout_alignParentLeft="true" android:layout_alignParentTop="true" android:layout_marginLeft="68dp" android:layout_marginTop="50dp" android:text="Start Recording" android:onClick="startRecording" /> <Button android:id="@+id/button2" android:layout_width="wrap_content" android:layout_height="wrap_content" android:layout_alignLeft="@+id/button1" android:layout_below="@+id/button1" android:layout_marginTop="64dp" android:text="StopRecording" android:onClick="stopRecording" /> </RelativeLayout>
package com.javatpoint.mediarecorder; import java.io.File; import java.io.IOException; import android.app.Activity; import android.content.ContentResolver; import android.content.ContentValues; import android.content.Intent; import android.media.MediaRecorder; import android.net.Uri; import android.os.Bundle; import android.os.Environment; import android.provider.MediaStore; import android.util.Log; import android.view.View; import android.widget.Button; import android.widget.Toast; public class MainActivity extends Activity { MediaRecorder recorder; File audiofile = null; static final String TAG = "MediaRecording"; Button startButton,stopButton;
@Override public void onCreate(Bundle savedInstanceState) { super.onCreate(savedInstanceState); setContentView(R.layout.activity_main); startButton = (Button) findViewById(R.id.button1); stopButton = (Button) findViewById(R.id.button2); public void startRecording(View view) throws IOException { startButton.setEnabled(false); stopButton.setEnabled(true); File dir = Environment.getExternalStorageDirectory(); try { audiofile = File.createTempFile("sound", ".3gp", dir); } catch (IOException e) { Log.e(TAG, "external storage access error"); return; } //Creating MediaRecorder and specifying audio source, output format, encoder & output format recorder = new MediaRecorder(); recorder.setAudioSource(MediaRecorder.AudioSource.MIC); recorder.setOutputFormat(MediaRecorder.OutputFormat.THREE_GPP); recorder.setAudioEncoder(MediaRecorder.AudioEncoder.AMR_NB); recorder.setOutputFile(audiofile.getAbsolutePath()); recorder.prepare(); recorder.start(); } } //Creating file
public void stopRecording(Viewview) { startButton.setEnabled(true); stopButton.setEnabled(false); //stopping recorder recorder.stop(); recorder.release(); //after stopping the recorder,create thesound file and add it to media library. addRecordingToMediaLibrary(); } protectedvoid addRecordingToMediaLibrary() { //creating content values of size 4 ContentValues values = new ContentValues(4); long current = System.currentTimeMillis(); values.put(MediaStore.Audio.Media.TITLE, "audio" + audiofile.getName()); values.put(MediaStore.Audio.Media.DATE_ADDED, (int) (current / 1000)); values.put(MediaStore.Audio.Media.MIME_TYPE, "audio/3gpp"); values.put(MediaStore.Audio.Media.DATA, audiofile.getAbsolutePath()); //creatingcontent resolver and storing it in the external content uri ContentResolvercontentResolver = getContentResolver(); Uri base = MediaStore.Audio.Media.EXTERNAL_CONTENT_URI; Uri newUri = contentResolver.insert(base,values); //sending broadcastmessage to scan the media file so that it can be available sendBroadcast(newIntent(Intent.ACTION_MEDIA_SCANNER_SCAN_FILE, newUri)); Toast.makeText(this, "Added File " + newUri, Toast.LENGTH_LONG).show(); } }
Android Text To Speech In android, you can convert your text into speech by the help of TextToSpeech class. After completion of the conversion, you can playback or create the sound file. Constructor of TextToSpeech class TextToSpeech(Context context,TextToSpeech.OnInitListener)
Methods of TextToSpeech class Method Description int speak (String text, int queueMode, HashMap params) converts the text into speech. Queue Mode may be QUEUE_ADD or QUEUE_FLUSH. Request parameters can be null, KEY_PARAM_STREAM, KEY_PARAM_VALUME etc. int setSpeechRate(float speed) it sets the speed for the speech. int setPitch(float speed) it sets the pitch for the speech. int setLanguage (Locale loc) it sets the locale specific language for the speech. void shutdown() it releases the resource set by TextToSpeech Engine. int stop() it interrupts the current utterance (whether played or rendered to file) and discards other utterances in the queue.
TextToSpeech.OnInitListener Interface You need to implement TextToSpeech.OnInitListener interface, for performing event handling on TextToSpeech engine. Method of TextToSpeech.OnInitListener Interface There is only one method in this interface Method Description void onInit (int status) Called to signal the completion of the TextToSpeech engine initialization. The status can be SUCCESS or ERROR.
activity_main.xml <RelativeLayout xmlns:androclass="http://schemas.android.com/apk/res/android" xmlns:tools="http://schemas.android.com/tools" android:layout_width="match_parent" android:layout_height="match_parent" tools:context=".MainActivity" > <EditText android:id="@+id/editText1" android:layout_width="wrap_content" android:layout_height="wrap_content" android:layout_alignParentLeft="true" android:layout_alignParentTop="true" android:layout_marginLeft="77dp" android:layout_marginTop="42dp" android:ems="10" > <requestFocus/> </EditText> <Button android:id="@+id/button1" android:layout_width="wrap_content" android:layout_height="wrap_content" android:layout_alignLeft="@+id/editText1" android:layout_below="@+id/editText1" android:layout_marginLeft="59dp" android:layout_marginTop="39dp" android:text="Speak" /> <TextView android:id="@+id/textView1" android:layout_width="wrap_content" android:layout_height="wrap_content" android:layout_alignBaseline="@+id/editText1" android:layout_alignBottom="@+id/editText1" android:layout_alignParentLeft="true" android:text="Enter Text:" /> </RelativeLayout>
MainActivity.java package com.example.texttospeech; import android.os.Bundle; import android.app.Activity; import android.view.Menu; import java.util.Locale; import android.app.Activity; import android.os.Bundle; import android.speech.tts.TextToSpeech; import android.util.Log; import android.view.View; import android.widget.Button; import android.widget.EditText; public class MainActivity extends Activity implements TextToSpeech.OnInitListener { /** Called when the activity is first created. */ private TextToSpeech tts; private Button buttonSpeak; private EditText editText;
@Override public void onCreate(Bundle savedInstanceState) { super.onCreate(savedInstanceState); setContentView(R.layout.activity_main); tts = new TextToSpeech(this, this); buttonSpeak = (Button) findViewById(R.id.button1); editText = (EditText) findViewById(R.id.editText1); buttonSpeak.setOnClickListener(new View.OnClickListener() { @Override public void onClick(View arg0) { speakOut(); } }); }
@Override public void onDestroy() { // Don't forget to shutdown tts! if (tts != null) { tts.stop(); tts.shutdown(); } super.onDestroy(); } @Override public void onInit(int status) { if (status == TextToSpeech.SUCCESS) { int result = tts.setLanguage(Locale.US); if (result == TextToSpeech.LANG_MISSING_DATA|| result == TextToSpeech.LANG_NOT_S UPPORTED) { Log.e("TTS", "This Language is not supported"); } else { buttonSpeak.setEnabled(true); speakOut(); } } else { Log.e("TTS", "Initilization Failed!"); } }
private void speakOut() { String text = editText.getText().toString(); tts.speak(text, TextToSpeech.QUEUE_FLUSH, null); } @Override public boolean onCreateOptionsMenu(Menu menu) { // Inflate the menu; this adds items to the action bar if it is present. getMenuInflater().inflate(R.menu.activity_main, menu); return true; } }
Android Sensor Sensors can be used to monitor the three- dimensional device movement or change in the environment of the device. Android provides sensor api to work with different types of sensors.
Types of Sensors Android supports three types of sensors: Category Description Motion Sensors These sensors are useful to measure acceleration forces and rotational forces along three axes. This category includes accelerometers, gravity sensors, gyroscopes, and rotational vector sensors. Environmental Sensors These sensors are useful to measure various environmental parameters, such as ambient air temperature and pressure, illumination, and humidity. This category includes barometers, photometers, and thermometers. Position Sensors These sensors are useful to measure the physical position of a device. This category includes orientation sensors and magnetometers.
The Android sensor framework provided a following classes and interfaces to access device sensors and acquire raw sensor data. Class Description SensorManager By using this class we can create an instance of sensor service and this class provides a various methods for accessing and listing sensors, registering and unregistering sensor event listeners and acquiring orientation information. Sensor By using this class we can create an instance of a specific sensor and this class provides a various methods that let you determine the sensor's capabilities. SensorEvent The system uses this class to create a sensor event object and it provides the raw sensor data, type of sensor that generated the event, accuracy of the data, and the timestamp for the event. SensorEventListener We can use this interface to create two callback methods that receive notifications (sensor events) when sensor values change or when sensor accuracy changes.
Android provides SensorManager and Sensor classes to use the sensors in our application. In order to use sensors, first thing you need to do is to instantiate the object of SensorManager class. It can be achieved as follows. SensorManager sMgr; sMgr = (SensorManager)this.getSystemService(SENSOR_SERVICE); The next thing you need to do is to instantiate the object of Sensor class by calling the getDefaultSensor() method of the SensorManager class. Its syntax is given below Sensor light; light=sMgr.getDefaultSensor(Sensor.TYPE_LIGHT); Once that sensor is declared , you need to register its listener and override two methods which are onAccuracyChanged and onSensorChanged. Its syntax is as follows sMgr.registerListener(this,light,SensorManager.SENSOR_DELAY_NORMAL); public void onAccuracyChanged(Sensor sensor, int accuracy) { } public void onSensorChanged(SensorEvent event) { }
Getting list of sensors supported You can get a list of sensors supported by your device by calling the getSensorList method, which will return a list of sensors containing their name and version number and much more information. You can then iterate the list to get the information. Its syntax is given below sMgr=(SensorManager)this.getSystemService(SENSOR_SERVICE ); List<Sensor> list = sMgr.getSensorList(Sensor.TYPE_ALL); for(Sensor sensor: list){ } Apart from the these methods, there are other methods provided by the SensorManager class for managing sensors framework. These methods are listed below
Sr.No Method & description 1 getDefaultSensor(int type) This method get the default sensor for a given type. 2 getInclination(float[] I) This method computes the geomagnetic inclination angle in radians from the inclination matrix. 3 registerListener(SensorListener listener, int sensors, int rate) This method registers a listener for the sensor 4 unregisterListener(SensorEventListener listener, Sensor sensor) This method unregisters a listener for the sensors with which it is registered. 5 getOrientation(float[] R, float[] values) This method computes the device's orientation based on the rotation matrix. 6 getAltitude(float p0, float p) This method computes the Altitude in meters from the atmospheric pressure and the pressure at sea level.
activity_main.xml (List of sensors supported by mobile) <?xml version="1.0" encoding="utf-8"?> <LinearLayout xmlns:android="http://schemas.android.com/apk/res/ android" android:orientation="vertical" android:layout_width="match_parent " android:layout_height="match_parent" android:paddingLeft="10dp" android:paddingRight="10dp"> <TextView android:id="@+id/sensorslist" android:layout_width="wrap_content" android:layout_height="wrap_content" android:layout_marginTop="80dp" android:text="Sensors" android:textSize="20dp" android:textStyle="bold" android:layout_gravity="center" android:visibility="gone"/> </LinearLayout>
MainActivity.java import android.hardware.Sensor; import android.hardware.SensorManager; import android.support.v7.app.AppCompatActivity; import android.os.Bundle; import android.view.View; import android.widget.TextView; import java.util.List; public class MainActivity extends AppCompatActivity { private SensorManager mgr; private TextView txtList; @Override protected void onCreate(Bundle savedInstanceState) { super.onCreate(savedInstanceState); setContentView(R.layout.activity_main); mgr = (SensorManager)getSystemService(Context.SENSOR_SERVICE); txtList = (TextView)findViewById(R.id.sensorslist); List<Sensor> sensorList = mgr.getSensorList(Sensor.TYPE_ALL); StringBuilder strBuilder = new StringBuilder(); for(Sensor s: sensorList){ strBuilder.append(s.getName()+"\n"); } txtList.setVisibility(View.VISIBLE); txtList.setText(strBuilder); } }
Changed background color when device is shuffled activity_main.xml <RelativeLayout xmlns:android="http://schemas.android.com/apk/res/androi d" xmlns:tools="http://schemas.android.com/tools" android:layout_width="match_parent" android:layout_height="match_parent" tools:context=".MainActivity" > <TextView android:id="@+id/textView" android:layout_width="match_parent" android:layout_height="match_parent" android:text="Shake to switch color" /> </RelativeLayout>
import android.app.Activity; import android.graphics.Color; import android.hardware.Sensor; import android.hardware.SensorEvent; import android.hardware.SensorEventListener; import android.hardware.SensorManager; import android.os.Bundle; import android.view.View; import android.widget.Toast; public class MainActivity extends Activity implements SensorEventList ener{ private SensorManager sensorManager; private boolean isColor = false; private View view; private long lastUpdate;
@Override public void onCreate(Bundle savedInstanceState) { super.onCreate(savedInstanceState); setContentView(R.layout.activity_main); view = findViewById(R.id.textView); view.setBackgroundColor(Color.GREEN); sensorManager = (SensorManager) getSystemService(SENSOR_SERVICE); lastUpdate = System.currentTimeMillis(); } //overriding two methods of SensorEventListener @Override public void onAccuracyChanged(Sensor sensor, int accuracy) {} @Override public void onSensorChanged(SensorEvent event) { if (event.sensor.getType() == Sensor.TYPE_ACCELEROMETER) { getAccelerometer(event); } }
private void getAccelerometer(SensorEvent event) { float[] values = event.values; // Movement float x = values[0]; float y = values[1]; float z = values[2]; float accelationSquareRoot = (x * x + y * y + z * z) / (SensorManager.GRAVITY_EARTH * SensorManager.GRAVITY_EARTH); long actualTime = System.currentTimeMillis(); Toast.makeText(getApplicationContext(),String.valueOf(accelationSquareRoot)+" "+ SensorManager.GRAVITY_EARTH,Toast.LENGTH_SHORT).show(); if (accelationSquareRoot >= 2) //it will be executed if you shuffle { if (actualTime - lastUpdate < 200) { return; } lastUpdate = actualTime;//updating lastUpdate for next shuffle if (isColor) { view.setBackgroundColor(Color.GREEN); } else { view.setBackgroundColor(Color.RED); } isColor = !isColor; } }
@Override protected void onResume() { super.onResume(); // register this class as a listener for the orientation and // accelerometer sensors sensorManager.registerListener(this,sensorManager.getDefaultSe nsor(Sensor.TYPE_ACCELEROMETER), SensorManager.SENSOR_DELAY_NORMAL); } @Override protected void onPause() { // unregister listener super.onPause(); sensorManager.unregisterListener(this); } }
Android Camera Camera is mainly used to capture picture and video. We can control the camera by using methods of camera API. Android provides the facility to work on camera by 2 ways: By Camera Intent By Camera API
Using existing android camera application in our application You will use MediaStore.ACTION_IMAGE_CAPTURE to launch an existing camera application installed on your phone. Its syntax is given below:- Intent intent = new Intent(android.provider.MediaStore.ACTION_IMAGE_CAPTURE);
Sr.No Intent type and description ACTION_IMAGE_CAPTURE_SECURE It returns the image captured from the camera , when the device is secured 1 ACTION_VIDEO_CAPTURE It calls the existing video application in android to capture video 2 EXTRA_SCREEN_ORIENTATION It is used to set the orientation of the screen to vertical or landscape 3 EXTRA_FULL_SCREEN It is used to control the user interface of the ViewImage 4 INTENT_ACTION_VIDEO_CAMERA This intent is used to launch the camera in the video mode 5 EXTRA_SIZE_LIMIT It is used to specify the size limit of video or image capture size 6
Now you will use the function startActivityForResult() to launch this activity and wait for its result. Its syntax is given below startActivityForResult(intent,0); This method has been defined in the activity class. We are calling it from main activity. There are methods defined in the activity class that does the same job , but used when you are not calling from the activity but from somewhere else.
Sr.No Activity function description startActivityForResult(Intent intent, int requestCode, Bundle options) It starts an activity , but can take extra bundle of options with it 1 startActivityFromChild(Activity child, Intent intent, int requestCode) It launch the activity when your activity is child of any other activity 2 startActivityFromChild(Activity child, Intent intent, int requestCode, Bundle options) It work same as above , but it can take extra values in the shape of bundle with it 3 startActivityFromFragment(Fragment requestCode) It launches activity from the fragment you are currently inside fragment, Intent intent, int 4 startActivityFromFragment(Fragment requestCode, Bundle options) It not only launches the activity from the fragment , but can take extra values with it fragment, Intent intent, int 5
Using Camera By using Camera Api This class is used for controlling device cameras. It can be used to take pictures when you are building a camera application. Camera API works in following ways: 1.Camera Manager: This is used to get all the cameras available in the device like front camera back camera each having the camera id. 2.CameraDevice: You can get it from Camera Manager class by its id. 3.CaptureRequest: You can create a capture request from camera device to capture images. 4.CameraCaptureSession: To get capture request s from Camera Device create a CameraCaptureSession. 5.CameraCaptureSession.CaptureCallback: This is going to provide the Capture session results.
Checking Camera Permissions: For the first we have used the Function requestPermissions(new String[]{Manifest.permission.CAMERA},MY_CAMERA_PERMIS SION_CODE); We will check whether the user has given permissions or not if not then first we will ask the user for permissions if a user is using Android version above Android Marshmallow(API 23) because From Android Marshmallow(API 23) and above by default all dangerous permission disabled. When the App opens for the first time after installation then you have to grant permissions. But if the android version is below Marshmallow then this function won t be called. requestPermissions(newString[]{Manifest.permission.CAMERA}, MY_CAMERA_PERMISSION_CODE)


")


findViewById(R.id.button1);")
 {")


 {")
 {")


 {")


 {")