Passive Attacks and Reconnaissance using NMAP for Network Scanning
Learn how to use NMAP for passive attacks and reconnaissance through port scanning techniques like ping scan, TCP port scan, and stealth scan. Understand how to analyze the output in Wireshark to identify open ports and version numbers on target systems.

Download Presentation

Please find below an Image/Link to download the presentation.
The content on the website is provided AS IS for your information and personal use only. It may not be sold, licensed, or shared on other websites without obtaining consent from the author. Download presentation by click this link. If you encounter any issues during the download, it is possible that the publisher has removed the file from their server.
E N D
Presentation Transcript
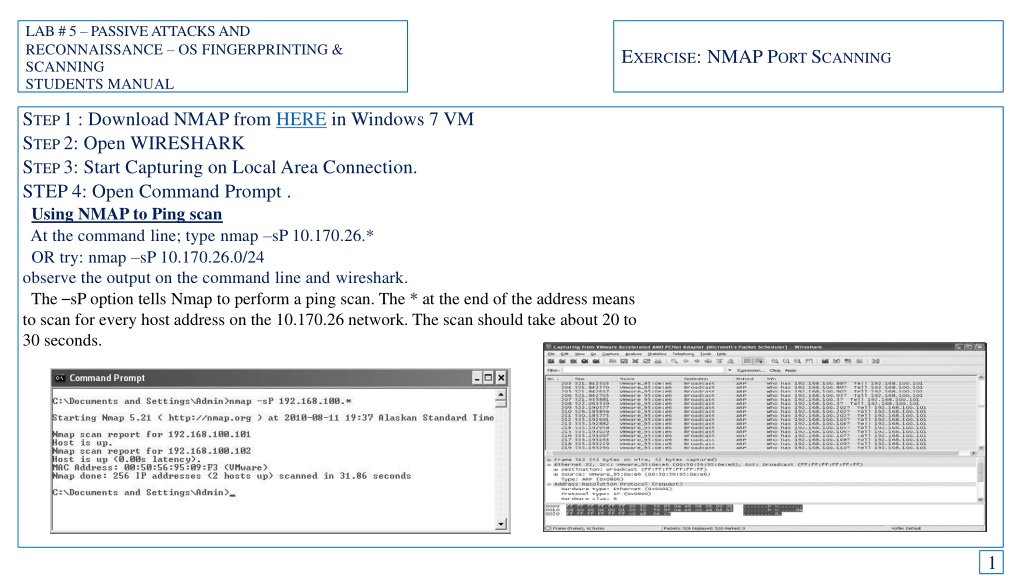
LAB # 5 PASSIVE ATTACKS AND RECONNAISSANCE OS FINGERPRINTING & SCANNING STUDENTS MANUAL EXERCISE: NMAP PORT SCANNING STEP 1 : Download NMAP from HERE in Windows 7 VM STEP 2: Open WIRESHARK STEP 3: Start Capturing on Local Area Connection. STEP 4: Open Command Prompt . Using NMAP to Ping scan At the command line; type nmap sP 10.170.26.* OR try: nmap sP 10.170.26.0/24 observe the output on the command line and wireshark. The sP option tells Nmap to perform a ping scan. The * at the end of the address means to scan for every host address on the 10.170.26 network. The scan should take about 20 to 30 seconds. 1
LAB # 5 PASSIVE ATTACKS AND RECONNAISSANCE OS FINGERPRINTING & SCANNING STUDENTS MANUAL EXERCISE: NMAP PORT SCANNING Using NMAP for TCP port scan: At the command line; type nmap sT 10.170.26.161 observe the output on the command line and wireshark. The sT option tells Nmap to perform a TCP port scan. This is a full connection scan. The scan may take few minutes. Look at the signature of the scan in Wireshark. Notice that there are many SYN packets sent from 10.170.26.101 (the computer doing the scanning) and many RST/ACK packets being sent back. RST/ACK is the response for a request to connect to a port that is not open. Look at what happens when an open port is discovered. If you look at the output from the Nmap scan, you know that port 80, the HTTP service port, is open. To find those particular packets out of the thousands of packets captured, you will need to filter out the unwanted traffic. In the Filter box, type tcp.port==80 and press enter. Look at the last four packets captured. Note the SYN, SYN/ACK, and ACK packets. A three-way handshake was completed so that the port could be established as open. This is okay, but it is very noisy and can show up in the server logs. The last of the four packets is an RST sent by the scanning computer. 2
LAB # 5 PASSIVE ATTACKS AND RECONNAISSANCE OS FINGERPRINTING & SCANNING STUDENTS MANUAL EXERCISE: NMAP PORT SCANNING Using NMAP to a stealth scan: At the command line; type nmap sS 10.170.26.161 observe the output on the command line and wireshark. The sS option tells Nmap to perform a TCP SYN stealth port scan. Since this type of scan requires Nmap to behave on the network in an atypical manner, you must have administrative rights. The scan should take about one second. In the Filter box, type tcp.port==80 and press enter. Look at the last three packets. Note that this time the three-way handshake is not completed. The SYN packet is sent and the SYN/ACK is returned, but instead of sending back an ACK, the scanning computer sends an RST. This will allow the scanning computer to establish that the port is in fact opened, but is less likely to be registered in the logs. 3
LAB # 5 PASSIVE ATTACKS AND RECONNAISSANCE OS FINGERPRINTING & SCANNING STUDENTS MANUAL EXERCISE: NMAP FOOT PRINTING Using NMAP to determine veraion number At the command line; type nmap v -a 10.170.26.161 observe the output on the command line. The v option tells Nmap to perform a ping scan. The * at the end of the address means to scan for every host address on the 10.170.26 network. The scan should take about 20 to 30 seconds. At the command line; type nmap V 10.170.26.161/170 1
LAB # 5 PASSIVE ATTACKS AND RECONNAISSANCE OS FINGERPRINTING & SCANNING STUDENTS MANUAL EXERCISE: NMAP PORT SCANNING Using NMAP for Aggressive and fast scanning: At the command line; type nmap A 10.170.26.161/170 observe the output on the command line The V option tells Nmap to perform a TCP port scan. This is a full connection scan. The scan may take few minutes. Look at the signature of the scan in Wireshark. Notice that there are many SYN packets sent from 10.170.26.101 (the computer doing the scanning) and many RST/ACK packets being sent back. RST/ACK is the response for a request to connect to a port that is not open. At the command line; type nmap F 10.170.26.161/170 observe the output on the command line The V option tells Nmap to perform a TCP port scan. This is a full connection scan. The scan may take few minutes. Look at the signature of the scan in Wireshark. Notice that there are many SYN packets sent from 2
LAB # 5 PASSIVE ATTACKS AND RECONNAISSANCE OS FINGERPRINTING & SCANNING STUDENTS MANUAL EXERCISE: NMAP PORT SCANNING Using NMAP for open ports: At the command line; type nmap open 10.170.26.161 observe the output on the command line The sS option tells Nmap to perform a TCP SYN stealth port scan. Since this type of scan requires Nmap to behave on the network in an atypical manner, you must have administrative rights. The scan should take about one second. At the command line; type nmap p 22,25,80,21 10.170.26.161 observe the output on the command line 3
LAB # 5 PASSIVE ATTACKS AND RECONNAISSANCE STUDENTS MANUAL EXERCISE: NMAP PORT SCANNING 4