Caterpillar Cat 931 LGP TRACK LOADER (Prefix 10N) Service Repair Manual Instant Download (10N00526 and up)
Please open the website below to get the complete manualnn//

Download Presentation

Please find below an Image/Link to download the presentation.
The content on the website is provided AS IS for your information and personal use only. It may not be sold, licensed, or shared on other websites without obtaining consent from the author. Download presentation by click this link. If you encounter any issues during the download, it is possible that the publisher has removed the file from their server.
E N D
Presentation Transcript
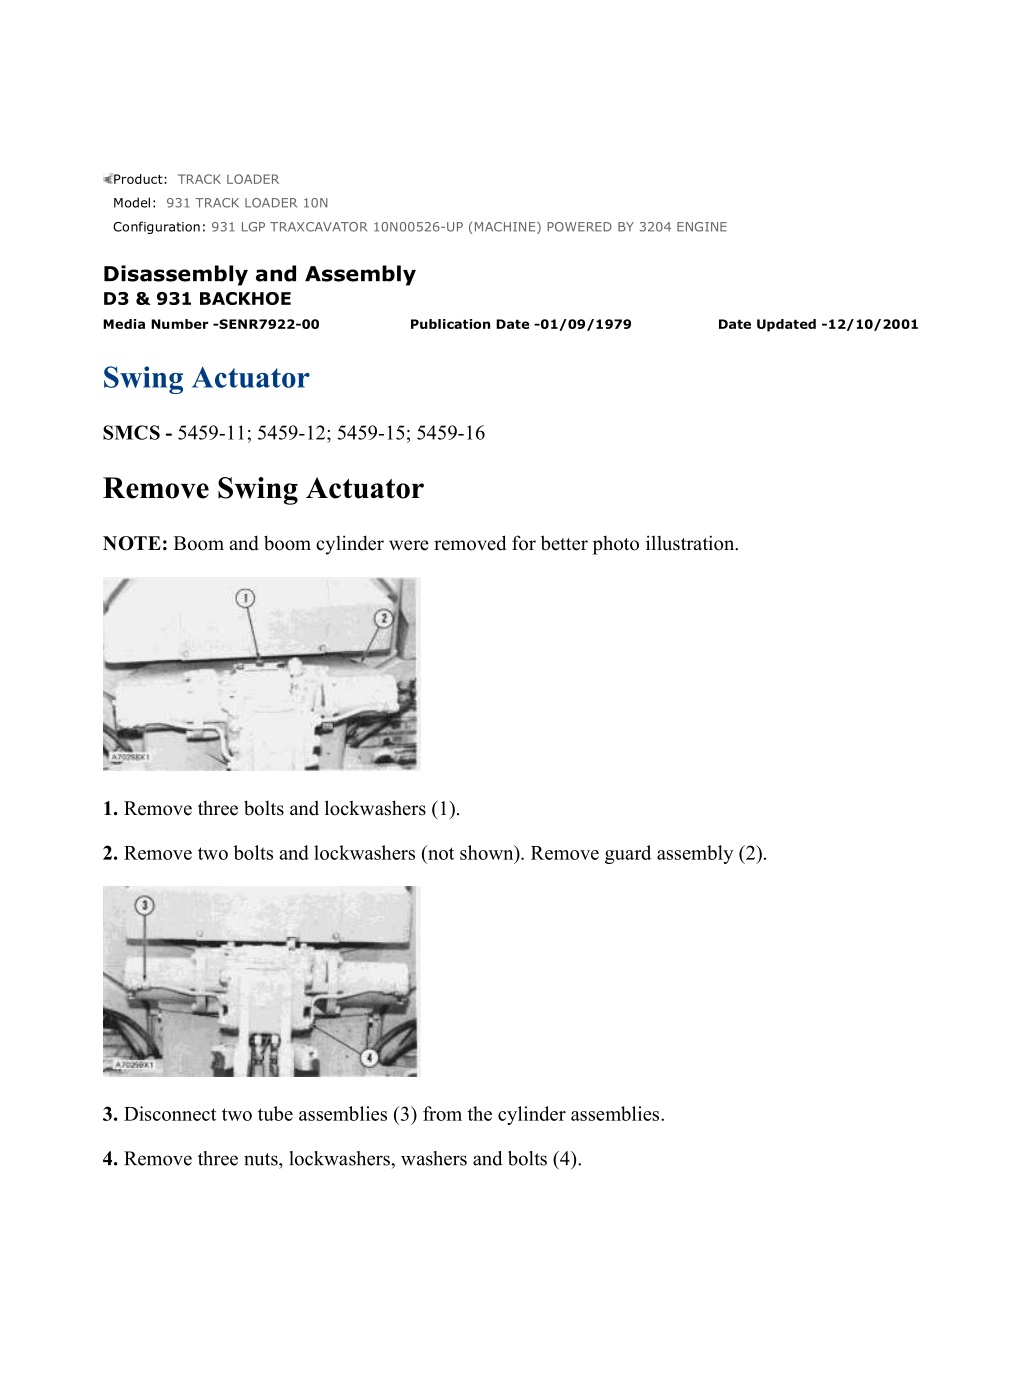
931 LGP TRAXCAVATOR 10N00526-UP (MACHINE) POWERED BY 3204 ENGI... 1/12 Product: TRACK LOADER Model: 931 TRACK LOADER 10N Configuration: 931 LGP TRAXCAVATOR 10N00526-UP (MACHINE) POWERED BY 3204 ENGINE Disassembly and Assembly D3 & 931 BACKHOE Media Number -SENR7922-00 Publication Date -01/09/1979 Date Updated -12/10/2001 Swing Actuator SMCS - 5459-11; 5459-12; 5459-15; 5459-16 Remove Swing Actuator NOTE: Boom and boom cylinder were removed for better photo illustration. 1. Remove three bolts and lockwashers (1). 2. Remove two bolts and lockwashers (not shown). Remove guard assembly (2). 3. Disconnect two tube assemblies (3) from the cylinder assemblies. 4. Remove three nuts, lockwashers, washers and bolts (4). https://127.0.0.1/sisweb/sisweb/techdoc/techdoc_print_page.jsp?returnurl=/sis... 2022/4/28
931 LGP TRAXCAVATOR 10N00526-UP (MACHINE) POWERED BY 3204 ENGI... 2/12 5. Remove six bolts and lockwashers (5). Remove guard assembly (6). NOTE: Remove the plugs to prevent a vacuum. 6. Remove two plugs (8). Remove ten bolts and lockwashers (7). Remove two cylinder assemblies (9). 7. Remove two bolts and lockwashers. Install two 1/2"-13 NC forged eyebolts (10). 8. Fasten a hoist to the swing actuator. Remove swing actuator (11). Weight is 185 lb. (84 kg). Install Swing Actuator NOTE: Boom and boom cylinder were removed for better photo illustration. 1. Remove two cover bolts and washers. Install two 1/2"-13 NC forged eyebolts (1). https://127.0.0.1/sisweb/sisweb/techdoc/techdoc_print_page.jsp?returnurl=/sis... 2022/4/28
931 LGP TRAXCAVATOR 10N00526-UP (MACHINE) POWERED BY 3204 ENGI... 3/12 2. Fasten a hoist to the swing actuator. Weight is 185 lb. (84 kg). NOTE: If rack assembly (3) was moved after removal of swing actuator, see Specifications for correct alignment before installation. 3. Put swing actuator (2) in position. Remove the hoist and the eyebolts. Install the two cover bolts. Tighten the bolts to a torque of 100 11 lb.ft. (135 15 N m). 4. Put two cylinder assemblies (4) in position on the swing actuator. 5. Install the ten lockwashers and bolts that hold the cylinder assemblies in position. Tighten the bolts to a torque of 175 20 lb.ft. (240 25 N m). Install the plugs in the cylinder assemblies. 6. Put guard assembly (5) in position. Install the six lockwashers and bolts that hold the guard in position. 7. Connect two tube assemblies (6). Install three bolts, lockwashers, washers and nuts (7). Tighten the bolts to a torque of 400 lb.ft. (540 N m). https://127.0.0.1/sisweb/sisweb/techdoc/techdoc_print_page.jsp?returnurl=/sis... 2022/4/28
https://www.ebooklibonline.com Hello dear friend! Thank you very much for reading. Enter the link into your browser. The full manual is available for immediate download. https://www.ebooklibonline.com
931 LGP TRAXCAVATOR 10N00526-UP (MACHINE) POWERED BY 3204 ENGI... 4/12 8. Put guard assembly (8) in position. Install the three bolts and washers on top. Tighten the bolts to a torque of 100 11 lb.ft. (135 15 N m). 9. Install the two lockwashers and bolts beneath the cover. Tighten the bolts to a torque of 175 20 lb.ft. (240 25 N m). 10. Check the level of the hydraulic tank before operation. See LUBRICATION AND MAINTENANCE GUIDE for correct level. Disassemble Swing Actuator start by: a) remove swing actuator 1. Remove O-ring seal (1) from the cylinder assembly. 2. Remove fitting (3). Remove the O-ring seal from the fitting. 3. Remove plug (4). Remove the O-ring from the plug. 4. Remove relief valve (2). 5. Use Steps 1 through 4 for the other cylinder assembly. https://127.0.0.1/sisweb/sisweb/techdoc/techdoc_print_page.jsp?returnurl=/sis... 2022/4/28
931 LGP TRAXCAVATOR 10N00526-UP (MACHINE) POWERED BY 3204 ENGI... 5/12 6. Remove tube assembly (5). Remove breather (6). 7. Remove six bolts and lockwashers (7). 8. Install two 3/8"-16 NC forcing bolts (8) and tighten the forcing bolts evenly. Remove cover (9) from the housing. 9. Remove O-ring seal (11) from the cover. Remove bearing (10) if necessary. 10. Remove shims (12). Put identification on shims for correct installation. https://127.0.0.1/sisweb/sisweb/techdoc/techdoc_print_page.jsp?returnurl=/sis... 2022/4/28
931 LGP TRAXCAVATOR 10N00526-UP (MACHINE) POWERED BY 3204 ENGI... 6/12 11. Remove pinion (13). 12. Use a hoist or two persons. Remove rack assembly (14). Weight is 80 lb. (36 kg). 13. Remove bearing (15) if necessary from housing (16). 14. Turn the housing as shown. Remove seal (17). https://127.0.0.1/sisweb/sisweb/techdoc/techdoc_print_page.jsp?returnurl=/sis... 2022/4/28
931 LGP TRAXCAVATOR 10N00526-UP (MACHINE) POWERED BY 3204 ENGI... 7/12 15. Remove plugs (18) from each side of the housing. Remove the O-ring seals from the plugs. NOTICE Do not install pin in holder beyond thickness of holder or seal can be damaged. 16. Turn holder (20) counterclockwise to remove rod (19). Remove the holder. 17. Remove seal (21) from rack (22). 18. Remove teflon seal (23). 19. Remove ring (24). https://127.0.0.1/sisweb/sisweb/techdoc/techdoc_print_page.jsp?returnurl=/sis... 2022/4/28
931 LGP TRAXCAVATOR 10N00526-UP (MACHINE) POWERED BY 3204 ENGI... 8/12 20. Remove cushion valve assembly (25). 21. Use Steps 16 through 20 to disassemble the other end of the rack. Install Swing Actuator 1. Check all parts for damage. If damaged, use new parts for replacement. 2. Make sure all parts are clean and free of dirt and foreign material. 3. Install cushion valve assembly (2) in rack (1). 4. Install ring (3). https://127.0.0.1/sisweb/sisweb/techdoc/techdoc_print_page.jsp?returnurl=/sis... 2022/4/28
931 LGP TRAXCAVATOR 10N00526-UP (MACHINE) POWERED BY 3204 ENGI... 9/12 5. Install teflon seal (4). 6. Install seal (5). NOTICE Do not install pin in holder beyond thickness of holder or seal (5) can be damaged. 7. Install holder (7). Install bent end of the rod in the rack and turn holder clockwise to install rod (6). 8. Use Steps 3 through 7 to assemble the other end of the rack. https://127.0.0.1/sisweb/sisweb/techdoc/techdoc_print_page.jsp?returnurl=/sis... 2022/4/28
931 LGP TRAXCAVATOR 10N00526-UP (MACHINE) POWERED BY 3204 EN... 10/12 9. Install the O-ring seals on the plugs. Install two plugs (9) in housing (8). 10. Install the seal in the housing with tooling (A). 11. If the bearing was removed, put a support under the housing and install bearing (10) with a press. NOTE: Put the rack assembly in position so timing mark on tooth is toward cover. 12. Use a hoist or two persons. Install rack assembly (11) in the housing. Weight is 80 lb. (36 kg). 13. Put pinion (12) in the housing with the timing mark on the pinion in alignment with timing mark on the rack. See Specifications. https://127.0.0.1/sisweb/sisweb/techdoc/techdoc_print_page.jsp?returnurl=/sis... 2022/4/28
931 LGP TRAXCAVATOR 10N00526-UP (MACHINE) POWERED BY 3204 EN... 11/12 14. Install shims (13) on the housing. See Specifications for correct amount of shims. 15. If the bearing was removed, put a support under the cover and install bearing (14) with a press. 16. Install O-ring seal (15) in the cover. 16. Put cover (16) in position on the housing. Install six lockwashers and bolts. 17. Install breather (17). Install tube assembly (18). https://127.0.0.1/sisweb/sisweb/techdoc/techdoc_print_page.jsp?returnurl=/sis... 2022/4/28
931 LGP TRAXCAVATOR 10N00526-UP (MACHINE) POWERED BY 3204 EN... 12/12 18. Install relief valve (23) on the cylinder. 19. Install O-ring seal (20) on the plug. Install plug (22). 20. Install O-ring seal (21) on the fitting. Install fitting (19). 21. Install O-ring seal (24) on the cylinder. 22. Use Steps 18 through 21 to assemble the other cylinder. https://127.0.0.1/sisweb/sisweb/techdoc/techdoc_print_page.jsp?returnurl=/sis... 2022/4/28
931 LGP TRAXCAVATOR 10N00526-UP (MACHINE) POWERED BY 3204 ENGI... 1/5 Product: TRACK LOADER Model: 931 TRACK LOADER 10N Configuration: 931 LGP TRAXCAVATOR 10N00526-UP (MACHINE) POWERED BY 3204 ENGINE Disassembly and Assembly D3 & 931 BACKHOE Media Number -SENR7922-00 Publication Date -01/09/1979 Date Updated -12/10/2001 Swing Frame SMCS - 4151-11; 4151-12; 4151-17 Remove Swing Frame start by: a) remove boom and boom cylinder b) remove swing actuator 1. Remove five bolts and lockwashers (1). Remove bracket (2). 2. Remove two hydraulic tube assemblies (3). https://127.0.0.1/sisweb/sisweb/techdoc/techdoc_print_page.jsp?returnurl=/sis... 2022/4/28
931 LGP TRAXCAVATOR 10N00526-UP (MACHINE) POWERED BY 3204 ENGI... 2/5 3. Fasten a hoist to the swing frame. Remove pin (4). 4. Remove two bolts and lockwashers (5). Remove plate (6). 5. Remove pin (7). 6. Remove swing frame (8). Weight is 210 lb. (94.5 kg). Remove two washers (9). Install Swing Frame 1. Check all parts for damage. If damaged, use new parts for replacement. 2. Make sure all parts are clean and free of dirt and foreign material. https://127.0.0.1/sisweb/sisweb/techdoc/techdoc_print_page.jsp?returnurl=/sis... 2022/4/28
931 LGP TRAXCAVATOR 10N00526-UP (MACHINE) POWERED BY 3204 ENGI... 3/5 3. Fasten a hoist to swing frame (1). Weight is 210 lb. (94.5 kg). Put the swing frame in position and install two washers (2). 4. Install pin (3). 5. Put plate (4) in position and install the two lockwashers and bolts that hold it in position. 6. Install pin (5). Remove the hoist. https://127.0.0.1/sisweb/sisweb/techdoc/techdoc_print_page.jsp?returnurl=/sis... 2022/4/28
931 LGP TRAXCAVATOR 10N00526-UP (MACHINE) POWERED BY 3204 ENGI... 4/5 7. Install two tube assemblies (6). NOTICE Hydraulic hoses (7) must have enough play to prevent damage when the swing frame moves. 8. Put bracket (8) in position and install the five lockwashers and bolts that hold it in position. end by: a) install swing actuator b) install boom and boom cylinder Disassemble And Assemble Swing Frame start by: a) remove swing frame NOTE: Remove bearings only if necessary. 1. Remove the top pivot bearing from the swing frame. https://127.0.0.1/sisweb/sisweb/techdoc/techdoc_print_page.jsp?returnurl=/sis... 2022/4/28
931 LGP TRAXCAVATOR 10N00526-UP (MACHINE) POWERED BY 3204 ENGI... 5/5 2. Remove the top hinge bearings from the swing frame. 3. Remove the bottom hinge bearings from the swing frame. 4. Use new parts for replacement. 5. Make sure all parts are clean and free of dirt and foreign material. NOTE: Lower the temperature of the bearings to -40 F (-40 C) before installation. 6. Install bottom hinge bearings in the swing frame with tooling (A). 7. Install top hinge bearings in the swing frame with tooling (A). 8. Install top pivot bearings in the swing frame with tooling (B). end by: a) install swing frame https://127.0.0.1/sisweb/sisweb/techdoc/techdoc_print_page.jsp?returnurl=/sis... 2022/4/28
931 LGP TRAXCAVATOR 10N00526-UP (MACHINE) POWERED BY 3204 ENGI... 1/2 Product: TRACK LOADER Model: 931 TRACK LOADER 10N Configuration: 931 LGP TRAXCAVATOR 10N00526-UP (MACHINE) POWERED BY 3204 ENGINE Disassembly and Assembly D3 & 931 BACKHOE Media Number -SENR7922-00 Publication Date -01/09/1979 Date Updated -12/10/2001 Backhoe Stabilizers SMCS - 6505-11; 6505-12 Remove Backhoe Stabilizers start by: a) remove stabilizer cylinder 1. Remove bolt, lockwasher and washer (2). Remove pipe (3). 2. Fasten a hoist to the stabilizer. Remove pin (1). Remove backhoe stabilizer (4). Weight is 160 lb. (72 kg). Install Backhoe Stabilizers 1. Fasten a hoist to the backhoe stabilizer. 2. Put backhoe stabilizer (1) in position on the frame. https://127.0.0.1/sisweb/sisweb/techdoc/techdoc_print_page.jsp?returnurl=/sis... 2022/4/28
931 LGP TRAXCAVATOR 10N00526-UP (MACHINE) POWERED BY 3204 ENGI... 2/2 3. Install pin (2). 4. Install the pipe, washer, lockwasher and bolt that hold the pin in position. end by: a) install stabilizer cylinder https://127.0.0.1/sisweb/sisweb/techdoc/techdoc_print_page.jsp?returnurl=/sis... 2022/4/28
931 LGP TRAXCAVATOR 10N00526-UP (MACHINE) POWERED BY 3204 ENGI... 1/5 Product: TRACK LOADER Model: 931 TRACK LOADER 10N Configuration: 931 LGP TRAXCAVATOR 10N00526-UP (MACHINE) POWERED BY 3204 ENGINE Disassembly and Assembly D3 & 931 BACKHOE Media Number -SENR7922-00 Publication Date -01/09/1979 Date Updated -12/10/2001 Console SMCS - 6505-11; 6505-12 Remove Console NOTE: Console can be removed with the backhoe on the machine, but it will be difficult. 1. Remove the backhoe from the machine. See Special Instructions Form SMHS6867. 2. Remove six bolts and lockwashers (1). Remove cover (2). Disconnect the four hydraulic hoses to the stabilizer cylinders. 3. Put identification on the tube assemblies for correct assembly. 4. Disconnect all tube assemblies (3) from the control valve. 5. Remove four nuts (4). Remove the four tube assemblies to the stabilizer cylinders. Remove four bolts and lockwashers (5). https://127.0.0.1/sisweb/sisweb/techdoc/techdoc_print_page.jsp?returnurl=/sis... 2022/4/28
931 LGP TRAXCAVATOR 10N00526-UP (MACHINE) POWERED BY 3204 ENGI... 2/5 6. Fasten a hoist to the console. Remove console (6). Weight is 184 lb. (83 kg). 7. Remove four bolts and lockwashers (7). 8. Remove four bolts and lockwashers (9). Remove control valve (8). Use two persons or a hoist. Weight is 106 lb. (47.7 kg). 9. Remove two bolts and lockwashers (11). Remove two nuts, lockwashers and screws (12). Remove grab iron (10). https://127.0.0.1/sisweb/sisweb/techdoc/techdoc_print_page.jsp?returnurl=/sis... 2022/4/28
931 LGP TRAXCAVATOR 10N00526-UP (MACHINE) POWERED BY 3204 ENGI... 3/5 10. Remove three bolts and lockwashers (13). Remove cover (14). 11. Remove four bolts and lockwashers (15). Remove cover (16). Install Console 1. Check all parts for damage. If damaged, use new parts for replacement. 2. Put cover (1) in position. Install the four lockwashers and bolts that hold the cover in position. 3. Put cover (2) in position. Install three lockwashers and bolts that hold the cover in position. https://127.0.0.1/sisweb/sisweb/techdoc/techdoc_print_page.jsp?returnurl=/sis... 2022/4/28
Suggest: For more complete manuals. Please go to the home page. https://www.ebooklibonline.com If the above button click is invalid. Please download this document first, and then click the above link to download the complete manual. Thank you so much for reading
931 LGP TRAXCAVATOR 10N00526-UP (MACHINE) POWERED BY 3204 ENGI... 4/5 4. Put grab iron (3) in position. Install the two screws, lockwashers, nuts, also the two bolts and lockwashers that hold the grab iron in position. 5. Use two persons or a hoist. Weight is 106 lb. (47.7 kg). Put control valve (4) in position. Install four lockwashers and bolts that hold the control valve in position. 6. Install four lockwashers and bolts (5). 7. Fasten a hoist to the console. Weight is 184 lb. (83 kg). Put console (6) in position on the backhoe. Install the four lockwashers and bolts that hold the console in position. NOTE: Connect tube assemblies as per identification. https://127.0.0.1/sisweb/sisweb/techdoc/techdoc_print_page.jsp?returnurl=/sis... 2022/4/28
931 LGP TRAXCAVATOR 10N00526-UP (MACHINE) POWERED BY 3204 ENGI... 5/5 8. Put four tube assemblies (8) in position and install nuts (9). 9. Connect all tube assemblies (7) to the control valve. Connect the four hydraulic hoses from the stabilizer cylinders. 10. Put cover (10) in position and install the six lockwashers and bolts that hold the cover in position. 11. Install the backhoe on the machine. See Special Instructions Form SMHS6867. https://127.0.0.1/sisweb/sisweb/techdoc/techdoc_print_page.jsp?returnurl=/sis... 2022/4/28
https://www.ebooklibonline.com Hello dear friend! Thank you very much for reading. Enter the link into your browser. The full manual is available for immediate download. https://www.ebooklibonline.com
 POWERED BY 3204")
 POWERED BY 3204")
 POWERED BY 3204")

 POWERED BY 3204")
 POWERED BY 3204")
 POWERED BY 3204")
 POWERED BY 3204")
 POWERED BY 3204")
 POWERED BY 3204")
 POWERED BY 3204")
 POWERED BY 3204")
 POWERED BY 3204")
 POWERED BY 3204")
 POWERED BY 3204")
 POWERED BY 3204")
 POWERED BY 3204")
 POWERED BY 3204")
 POWERED BY 3204")
 POWERED BY 3204")
 POWERED BY 3204")
 POWERED BY 3204")
 POWERED BY 3204")

 POWERED BY 3204")
 POWERED BY 3204")