Efficient Expense Reporting with Allocations

Streamline your expense reporting process by following a step-by-step guide to create an expense report with allocations. Learn how to clear alerts, add allocations, and submit your report efficiently within your organization's system. Make the most of the allocated budgets for different expenses.

Download Presentation

Please find below an Image/Link to download the presentation.
The content on the website is provided AS IS for your information and personal use only. It may not be sold, licensed, or shared on other websites without obtaining consent from the author. Download presentation by click this link. If you encounter any issues during the download, it is possible that the publisher has removed the file from their server.
E N D
Presentation Transcript
CREATE AN EXPENSE REPORT WITH ALLOCATIONS
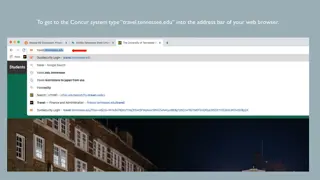
On the single sign on page, type in your mycoyote ID and password, hit enter and then either choose My Employment or, Administrative Systems and click on the Travel and Corporate card Icon as shown below:
Once you click on create from an Approved Request -- Click on the first pop up Create From an Approved Request Click on Create from an Approved Request --Select the Available Request and Create Report
Once the report is created, there will be alerts. All the red alerts will have to be cleared. Click on the down arrow to view all the alerts
Clearing Alerts In an expense report, there will always be an alert for adding the start time and end time, and adding the approver Please click on view and you will be directed to the header page, to update the time, and the budget approver, and hit save All the other alerts will be either for attaching receipts, adding location for airfare, lodging etc. for expenses on the report Since the expense report is created from your Travel Request prior to travel, you must update the actual meals for each specific days, and enter separate meal expense entries Once all the alerts are cleared, the report is ready to be submitted click on Submit Report
Adding Allocation To start creating the allocations, select the expenses and click on allocate The allocation can be done by percentage or by amount Once the option is selected, click on Add, to start adding the chart field string The budget approver will have to be added at the end of the chart field string
Adding the Chartfield String A pop up will appear add the business unit, fund, department id, program and project code, and hit save Once the chartfield is entered and saved, the allocations will appear, showing the account string Hit save at the bottom right corner, and then finally save expense The expense report is now ready with the allocations
Once the allocations are saved, the expense line item will show as Allocated on the right corner. Click on the Allocated button, to show the chart field strings on a small pop up.
THANK YOU! If further information or assistance is needed, please do not hesitate to contact Accounts Payable/Travel at 909-537-3158