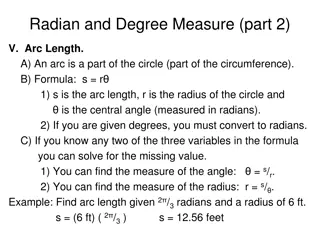
Understanding Circle Parts and Measurements

Explore the different parts of a circle, such as circumference, radius, and diameter, and understand their relationships. Engage in activities to compare lengths of different parts using string. Learn how to draw a circle accurately and deepen your knowledge of geometric concepts.

Download Presentation

Please find below an Image/Link to download the presentation.
The content on the website is provided AS IS for your information and personal use only. It may not be sold, licensed, or shared on other websites without obtaining consent from the author. Download presentation by click this link. If you encounter any issues during the download, it is possible that the publisher has removed the file from their server.
E N D
Presentation Transcript
Learning Intentions: Learning Intentions: By the end of this unit, you should: - know the different parts of the circle. - understand how they relate to each other. - be able to draw a circle to a given size. Success Criteria: Success Criteria: You will know if you have been successful when: - you can identify the circumference, radius and diameter of a circle. - you can explain the relationship between these parts - you can use a compass to draw a circle to a given radius or diameter. 2
For each of the three circles: cut a piece of string the same length as the red line. cut a piece of string the same length as the green line. cut a piece of string the same length as the black outline. Keep your three pieces of string for each circle together. You will be comparing them for Activity 2. 3 ACTIVITY 1
Lay your pieces of string next to each other for each of the three circles. In your group or with the person next to you, use your string to discuss: what you notice about the length of the red line compared to the green line. what you notice about the length of the green line compared to the length of the black outline. Note your thoughts down on your worksheet. ACTIVITY 2 4
FEEDBACK TIME! What did you notice about the length of the red line compared to the green line? You should have noticed that the red line was half length of the green line. half the CLASS DISCUSSION 5
FEEDBACK TIME! What did you notice about the length of the green line compared to the black outline? You should have noticed that the black outline was approximately 3 times the length of the green line. CLASS DISCUSSION 6
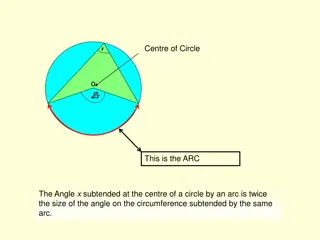
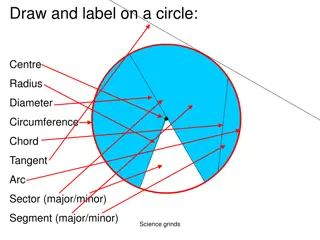
Lets look at the different parts of the circle: CIRCUMFERENCE The green line is called the DIAMETER DIAMETER. This is the distance between two points on the circumference through the centre point through the centre point of the circle. The black outline is called the CIRCUMFERENCE CIRCUMFERENCE. This is the length of the outside of the circle. DIAMETER RADIUS The DIAMETER DIAMETER is always twice the length of the RADIUS RADIUS. The red line is called the RADIUS RADIUS. This is the distance from the centre of the circle to any point on the circumference. ACTIVITY 3 7
O 3.5mm The drawing opposite is used to mark out the S1 bear keyring that pupils make in Technical. 18 12 Both a circle and a curve appear on the drawing. When a full circle full circle is shown, we show the diameter of the circle using this symbol: diameter When only part of a circle only part of a circle is shown i.e. a curve, we show the radius radius using this symbol: R 10 15 15 15 60 All sizes are always in MILLIMETRES. MILLIMETRES. CIRCLES IN DRAWINGS 8
When we draw circles, we use a compass. One leg of the compass has a point and the other has a pencil. 1. The point of the compass goes on the centre point. 2. The pencil is then set to the correct distance from the point. Look at the image opposite. What part of the circle is shown as line A-B? THE RADIUS When we draw circles, we set the compass to the size of the radius radius of the circle. The compass is spun round the centre point centre point to give us the circle. DRAWING CIRCLES 9
DRAWING CIRCLES 1. To set your compass, place the point on the zero on the scale on your ruler. 2. Move the pencil along the scale until is reaches the size you want (remember this should be in millimetres). 3. Once set, place the point of the compass on the centre point. Spin the compass around this point to draw the circle. *Handy Tip* You may find it easier to draw the circle by keeping the point still and spinning the paper instead of the compass. Try it both ways and see what works best for you. 10
COMPLETE ACTIVITY 4 ON YOUR WORKSHEETS ASK THE PERSON NEXT TO YOU TO DOUBLE CHECK YOUR SIZES ONCE YOU VE DRAWN YOUR CIRCLES. ACTIVITY 4 11
DRAWING CIRCLES We already know that to draw a circle with a compass, we need to know the RADIUS. What would we do if we were given the diameter instead? HALF THE SIZE HALF THE SIZE Complete ACTIVITY 5 on your worksheets. Complete ACTIVITY 5 on your worksheets. Remember to half the diameter size to draw the circle. If you don t half it, your circle will end up twice Remember to half the diameter size to draw the circle. If you don t half it, your circle will end up twice the size it should be! the size it should be! ACTIVITY 5 12
1. What is the name of the red line? RADIUS 2. What is the name of the green line? DIAMETER 3. What is the name of the black outline? CIRCUMFERENCE 4. What size should the compass be set to when drawing a circle? THE RADIUS 5. What does this symbol mean? DIAMETER 6. What does this symbol mean? R RADIUS 7. What size should the compass be set to if you are asked to draw a circle 40. 20 mm 13 QUICK QUIZ