Leica Cyclone Server Installation Guide - Version 2020.1.0
Detailed instructions for installing Leica Cyclone 2020.1.0 on a server, configuring databases, and setting up client workstations. The guide covers steps from downloading the installer to configuring user folders on the server. Learn to set up Cyclone efficiently for your organization's needs.
Download Presentation

Please find below an Image/Link to download the presentation.
The content on the website is provided AS IS for your information and personal use only. It may not be sold, licensed, or shared on other websites without obtaining consent from the author.If you encounter any issues during the download, it is possible that the publisher has removed the file from their server.
You are allowed to download the files provided on this website for personal or commercial use, subject to the condition that they are used lawfully. All files are the property of their respective owners.
The content on the website is provided AS IS for your information and personal use only. It may not be sold, licensed, or shared on other websites without obtaining consent from the author.
E N D
Presentation Transcript
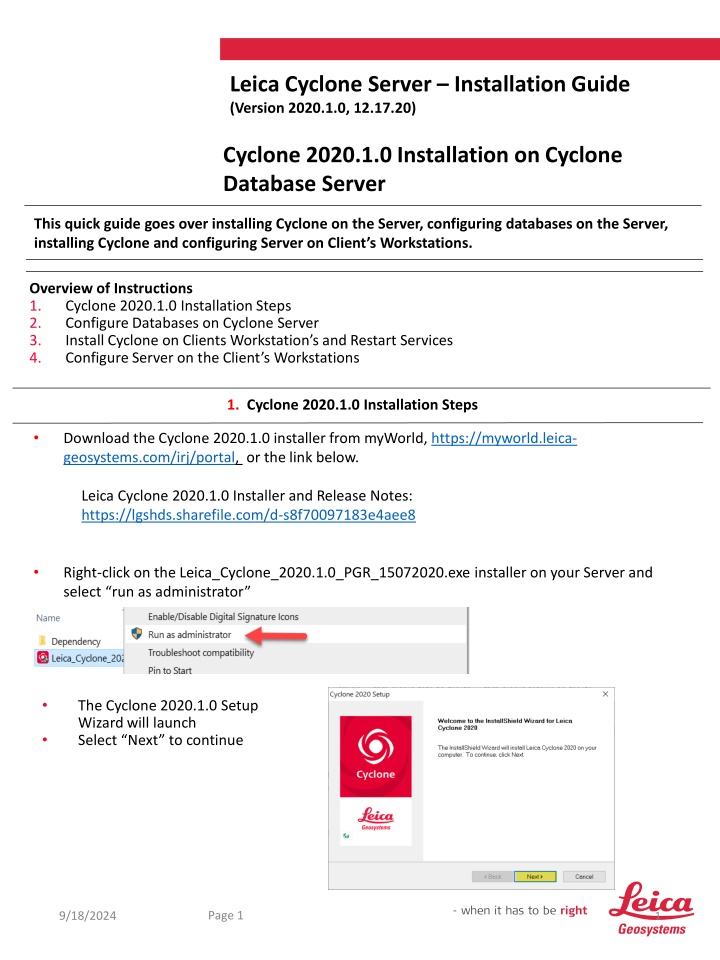
Leica Cyclone Server Installation Guide (Version 2020.1.0, 12.17.20) Cyclone 2020.1.0 Installation on Cyclone Database Server This quick guide goes over installing Cyclone on the Server, configuring databases on the Server, installing Cyclone and configuring Server on Client s Workstations. Overview of Instructions 1. Cyclone 2020.1.0 Installation Steps 2. Configure Databases on Cyclone Server 3. Install Cyclone on Clients Workstation s and Restart Services 4. Configure Server on the Client s Workstations 1. Cyclone 2020.1.0 Installation Steps Download the Cyclone 2020.1.0 installer from myWorld, https://myworld.leica- geosystems.com/irj/portal, or the link below. Leica Cyclone 2020.1.0 Installer and Release Notes: https://lgshds.sharefile.com/d-s8f70097183e4aee8 Right-click on the Leica_Cyclone_2020.1.0_PGR_15072020.exe installer on your Server and select run as administrator The Cyclone 2020.1.0 Setup Wizard will launch Select Next to continue Page 1 9/18/2024 1
If you agree to the License Agreement terms, select Yes Cyclone s program files will install on the C Drive by default Click Next Cyclone Customization Installation should be selected Then select Next Page 2 9/18/2024 2
Confirm all of the features to install are selected Then select Next The Cyclone Program Folders is listed and can be modified if needed. Select Next The Cyclone Installer will now copy the files to the directories listed Select Next Page 3 9/18/2024 3
Installation will proceed Select Using an entitlement on this computer Then Next Cyclone will now install the Cyclone Configurations and CLM License Server Select Install Page 4 9/18/2024 4
Check Desktop if you would like a Cyclone icon on your desktop Then Next Installation is Complete Select Finish Then OK Page 5 9/18/2024 5
Cyclone will now install your User Configuration Folders Select Next The Cyclone User Folders on the Server should all be located on the local drive ** Once you have reviewed and/or changed any of the folders select Next Once the directories are created select Finish Then Close **Note: The Cyclone Databases can be Configured on a NAS Drive. A Quick Guide is available upon request Page 6 9/18/2024 6
2. Configure the Databases on the Server The Cyclone IMP Databases will need to be configured on the Cyclone Server Open the Cyclone App from your Start menu In the Cyclone Navigator select Configure/Databases Select your Server from the drop down list Click Add Select the Browse icon to browse to the IMP on the Server Note: Configure the databases under the shared Server. The Unshared Server is for local configurations. If you are configuring the databases from a NAS Drive refer to the NAS Configuration Guide Page 7 9/18/2024 7
Browse to the IMP on the Server Select the database and then Open Then select OK Page 8 9/18/2024 8
3. Install Cyclone on the Clients Workstation and Restart Services Install Cyclone 2020.1.0 on each client workstation Copy the full Cyclone 2020 installation package to the local drive on the client Right-click on the Leica_Cyclone_2020.1.0_PGR_15072020.exe file in the installation package and run as admisntration Proceed with installation on each client following the same Cyclone installation steps as the Server Once Cyclone has been installed on the Server and Clients open Local Services on the Server Stop the CLM Remote Daemon(Svr), Cyclone License Server, FlexNet License Server, FlexNet License Services, and FlexNet License Service 64 Start all of the Service in the same order Note: The Services will need to be stopped and restarted on both the Cyclone Server and the Clients Page 9 9/18/2024 9
4. Configure the Server on the Clients Workstations The Server will now need to be configured on the Clients to access the Cyclone IMP Databases Open the Cyclone App on the Client Select Configure Server Select Add Enter the Cyclone Server s name Click OK The Cyclone Server is now configured. All the databases that were configured on the Server are listed and available for the Clients use Note: Importing raw data is only supported locally. Import data locally and after the import process is complete, move the database to the Server and configure it for use over the network. Page 10 9/18/2024 10
