Introduction to Insert Tab in Microsoft Word 2007
Di
y
ala
U
niver
s
i
ty
/
eng
i
n
eering co
l
la
g
e
C
om
m
uni
c
at
i
on
d
e
par
t
m
ent
C
o
m
p
u
ter
s
c
ience
.
Lec5:
Introduction
t
o
Microsoft
Word:
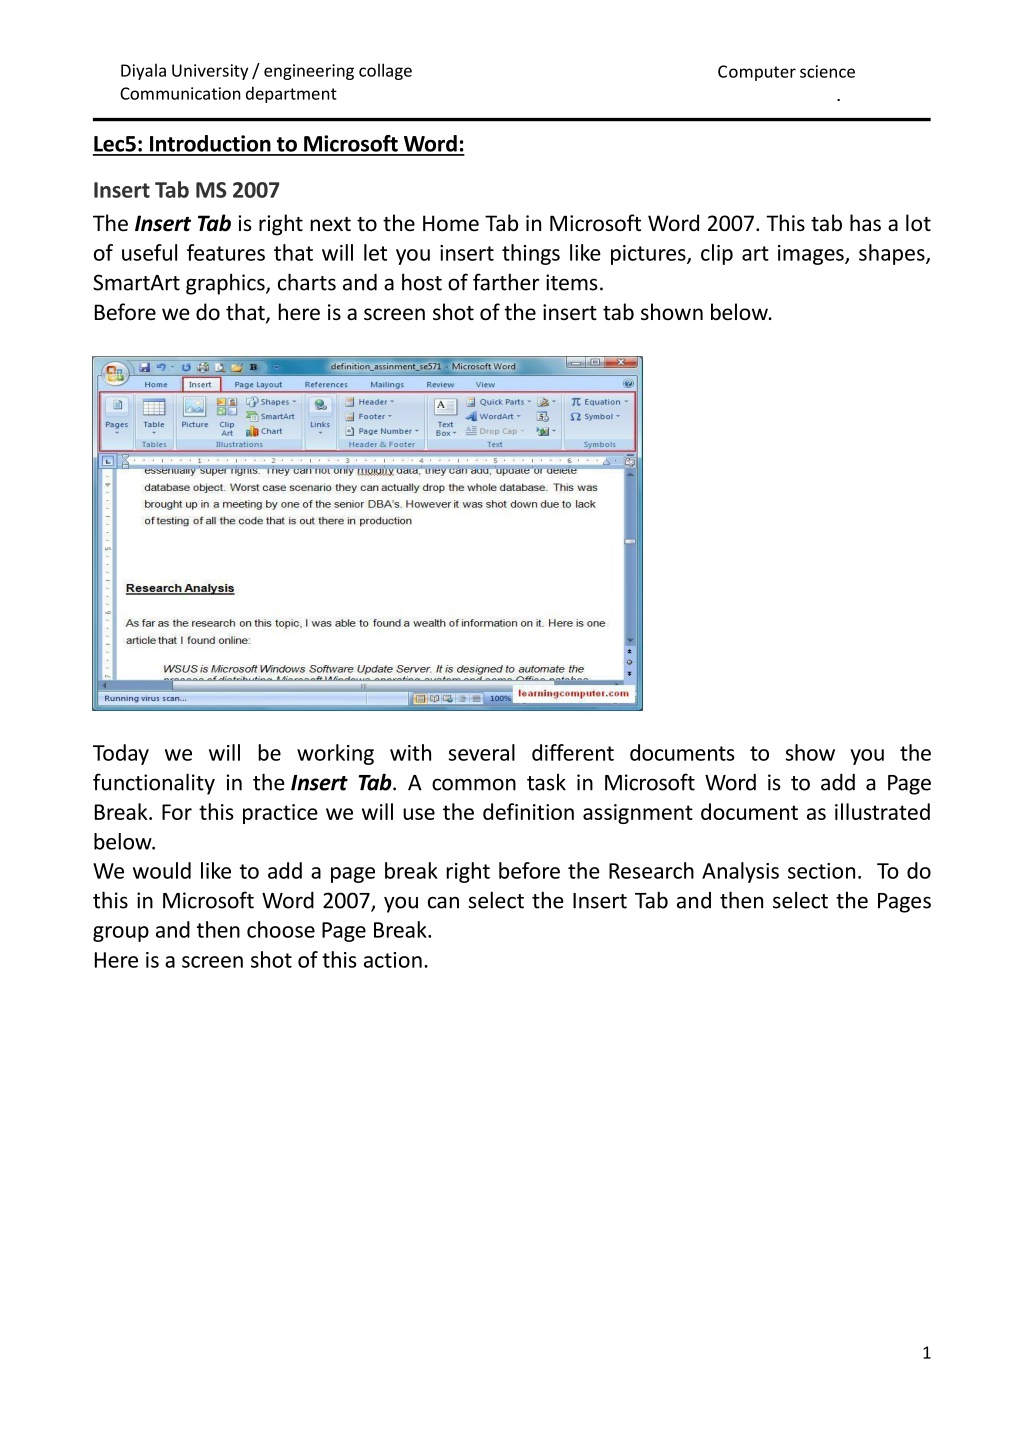
Insert Tab
MS 20
07
The
Insert
Tab
is
r
i
g
ht
next
to
the
H
o
me
Tab
in
Microsoft
Word
2007.
This
tab
has
a
lot
of
useful
features
th
at
wil
l
let
you
insert
th
i
ngs
l
ike
p
i
ctures,
cl
ip
art
ima
g
es,
shapes,
SmartArt
g
raphics, ch
arts
and
a
host of
farther
item
s
.
Before we do
that,
here
is
a screen shot
of the
insert
tab
sho
w
n
below.
Today
we
wil
l
be
working
with
several
different
documents
to
show
you
the
fu
n
c
t
io
n
ality
in
the
Insert
Ta
b
.
A
common
task
in
M
icros
oft
Word
is
to
add
a
P
a
g
e
Break.
For
this
practice
we
wil
l
use
the
d
efinition
a
s
signment
document
as
il
l
ustr
a
ted
below.
We
would
l
ike
to
a
d
d
a
page
break
r
ight
before
the
Research
Analysis
section.
To
do
this
in
Mi
c
rosoft
Word
2007,
you
can
sele
ct
the
Insert
Tab
a
n
d
then
sele
ct
the
Pages
group
and then ch
oo
se Page Break.
Here
i
s
a screen shot of th
i
s
a
ctio
n
.
1
Di
y
ala
U
niver
s
i
ty
/
eng
i
n
eering co
l
la
g
e
C
om
m
uni
c
at
i
on
d
e
par
t
m
ent
C
o
m
p
u
ter
s
c
ience
.
After
per
f
orming
the
abov
e
-mentioned
actio
n
,
we
were
able
to
in
sert
a
page
break
r
ight
before the
Res
e
arch
Ana
l
ysis
sec
t
ion.
This
i
s
highlighted
in
the
fo
l
l
o
wing figu
r
e.
Next,
we
are
going
to
look
at
a
Meeting
Agenda
for
more
practice
with
the
Insert
Tab
in
M
icr
o
s
oft
Word
2007.
We
have
some
basic
i
n
formation
a
b
out
the
meeting
like
date,
ti
m
e and
p
resenter in
the
beginning of
o
ur
document.
We
need
to
add
at
least
two
more
thing
s
,
the
schedule
a
n
d
the
company
logo
a
s
h
i
g
hlighted in yello
w
.
2
Di
y
ala
U
niver
s
i
ty
/
eng
i
n
eering co
l
la
g
e
C
om
m
uni
c
at
i
on
d
e
par
t
m
ent
C
o
m
p
u
ter
s
c
ience
.
To
add
the
tabl
e,
sele
ct
the
Tab
l
e
command
from
the
Insert
T
ab
which
wil
l
launch
the
Insert
Tab
l
e
fu
n
c
t
ionality
in
Microsoft
Word
2007.
It
wil
l
let
you
p
i
ck
the
number
of
columns
and
rows
of
the
desired
table
in
your
document.
As
you
drag
your
mouse
over
the
highli
g
hted
area, you
can
select the
rows
and
columns
t
h
at
you
would
l
ike.
Here
I
have
chosen
a
2×5
tabl
e
.
Also
notice
that
as
you
drag
the
mouse
you
will
get
a
l
ive preview
of your table in
your
do
c
ument, v
e
ry
c
ool!
This
is
sh
o
wn
below
in
t
he
scr
e
en
shot.
3
Di
y
ala
U
niver
s
i
ty
/
eng
i
n
eering co
l
la
g
e
C
om
m
uni
c
at
i
on
d
e
par
t
m
ent
C
o
m
p
u
ter
s
c
ience
.
Before
we
go
ahead
and
enter
the
data,
I
want
to
talk
about
Contextu
a
l
tabs.
These
are
special
tabs
that
appear
only
when
certain
o
bjects
are
being
used
such
as a
table
or
a
p
i
cture.
The
i
d
ea
is
to
keep
them
hidden
until
the
object
is
acti
v
e,
leading
to
a
more
effic
ient
work
flow
and
less
cl
u
t
tered area.
The
Table object
has two
such contextual tabs: desi
g
n and
la
y
o
ut.
The
d
esign
lets
you
control
things
like
tab
l
e s
t
yles,
borders
a
nd
sha
ding.
This
tab
is illustrate
d
below in
t
he
screen
capt
u
re.
4
Di
y
ala
U
niver
s
i
ty
/
eng
i
n
eering co
l
la
g
e
C
om
m
uni
c
at
i
on
d
e
par
t
m
ent
C
o
m
p
u
ter
s
c
ience
.
The
next
contex
t
ual
tab
relat
e
d
to
Tables
is
the
la
y
o
ut
tab.
T
his
tab
will
a
ctually
let
you
modify
the
str
u
c
t
ure
of
the
ta
b
l
e
i
n
c
l
uding
rows
and
co
l
umns
plus
alignm
e
nt
a
n
d
ce
ll
si
z
e.
This
is
sh
o
wn
below
with
all
the avai
l
a
ble
opti
o
ns.
Once
the
t
able
is
created,
y
o
u can
start entering
t
he data as
you
wish.
5
Di
y
ala
U
niver
s
i
ty
/
eng
i
n
eering co
l
la
g
e
C
om
m
uni
c
at
i
on
d
e
par
t
m
ent
C
o
m
p
u
ter
s
c
ience
.
These styles use
a
combi
n
a
t
ion
of
colour
schemes,
font
properties
and
graphic
a
l
effects.
As
I
move
my
mouse
o
ver
the
styles,
I
get
a
preview
of
what
my
table
will
look
l
ike
if I
select
that
option.
Here
i
s
a screen shot.
My
f
i
r
st
c
o
lumn
is
taki
n
g way
t
oo much
space,
so
I
would
l
i
ke to move the
border
a
l
i
ttle
to
the
left.
I c
an do
this b
y selec
t
i
n
g
the
first
column
border and
moving
it left.
This
is
shown
b
y the
red
arrow
in
the scr
e
en shot below.
Noti
c
e the dotted line
will
be
the
new
location
for
the
column
border.
6
Di
y
ala
U
niver
s
i
ty
/
eng
i
n
eering co
l
la
g
e
C
om
m
uni
c
at
i
on
d
e
par
t
m
ent
C
o
m
p
u
ter
s
c
ience
.
To
give
the
table
a
borders
o
n
all
sides
and
in
between
cel
l
s,
select
the
Bo
r
de
r
s
command
in
table
styles
group
under
the
Tab
l
e
Tools
Tab
in
Microsoft
Word
2
0
07.
This
wil
l
sh
o
w
a
drop-down
menu
where
i
t
will
choose
all
borders.
This
is il
l
ustrated
b
elow in
the
screen
s
hot.
7
Di
y
ala
U
niver
s
i
ty
/
eng
i
n
eering co
l
la
g
e
C
om
m
uni
c
at
i
on
d
e
par
t
m
ent
C
o
m
p
u
ter
s
c
ience
.
To use
the Clip
Art
fe
ature of
Microsoft
Office 2007 that
will
let
to
i
n
sert free
i
m
ag
e
s
and
gra
p
hics in this document.
The Clip Art d
i
a
log box
laun
c
hes on
the
right
si
d
e
of
docum
e
n
t
.
Ty
p
e business in
t
he
Search
for
text box
and
hit
Go
you
will
find
many
s
ymbol
p
i
c
ks
one
and put
it
on
the
documen
t.
This
is
sh
o
wn
below
the
scre
e
n capt
u
re.
8
Di
y
ala
U
niver
s
i
ty
/
eng
i
n
eering co
l
la
g
e
C
om
m
uni
c
at
i
on
d
e
par
t
m
ent
C
o
m
p
u
ter
s
c
ience
.
M
odify
the
i
m
age
size
by
gr
a
bbing
the
sizing
handles
on
the
bottom
r
i
g
ht
corner
of
the
i
m
age,
as
shown
by
the
blue
arrow.
Using
the
mouse
to
dr
a
g
the
picture
to
i
n
c
r
ease
the
size.
A screen
s
hot
of
the
P
i
ct
u
re Tools
tab
a
n
d
the updated
ima
g
e
is
as
follows.
What
else
can
I
do
to
make
the
ima
g
e
stand
out
more?
Adding
a
border
to
my
compa
n
y
logo
may
enhance
the
effect.
So,
I
will
cl
ick
on
the
Picture
Styles
g
r
oup
under
the
P
i
ct
u
re
Tools
tab.
I
wil
l
select
the
drop-down
arrow
to
lau
n
ch
gallery
of
st
y
les.
I
will
choose the b
l
ack Simple Frame for
my
L
ogo.
I’ve i
n
c
luded
a screen
shot
of
t
h
i
s.
9
Di
y
ala
U
niver
s
i
ty
/
eng
i
n
eering co
l
la
g
e
C
om
m
uni
c
at
i
on
d
e
par
t
m
ent
C
o
m
p
u
ter
s
c
ience
.
Headers
and
footers
are
imp
o
rtant
items.
A
header
could
h
a
ve
information
on
the
document
ti
t
le,
author
name,
ver
s
ion
number
etc.
while
a
f
o
oter
is
useful
as
it
conta
i
ns
things
like
Page Numbers
and
D
ates.
To
create
a
Header
section,
c
l
ic
k
on
the
I
nsert
Tab
a
nd
select
Header
in
the
He
a
der
and
Footer
gr
o
up.
I
have included
a screen capture
here
also:
10
Di
y
ala
U
niver
s
i
ty
/
eng
i
n
eering co
l
la
g
e
C
om
m
uni
c
at
i
on
d
e
par
t
m
ent
C
o
m
p
u
ter
s
c
ience
.
For Print
P
review,
i
t
was
able to
see the
document and
it
looks
l
i
ke
t
he
o
ne
below.
11
In Microsoft Word 2007, the Insert Tab is a powerful feature that allows you to easily insert various elements such as pictures, clip art, shapes, charts, and more. This tutorial covers how to use the Insert Tab to add page breaks, tables, and work with contextual tabs for efficient document editing. Dive into practical examples and screenshots to enhance your skills with the Insert Tab functionality in Microsoft Word 2007.

Download Presentation

Please find below an Image/Link to download the presentation.
The content on the website is provided AS IS for your information and personal use only. It may not be sold, licensed, or shared on other websites without obtaining consent from the author.If you encounter any issues during the download, it is possible that the publisher has removed the file from their server.
You are allowed to download the files provided on this website for personal or commercial use, subject to the condition that they are used lawfully. All files are the property of their respective owners.
The content on the website is provided AS IS for your information and personal use only. It may not be sold, licensed, or shared on other websites without obtaining consent from the author.
E N D
Presentation Transcript
Diyala University/ engineering collage Communicationdepartment Computerscience . Lec5: Introduction toMicrosoft Word: Insert Tab MS 2007 The Insert Tab is right next to the Home Tab in Microsoft Word 2007. This tab has a lot of useful features that will let you insert things like pictures, clip art images, shapes, SmartArt graphics, charts and a host of farther items. Before we do that, here is a screen shot of the insert tab shown below. Today we will be working with several different documents to show you the functionality in the Insert Tab. A common task in Microsoft Word is to add a Page Break. For this practice we will use the definition assignment document as illustrated below. We would like to add a page break right before the Research Analysis section. To do this in Microsoft Word 2007, you can select the Insert Tab and then select the Pages group and then choose Page Break. Here is a screen shot ofthis action. 1
Diyala University/ engineering collage Communicationdepartment Computerscience . After performing the above-mentioned action, we were able to insert a page break right before the Research Analysis section. This is highlighted in the following figure. Next, we are going to look at a Meeting Agenda for more practice with the Insert Tab in Microsoft Word 2007. We have some basic information about the meeting like date, time and presenter in the beginning ofour document. We need to add at least two more things, the schedule and the company logo as highlighted in yellow. 2
Diyala University/ engineering collage Communicationdepartment Computerscience . To add the table, select the Table command from the Insert Tab which will launch the Insert Table functionality in Microsoft Word 2007. It will let you pick the number of columns and rows of the desired table in your document. As you drag your mouse over the highlighted area, you can select the rowsand columns that you would like. Here I have chosen a 2 5 table. Also notice that as you drag the mouse you will get a live preview ofyour table in your document, very cool! This is shown below in the screen shot. 3
Diyala University/ engineering collage Communicationdepartment Computerscience . Before we go ahead and enter the data, I want to talk about Contextual tabs. These are special tabs that appear only when certain objects are being used such as a table or a picture. The idea is to keep them hidden until the object is active, leading to a more efficient work flow and less cluttered area. The Table object has two such contextual tabs: design and layout. The design lets you control things like table styles, borders and shading. This tab is illustratedbelow in the screen capture. 4
Diyala University/ engineering collage Communicationdepartment Computerscience . The next contextual tab related to Tables is the layout tab. This tab will actually let you modify the structure of the table including rows and columns plus alignment and cell size. This is shown below with all the available options. Once the table is created, you can start entering the data as you wish. 5
Diyala University/ engineering collage Communicationdepartment Computerscience . These styles use a combination of colour schemes, font properties and graphical effects. As I move my mouse over the styles, I get a preview of what my table will look like if I select that option. Here is a screen shot. My first column is taking way too much space, so I would like to move the border a little to the left. I can do this by selecting the first column border and moving it left. This is shown by the red arrowin the screen shot below. Notice the dotted line will be the new location for the column border. 6
Diyala University/ engineering collage Communicationdepartment Computerscience . To give the table a borders on all sides and in between cells, select the Borders command in table styles group under the Table Tools Tab in Microsoft Word 2007. This will show a drop-down menu where it will choose all borders. This is illustrated below in the screen shot. 7
Diyala University/ engineering collage Communicationdepartment Computerscience . To use the Clip Art feature of Microsoft Office 2007 that will let to insert free images and graphics in this document. The Clip Art dialog box launches on the right side of document. Type business in the Search for text box and hit Go you will find many symbol picks one and put it on the document. This is shown below the screen capture. 8
Diyala University/ engineering collage Communicationdepartment Computerscience . Modify the image size by grabbing the sizing handles on the bottom right corner of the image, as shown by the blue arrow. Using the mouse to drag the picture to increase the size. A screen shot of the Picture Tools tab and the updated image is as follows. What else can I do to make the image stand out more? Adding a border to my company logo may enhance the effect. So, I will click on the Picture Styles group under the Picture Tools tab. I will select the drop-down arrow to launch gallery of styles. I will choose the black Simple Frame formy Logo. I ve included a screen shot of this. 9
Diyala University/ engineering collage Communicationdepartment Computerscience . Headers and footers are important items. A header could have information on the document title, author name, version number etc. while a footer is useful as it contains things like Page Numbers and Dates. To create a Header section, click on the Insert Tab and select Header in the Header and Footer group. I have included a screen capture here also: 10
Diyala University/ engineering collage Communicationdepartment Computerscience . For Print Preview, it was able to see the document and it looks like the one below. 11


![Project Initiation Document for [Insert.Project.name] [Insert.Project.number]](/thumb/226757/project-initiation-document-for-insert-project-name-insert-project-number.jpg)