How to Create Thermal Images from a Thermal Flashlight
Thermal flashlight images can be made using different approaches such as long exposure photography or using light tracking software. This guide provides detailed steps on how to capture thermal images effectively with tips on light tracking apps, long exposure techniques, and imaging locations for optimal results.

Download Presentation

Please find below an Image/Link to download the presentation.
The content on the website is provided AS IS for your information and personal use only. It may not be sold, licensed, or shared on other websites without obtaining consent from the author.If you encounter any issues during the download, it is possible that the publisher has removed the file from their server.
You are allowed to download the files provided on this website for personal or commercial use, subject to the condition that they are used lawfully. All files are the property of their respective owners.
The content on the website is provided AS IS for your information and personal use only. It may not be sold, licensed, or shared on other websites without obtaining consent from the author.
E N D
Presentation Transcript
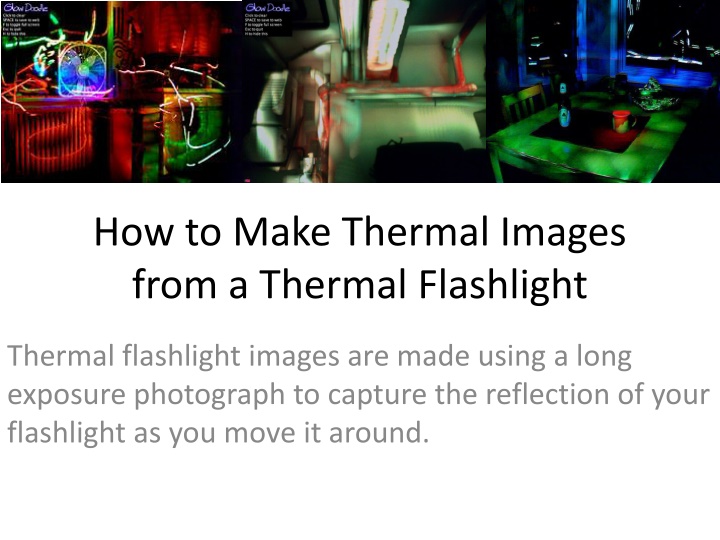
How to Make Thermal Images from a Thermal Flashlight Thermal flashlight images are made using a long exposure photograph to capture the reflection of your flashlight as you move it around.
First: Choose your light tracking approach Glowdoodle, this is free software that you can use online or download. It tracks light and a takes a picture through your webcam. The pictures are not very high quality, but it is a quick and effective method to cover a whole room. Rather than uploading your pictures online which can be hard to find, try taking a screen shot of your screen and saving your own version. http://scripts.mit.edu/~eric_r/glowdoodle/index.php Take a long exposure with a camera. You ll have to do a little bit of research on how to set your camera to take long exposures. This option will give you the highest quality pictures. Using a tripod is highly recommended to make sure your pictures are stable. http://www.digitalrev.com/article/how-to-setup-your- camera/MzM2NjA2NTE_A http://publiclab.org/notes/ceich/3-1-2012/long-exposure- photography Download a light streak application to your phone. This depends on what phone you have, search for light streaking or long exposure applications. It s a good idea to use tripod to keep your phone still while you capture images. Also consider taking a video of your thermal flashlight investigation, this can be helpful for capturing thermal monitoring done in the daylight or outdoors where you can t control visible light.
Long exposure: Technical points Use a tripod, or prop up the phone (Glif+ is a popular iPhone tripod, should you want one, but you can also build one DIY-style) If you have an iPhone, you can use your Apple earbuds for shutter release. If you plug in the white earbuds that were included with your iPhone, open the camera app and press the volume up button, you ll be able to take photos without physically touching your iPhone. This will reduce camera shake. The app needs to support turn on the Volume Shutter (in the settings for the app) Long exposure apps: Glow Doodle (make sure it is for photography, not for finger drawing!); Slow Shutter Cam; LongExpo; Average Camera Pro; Camera FV-5 Lite; NightCap Pro For a regular digital camera, use bulb mode. Bulb mode is a certain way of controlling your camera s shutter; it can keep it open for long periods of time. All cameras are different, but once you switch your camera over to bulb mode, you either press the shutter button once to open the shutter, and then you press it again to close the shutter, or you hold the shutter button down for how long you want. You will need to do trail and error to find the right settings for your documentation. Take lots and lots and lots of photos, and choose the right one or, if you have photoshop, you can layer the photos over each other to get an overall effect.
Second: choose your imaging location To make successful thermal images you location needs to be dark, so turn off lights or try to otherwise limit ambient light however Take a picture of the location before you turn off the lights, this daylight image will be helpful to match against your thermal image.
Third: set your flashlight to the right temperature range Measure the ambient temperature in the room, and consider the temperature range of the phenomena you are hoping to map. Set your Thermal Flashlight accordingly. What you see in your infrared images will depend on the range you set your camera to. Here are galleries of FLIR images with temperature ranges for reference: http://www1.infraredtraining.com/view/?id=40048 Make sure to record what range you set your Thermal Flashlight to. Also try experimenting with different temperature ranges
Make your images! Set your long exposure photograph going and walk around your space For most accurate results keep the flashlight close (~1 ft) from the surface of what your are imaging Make sure don t point the LED of the flashlight directly at camera or you will create dazzling light streaks. Instead try to capture the reflection of the LED on from the surface of what you are trying to image.
Consider Printing a color wheel and marking it with your temperature range to help read your images
Share your work Upload research notes documenting your research to publiclab.org: You ll need to register for an account (it s free)