Efficient Online Course Management Guide
Streamline your online course setup with steps on adding due dates, editing syllabus, and ensuring student engagement. Also includes browser settings for optimal performance. Learn how to add due dates for assignments, discussions, and quizzes, and customize your syllabus to include essential information. Ensure proper browser settings for Google Chrome users. Visual guides provided for easy implementation.

Download Presentation

Please find below an Image/Link to download the presentation.
The content on the website is provided AS IS for your information and personal use only. It may not be sold, licensed, or shared on other websites without obtaining consent from the author. Download presentation by click this link. If you encounter any issues during the download, it is possible that the publisher has removed the file from their server.
E N D
Presentation Transcript
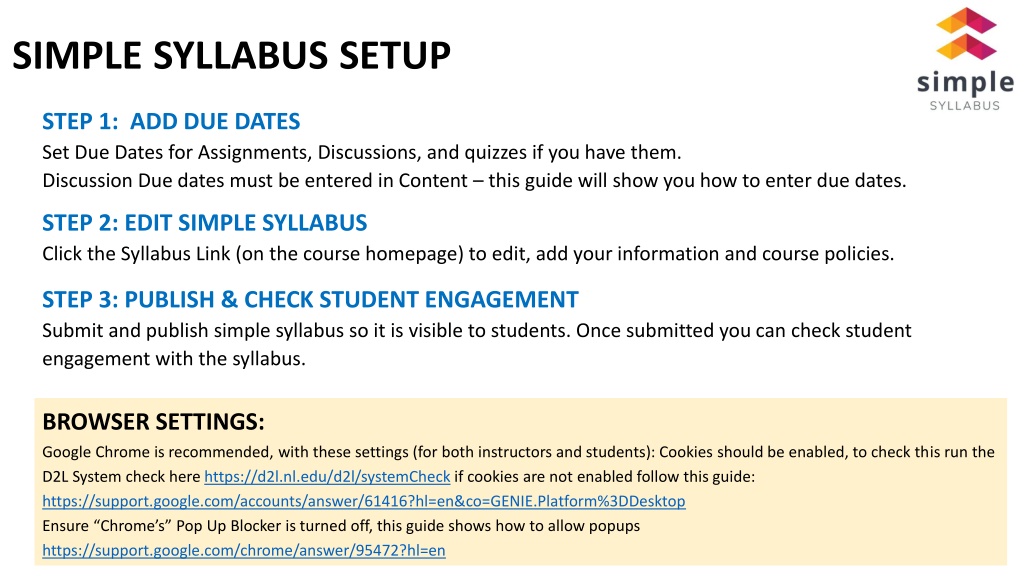
SIMPLE SYLLABUS SETUP STEP 1: ADD DUE DATES Set Due Dates for Assignments, Discussions, and quizzes if you have them. Discussion Due dates must be entered in Content this guide will show you how to enter due dates. . STEP 2: EDIT SIMPLE SYLLABUS Click the Syllabus Link (on the course homepage) to edit, add your information and course policies. . STEP 3: PUBLISH & CHECK STUDENT ENGAGEMENT Submit and publish simple syllabus so it is visible to students. Once submitted you can check student engagement with the syllabus. BROWSER SETTINGS: Google Chrome is recommended, with these settings (for both instructors and students): Cookies should be enabled, to check this run the D2L System check herehttps://d2l.nl.edu/d2l/systemCheck if cookies are not enabled follow this guide: https://support.google.com/accounts/answer/61416?hl=en&co=GENIE.Platform%3DDesktop Ensure Chrome s Pop Up Blocker is turned off, this guide shows how to allow popups https://support.google.com/chrome/answer/95472?hl=en
ADD DUE DATES (ASSIGNMENTS) 1. Go to Assignments . 2. Select the first box as seen in this image to select all assignments. 3. Select the Bulk Edit button above the box to add Due dates to all assignments
ADD DUE DATES (ASSIGNMENTS) Pt 2 On the Bulk Edit Assignments page: Click the Has Due Date check-box next to each assignment, and enter the date and time the assignment is due. Complete for all assignments and choose Save at the bottom.
ADD DUE DATES (Discussions) Pt 1 Instructors enter due dates for discussions in Content Click Content, and select a Module that has a discussion topic. Next to the Discussion Title select the down arrow and choose Edit Properties in Place
ADD DUE DATES (Discussions) Pt 2 The Add dates and restrictions field appears click on the field The Due Date field will appear click to add the due date and time. Click Update to save your changes
EDIT SIMPLE SYLLBUS Click the Syllabus link on the D2L Course homepage, a similar window to below appears, then select the Edit Syllabus Button: NOTE: If you see a blank or NLU portal screen return to Slide 1 and review the browser requirements.
Required Areas in SimpleSyllabus Required areas are marked with a red asterisk (*) 1. Instructor Information Name and email are added from Banner and may not be edited. Pronouns, Response Time, Grading & Feedback, are optional. Faculty phone and office hours are required fields VIEW: Annotated Simple Syllabus & see which areas are optional, required, editable or not 2. Expected Course Practices: In this area add your course policies, e.g. late work, attendance, assignment or other expected practices or requirements
Required Areas to update in Simple Syllabus Items with a Red Asterisk * are required to be updated
SIMPLE SYLLBUS ICONS & BUTTONS The Blue Pencil icon indicates areas you can edit Invisible hides items. Public makes items visible Save allows you to save your edits
Simple Syllabus Schedule This section is populated by D2L automatically - it will be BLANK if Due Dates are not entered. The Schedule cannot be directly edited in Simple Syllabus. If you modify due dates in D2L, changes will be visible in Simple Syllabus only when you open and then close the syllabus for editing. Alternatively, the changes will be updated during the next auto sync at 10 am, 2 pm, or 6 pm.
Click Submit Submit to Publish the Syllabus Instructors need to update required fields before they can submit. If you don t see a submit button check for required fields you may have missed.
Confirm the Syllabus is Submitted Once submitted the Last Updated date will appear
CheckStudentEngagement Click the Student Icon to access the engagement report, to check if students viewed the syllabus
Student Engagement Report The Engagement Report shows if students viewed the syllabus and what % they read. A green box appears if they acknowledged reading the syllabus

")
 Pt 2")
 Pt 1")
 Pt 2")