Bulk Loading Documents into Windchill: Step-by-Step Guide


1
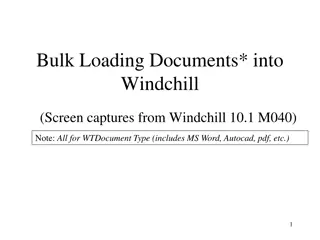
Bulk Loading Documents* into
Windchill
(Screen captures from Windchill 10.1 M040)

Note:
All for WTDocument Type (includes MS Word, Autocad, pdf, etc.)

2

Note: Other columns are required but are hidden – see next slide.
1.
Fill in required information in
RED
as shown below
2.
Two files to be Bulk Loaded are shown below
(any quantity can be handled)
3.
Enter Version at which the document is to be loaded
(e.g. P1, P2, A, B, etc.)
4.
If Version is “Px”
(where x is some number)
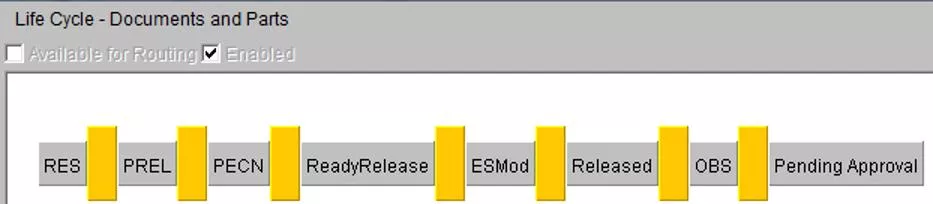
, lifecycle state is RES
5.
If Version is A or higher, lifecycle state is ESMOD
This applies for Documents and Parts Lifecycle
3
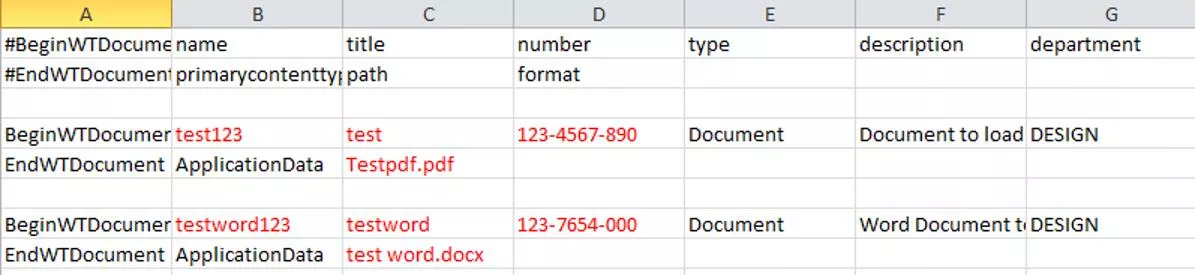
Note: .csv file shown in Excel
and in WordPad
1.
Ensure that all required columns are included and are filled in as shown.
2.
Save as .csv format in \src\loadfiles folder as shown on Windchill server.
Note: If there is only one file, need to put values in XML file only
else If there are more than one file, need to put values in CSV file
Some Names need to have commas. But – Commas interfere with the CSV to XML conversion. If any
Names have commas, do this:
–
Temporarily replace
,
in the CSV file with
!!!
–
After converting, replace
!!!
in the xml file with
,
4
Save the file(s) that will be bulk loaded in
D:\ptc\Windchill_10.1\Windchill\loadfiles\content
Save the .csv file in
D:\ptc\Windchill_10.1\Windchill\src\loadfiles
Note: All done in Windchill server
Note: Create loadfiles folder under src if it does not exist
From a Windchill shell on the \src\loadfiles folder, run the command
shown.
•
cd src\loadfiles
•
windchill wt.load.util.CSV2XML –input
TestBulkUpload
.csv
•
Result: Output .xml file with converted info from Input .csv file in the same folder
5
Note: We can change this file name:
TestBulkUpload
.csv
to any file name.
6
Mapping – Input .csv to Output .xml
.csv
.xml
•
windchill wt.load.LoadFromFile -d
D:\ptc\Windchill_10.1\Windchill\src\loadfiles\
TestBulkUpload
.xml -CONT_PATH
\"/wt.inf.container.OrgContainer=Alcon/wt.inf.library.WTLibrary=
TestLib1
\"
7
1.
Load the .xml file using same Shell, using command shown.
Change <YOUR_LIBRARY> to a specific Library
Load file to Library specified
Enter admin username and password
8
Successful Results
This guide provides detailed instructions on bulk loading documents into Windchill using screen captures from Windchill 10.1 M040. Learn how to manage the lifecycle of documents and parts, fill in required information, save files in CSV format, convert CSV to XML, and load the XML file into Windchill. Follow the steps outlined to efficiently manage document uploads in Windchill.

Download Presentation

Please find below an Image/Link to download the presentation.
The content on the website is provided AS IS for your information and personal use only. It may not be sold, licensed, or shared on other websites without obtaining consent from the author.If you encounter any issues during the download, it is possible that the publisher has removed the file from their server.
You are allowed to download the files provided on this website for personal or commercial use, subject to the condition that they are used lawfully. All files are the property of their respective owners.
The content on the website is provided AS IS for your information and personal use only. It may not be sold, licensed, or shared on other websites without obtaining consent from the author.
E N D
Presentation Transcript
Bulk Loading Documents* into Windchill (Screen captures from Windchill 10.1 M040) Note: All for WTDocument Type (includes MS Word, Autocad, pdf, etc.) 1
This applies for Documents and Parts Lifecycle 1. 2. 3. 4. 5. Fill in required information in RED as shown below Two files to be Bulk Loaded are shown below (any quantity can be handled) Enter Version at which the document is to be loaded (e.g. P1, P2, A, B, etc.) If Version is Px (where x is some number), lifecycle state is RES If Version is A or higher, lifecycle state is ESMOD Note: Other columns are required but are hidden see next slide. 2
1. Ensure that all required columns are included and are filled in as shown. 2. Save as .csv format in \src\loadfiles folder as shown on Windchill server. Note: If there is only one file, need to put values in XML file only else If there are more than one file, need to put values in CSV file Some Names need to have commas. But Commas interfere with the CSV to XML conversion. If any Names have commas, do this: Temporarily replace , in the CSV file with !!! After converting, replace !!! in the xml file with , Note: .csv file shown in Excel and in WordPad 3
Save the .csv file in D:\ptc\Windchill_10.1\Windchill\src\loadfiles Note: Create loadfiles folder under src if it does not exist Save the file(s) that will be bulk loaded in D:\ptc\Windchill_10.1\Windchill\loadfiles\content 4 Note: All done in Windchill server
From a Windchill shell on the \src\loadfiles folder, run the command shown. cd src\loadfiles windchill wt.load.util.CSV2XML input TestBulkUpload.csv Result: Output .xml file with converted info from Input .csv file in the same folder 5 Note: We can change this file name: TestBulkUpload.csv to any file name.
Mapping Input .csv to Output .xml .csv .xml 6
1. Load the .xml file using same Shell, using command shown. Change <YOUR_LIBRARY> to a specific Library Load file to Library specified Enter admin username and password windchill wt.load.LoadFromFile -d D:\ptc\Windchill_10.1\Windchill\src\loadfiles\TestBulkUpload.xml -CONT_PATH \"/wt.inf.container.OrgContainer=Alcon/wt.inf.library.WTLibrary=TestLib1\" 7