Detailed Guide on Using Timekeeper Job Aid for Efficient Work Management
Explore a comprehensive guide to efficiently navigate and utilize the features of the Timekeeper Job Aid. Learn how to manage workspaces, view timecards, handle exceptions, generate reports, and access timecard data effectively. Discover tips on sorting/grouping options, workspace tabs, and maximizing/restoring actions. Enhance your productivity with step-by-step instructions and visual aids.

Download Presentation

Please find below an Image/Link to download the presentation.
The content on the website is provided AS IS for your information and personal use only. It may not be sold, licensed, or shared on other websites without obtaining consent from the author. Download presentation by click this link. If you encounter any issues during the download, it is possible that the publisher has removed the file from their server.
E N D
Presentation Transcript
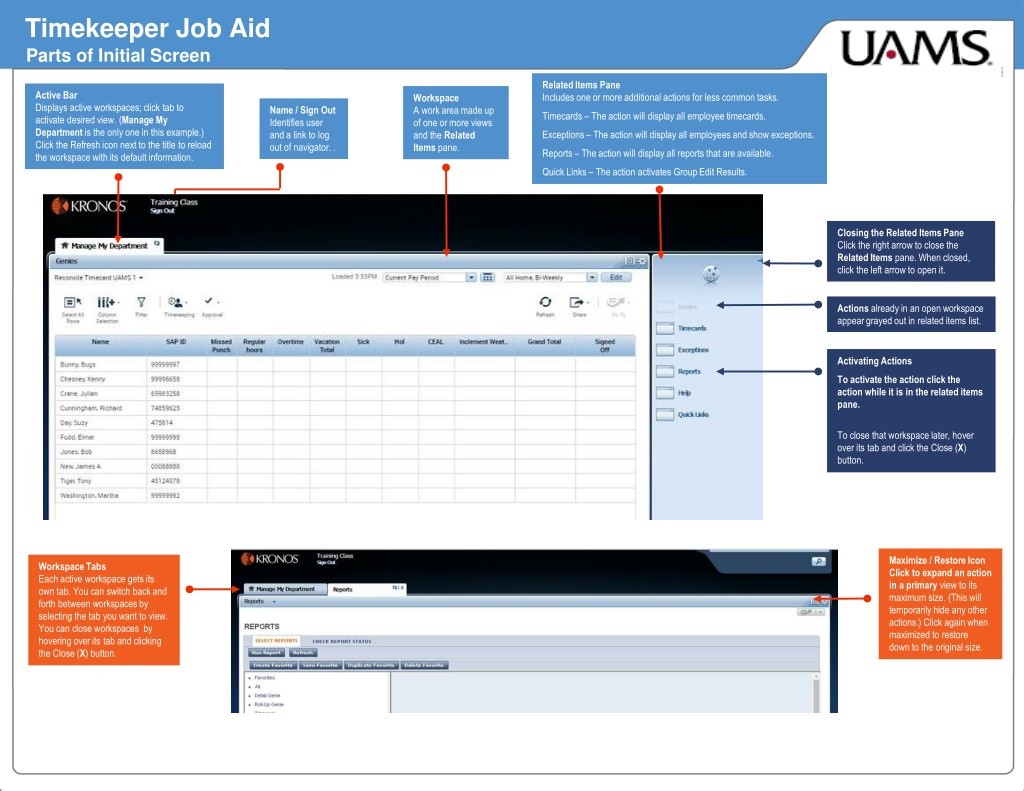
Timekeeper Job Aid Parts of Initial Screen Related Items Pane Includes one or more additional actions for less common tasks. Active Bar Displays active workspaces; click tab to activate desired view. (Manage My Department is the only one in this example.) Click the Refresh icon next to the title to reload the workspace with its default information. Workspace A work area made up of one or more views and the Related Items pane. Name / Sign Out Identifies user and a link to log out of navigator. . Timecards The action will display all employee timecards. Exceptions The action will display all employees and show exceptions. Reports The action will display all reports that are available. Quick Links The action activates Group Edit Results. Closing the Related Items Pane Click the right arrow to close the Related Items pane. When closed, click the left arrow to open it. Actions already in an open workspace appear grayed out in related items list. Activating Actions To activate the action click the action while it is in the related items pane. To close that workspace later, hover over its tab and click the Close (X) button. Maximize / Restore Icon Click to expand an action in a primary view to its maximum size. (This will temporarily hide any other actions.) Click again when maximized to restore down to the original size. Workspace Tabs Each active workspace gets its own tab. You can switch back and forth between workspaces by selecting the tab you want to view. You can close workspaces by hovering over its tab and clicking the Close (X) button.
Timekeeper Job Aid Using Reconcile Timecard GoTo Open this drop-down list and select an action to navigate to. Your new destination will retain the same context (i.e. set of employees and range of dates) as the one you were just using in the Genie. Sorting/Grouping options Click the small arrow that appears when you hover over a column header to see your options for how to sort or group the data by that column. Context Selector Displays the current employee set and date range (which, together, are referred to as context ) for the genie. To change this context, click it and select a new one from the resulting drop-down list. Select Options The drop down options will allow you to select Reconcile Timecard or Quickfind. Select/Unselect All Rows Click this shortcut to select all displayed rows before performing another action. Click again to unselect all rows. Share Provides options for printing the data displayed in the genie, or exporting it to a spreadsheet format. Column Selection Click this icon to open a list of available columns for the genie. You can then selectively turn columns on or off to customize your display. Your selections will persist (even between sessions) until you change them. Refresh Discards any unsaved edits and reloads the most current data in the database. Filter Toggling this on displays filter fields at the top of any columns that can be filtered. As you type in any of these filter fields, only rows containing the characters you type will remain in the workspace. Detail Window Right click over a cell or person . In many cases this will open a window with detailed information and icons for any actions you might want to perform on that cell or person.
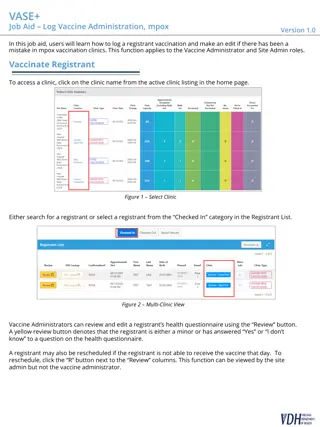
Timekeeper Job Aid Accessing Timecard Data From reconcile Timecard select employees to view. - To view individual employee timecard double click on employee name. - To view a group of employees highlight each employee line and click on the GoTo icon. - To view all employee timecards click on Timecard link in the Related Items pane. Totals / Accruals / Audits Section Once employee timecard is displayed, click on drop down icon. The totals will be displayed as long as you have the Timecard action open. Timecard with split screen showing totals and other miscellaneous tabs.
Timekeeper Job Aid Accessing Exceptions Action From reconcile Timecard select employees with excpetion to view. - To view a group of employee exceptions highlight the employee line and click on the GoTo icon. - To view all employees with or without exceptions click on Exception link in the Related Items pane. Context Selector To view all employees with a specific exception, hover over any column and click on Details. Button. Identifies the time span you are using and the employees who appear in this view. View Details Links to more detailed information about the selected employee(s) time data exceptions.
Timekeeper Job Aid Exceptions Report Views Exception Details View- (From Column Details selection) The view shown below displays employees with missed punches. To correct, click on the red missed punch icon and enter the correct time. * Multiple employees missed punches can be corrected on this one screen. Exception View Details (From View Details button at bottom of screen) The view shown below displays the dates and exception details for a specific employee. Exceptions may be resolved on this page. Hover over the red icon to view more information on the exception type. You can also access an employee timecard by clicking on View Timecard.
Timekeeper Job Aid Performing Common Timekeeper Tasks Making a group edit in Reconcile Timecard 3 When you are working in Reconcile Timecard, you can select a group of employees and apply the same edit to all of them simultaneously, saving time and reducing the chance of error. 1 In Reconcile Timecard, if there is a specific column that will conveniently sort the group of employees you wish to edit, use the column s Sorting/Grouping option to sort by that column. 1 2 2 Select the employees to whom you want to apply the edit. To select individual employees, hold down the Control key while selecting names. To select a contiguous set of employees, select the first employee and then hold down the Shift key while selecting the last employee. To select all employees, click the Select All Rows action icon. 3 With the employees selected, click the action icon related to the edit you want to perform. In this example, the action is timecards signoff. (To add missed punches/pay codes, select timekeeping icon.) 4 4 Click Apply (or Yes) to apply and save the edit. Using Goto navigation Payroll Contact Information Goto navigation makes it possible for you to select a specific employee set and date range in the action you are currently viewing, and carry that information with you to another action. This is convenient if you need to view information and/or perform tasks spread across several actions, with the same group of employees. .Phone: (501) 686-6100 Fax: (501) 603-1578 1 In reconcile timecard, select the group of employees you want to carry over to a new action, using the same selection approach as you would when making a group edit (see Making a group edit in a Workforce Genie). Note: After employees are selected, hover over the Go To icon to get the number of employees and the period selected that will be shown on the following page. payroll@uams.edu Email: payroll@uams.edu https://finance.uams.edu/home/payroll-2/ .Payroll website: https://finance.uams.edu/home/payroll-2/ 2 Open the Goto menu and select the action (widget) you would like to move to. Time View website designed for employees to view their Kronos timecards You can continue to open new actions with the selected employees. To reset your selection when you are done working with those employees, click the workspace s Refresh icon. http://timeview.apps.uams.edu/ Website: http://timeview.apps.uams.edu/ or available from the link in ESS under the most frequently used links.
Timekeeper General Information Kronos Sign Off Last regular pay Normal Biweekly sign off is 7:00 am Tuesday of the week employees are paid. If an employee is in a terminated status on the check date (when payroll processes) they will receive a PAPER CHECK. If the employee is in an active status on the check date (when payroll processes) they will receive a direct deposit. payroll@uams.edu Email Adjustments must be sent to payroll@uams.edu prior to 3:00 pm the day before processing. Example Biweekly employee with termination date of 7/7/18, entered before payroll processes on 7/10/18. Employee will receive a paper check on 7/13/18. If termination is not entered until after payroll processes on 7/10/18, employee will receive a direct deposit on 7/13/18 (most biweekly employees receive a paper check for their last regular paycheck). Adjustments due to Holiday schedule are shown on the payroll calendar. Supplemental Payroll Monthly employee with termination date of 7/15/18 will receive a paper check on 7/31/18. Monthly employee with a termination date of 7/31/18, will receive a direct deposit. Monthly employees who work through the last day of the month, should receive direct deposit. Supplemental is for hours/dollars that were left off of the regular scheduled payroll. Supplemental requests must be for 8 hours or more. If less than 8 hours, the time will be added to the next regular scheduled payroll (see above about email adjustments). Terminal Vacation: All pay must be processed with the regular or scheduled supplemental payroll. Employee Separation form must be completed and signed off by all applicable departments before terminal vacation may be paid. Once completed, the form will be sent to the payroll office. Terminal vacation is paid with the scheduled supplemental payroll that processes after the employee s last regular pay period. Terminal vacation is paid as a PAPER CHECKand mailed to the employee s home address. Biweekly Supplemental processes on the Wednesday following the normal payroll@uams.edu biweekly pay date. Email requests are due by 11:00 am. The request must be sent to payroll@uams.edu and provide employee name, SAP#, amount and type of hours missed, pay period date and if the hours were worked in week one or week two of the pay period. Payments will be processed as a direct deposit (active employees) for Friday of the same week. If the employee is terminated, the payment will be processed as a paper check and mailed to the home address. Example biweekly employee s last day of employment is 7/1/18. Last regular pay will be 7/20/2018. If separation form is completed on time, terminal vacation will be paid with the supplemental that processes on 7/25/18 with a check date of 7/27/18. Monthly Supplemental processes on the first Wednesday following the normal monthly pay date. When monthly pay date falls on Tuesday, the supplemental may be processed on the second Wednesday of the month. Emails requests are due by 11:00 am. The request must be sent to payroll@uams.edu and include the employee s name, SAP#, and the reason the supplemental is requested (ex. Employee hired after payroll was processed, salary adjustment after payroll processed, incentive submitted late). Payments will be processed as a direct deposit (active employees) for Friday of the same week. If the employee is terminated, the payment will be processed as a paper check and mailed to the home address. Payroll Staff: payroll@uams.edu Mary Prince, Payroll Director Deanna Jones, Payroll Analyst Tonja Young, Payroll Analyst Phone: 501-686-6100 Fax: 501-603-1578 Payroll Website: http://finance.uams.edu/home/payroll-2/ Online W2 forms Please encourage all employees to elect to receive W2 forms electronically if they have not already done so. A few of the benefits are earlier receipt of form, ability to reprint at any time from ESS, less chance of identity theft as the forms will not be sent out in the mail. Employees may elect this option in ESS. The link is open from mid April January each year. Employees do not have to sign up yearly. If online is elected, it will remain that way until the election is changed to paper. Terminated/inactive employees will receive a paper copy. askhr@uams.edu Human Resources askhr@uams.edu Employee Services: 501-686-5650 https://hr.uams.edu https://hr.uams.edu