VASE+ Job Aid 2nd Dose Appointment Scheduling

Users will learn how to schedule a 2nd dose appointment after administering the 1st dose in the VASE+ workflow. The process involves identifying the recipient needing the 2nd dose, selecting a suitable clinic date, verifying recipient information, choosing an available appointment slot, and confirming the appointment. This function is typically performed by the Vaccine Appointment Scheduler role, with the Site Admin role also capable of executing it. The job aid provides detailed steps and visuals to guide users through the scheduling process efficiently.

Download Presentation

Please find below an Image/Link to download the presentation.
The content on the website is provided AS IS for your information and personal use only. It may not be sold, licensed, or shared on other websites without obtaining consent from the author. Download presentation by click this link. If you encounter any issues during the download, it is possible that the publisher has removed the file from their server.
E N D
Presentation Transcript
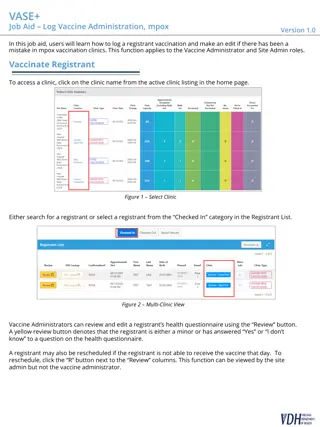
VASE+ Job Aid 2ndDose Appointment Version 1.1 In this job aid, users will learn how to schedule a 2nddose appointment after the administration of 1stdose. The 2nddose appointment can be scheduled on-site right after the first dose has been completed. In the VASE+ workflow, this is done as part of the check-out process. The clinics that can be viewed will be dependent on locality that the user is tied to. The system also includes rules based on the vaccine type to only show clinics that are 21 or 28 days (+- 2 days) in the future. This function is intended to be performed by the Vaccine Appointment Scheduler role. Note: The Site Admin role also has the capability to perform this function from a system standpoint 1. Administer 1st Dose Find your assigned clinic. Check in the recipient Figure 1 From this page you will be able to start the vaccine administration process. Vaccinate the recipient, document encounter, and submit. Figure 2 From this page you will be able to document the vaccine administration.
VASE+ Job Aid 2nd Dose Appointment Version 1.1 2. Schedule 2nd Dose Appointment Click on the Check Out section of your assigned clinic. Identify the recipient that needs a second dose appointment. Click on Schedule 2ndDose Appointment. Figure 3 Note you can only schedule for clinics in the future that meet the waiting time criteria for second dose. Find the corresponding second dose clinic and date by using the dropdown menus. Click Select on the desired second dose clinic to proceed with scheduling assignment. Figure 4 Note this page will list all possible corresponding 2nd dose clinics where slots are available.
VASE+ Job Aid 2nd Dose Appointment Version 1.1 2. Schedule 2ndDose Appointment (Continued ) Verify the recipient's personal information and make corrections as needed. Verify and input any special accommodations as need. Click Save and Continue to proceed. Figure 5 Note changes here will reflect in the recipients next appointment.
VASE+ Job Aid 2nd Dose Appointment Version 1.1 2. Schedule 2ndDose Appointment (Continued ) Choose and click on the appointment slot. Figure 6 All available appointment time slots will be visible here. Review the 2nd dose appointment details and confirm the appointment. Figure 7 Notice the Alert. Appointment must be confirmed to proceed. Exiting prior to confirmation will relinquish this appointment slot.
VASE+ Job Aid 2nd Dose Appointment Version 1.1 2. Schedule 2ndDose Appointment (Continued ) The 2nd dose appointment has now been confirmed. Figure 8 From this confirmation you may go home, cancel, or reschedule the appointment. Clinking Home will send you back to your clinic Check Out screen to verify the appointment assignment and changes. Figure 9 Notice that recipient entry has now been updated as having a 2nd dose appointment. The recipient can now be found in their assigned 2nd dose clinic.
VASE+ Job Aid 2nd Dose Appointment Version 1.1 2. Schedule 2ndDose Appointment (Continued ) Note, if the Schedule 2 Appt. button is not available, this is because there is currently no clinic scheduled, or the vaccine dose was logged incorrectly. If the box says No Appts Available , the clinic will need to create a schedule for a day in the future when second dose appointments could be given. Once a clinic schedule is created, a second dose appointment may be made. Figure 12 No Appts Available If the dose was entered as a second dose by mistake, a Site Admin will need to work with the vaccine administrator and the registrant to fix the information. The Edit Vaccine option is only available the day of the appointment and after the vaccine information was originally entered. To edit the vaccine log information, the user must be on the Checked Out tab. Click on the Edit Vaccine button under the Review column for the registrant whose vaccine information needs to be edited. The information in Figure 6 will appear. Change the dose number from 2 to 1 and click the Submit button to save the information. The second dose will then be available to schedule. Figure 11 Edit Vaccine Dose Information