Master's Degree Audit Guide for Students
Accessing and creating a degree audit is crucial for students pursuing a master's degree. This guide provides step-by-step instructions on how to access the degree audit system, create an audit, and move courses within the program structure. Visual aids accompany each process for easy understanding.

Download Presentation

Please find below an Image/Link to download the presentation.
The content on the website is provided AS IS for your information and personal use only. It may not be sold, licensed, or shared on other websites without obtaining consent from the author. Download presentation by click this link. If you encounter any issues during the download, it is possible that the publisher has removed the file from their server.
E N D
Presentation Transcript
MASTERS STUDENTS DEGREE AUDIT GUIDE
How to Access Degree Audit 1. Sign into MyTC 1. Locate the Degree Audit link on the right hand side of the Student Resources page 1. Click on the link. NOTE: The link will automatically direct you to the Degree Audit system 2
Audit Creation Options on the main page from left to right Home: takes you back to the main screen Course History: view courses and grades by term Academic Goals: view current declared goal as well as other audits Add: Create a new goal Create Audit: Create an audit based on the highlighted goal 3
Creating an Audit The declared major, the major to which the student was admitted, will be located in the academic goal box. Make sure it is highlighted (selected). NOTE: If the declared major is incorrect, contact the Admissions Office. Located and click the Create Audit button. NOTE: An audit will be generated and will automatically direct you to the Current Audit tab. 4
Note: The first time a user runs an audit, a tour will highlight the features of the degree audit. 5
Current Audit Overview See below the screen shot for a description of the different components of the audit page. a. Actions: Students can share or rerun/refresh their audits. They can also save a particular audit in the system, which will show progress at that point in time. Finally, they can make a pdf copy of their audits. b. General Degree Information c. Audit 6
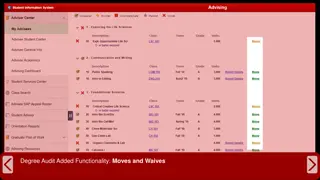
How to Move Courses Depending on the structure of the major program, students may be able to move courses that they have taken into certain requirement groups. The move course icon, which looks like a small anchor, appears next to requirement groups that allow for moving courses. Clicking on the anchor will open a panel in which you can move courses as needed. 7
How to Move Courses (cont) Click on the Move Courses Tab to reveal the Move courses panel. Click the down arrow to reveal course options. You may also see a list of compatible courses below the dropdown menu. 8
NOTE: Courses that can be moved will appear in a drop down list. If a course does not appear in the list, it cannot be moved to satisfy that requirement. Click on the course you would like to move to the requirement. This will collapse the dropdown menu and only display the selected course. Click on Move Course to complete the move. This will rerun the audit to reflect your move. To cancel a move, just click on the x in the top right next to the tour button. Your moved course will look as follows with an anchor. To lock it in place, click the anchor and it will turn into a pin. This will allow your advisor and the Registrar to be able to see the moved course. 9
How to Add a Goal Adding a goal will add another program (major) to your audit list. This does not constitute an official major/program change, but allows you to explore the options of adding programs. 1.) Locate Add Goal NOTE: Adding a goal will NOT replace or delete the declared major. NOTE: Official use for students pursuing an en passant degree. 10
How to Add a Goal (cont.) 2.) Select the major NOTE: Select the major to its lowest possibility (concentration). The Year, Degree, Major and Concentration bar will turn blue. 11
How to Add a Goal (cont.) 3.) Name your goal and click Save. 4.) Your goal will be listed on your home page 12
Course Planning NOTE: Names of specific sections in the Degree Audit may differ between programs. For example, not everyone may have the "Program Development and Evaluation" section. The course planning tool can be utilized by clicking any shaded section on the Degree Audit. Adding future courses: Click on the section (light shade bar) you wish to add a future course (do not click on the dark blue bars as they do not contain coursework - those are only section folders). This will pop up the planning interface. 13
Course Planning Tool Plan: shows that you are in the planning tab. PDF - This will download a grid of every course on the transcript. Update Max Year: Allows you to add an academic year not listed on the grid. List View: Switches the grid to a list style Plan a Course: Area listing allowable courses that can fit in a chosen term and section. Pages tab: If there are more pages to be seen, click on the numbers or arrows to see more courses. 14
Adding a Planned Course For every academic year, the left box is Autumn, the center box is Spring, and the right box is Summer Click in the box where you plan to add a future course. This will highlight the box in blue and every course could potentially go there, will appear in the course list. NOTE: Planning a course will not register you for that course. You will have to register as you normally would through the MyTC Portal once registration opens for that term. 15
Adding a Planned Course (cont.) Use the search bar to narrow your search for the course you wish to add. When you locate it, click it. Use the add button to add the course. (NOTE: If the course is variable credits, you can adjust the number of credits on the right) 16
Adding a Planned Course (cont.) You will now see the course in the selected box and in the course list, there will be a tiny blue check by that course. If you wish to add another course to this term, you may continue the process. If you wish to change a term, please click the appropriate box. If you are done, click the X in the upper right corner to exit the planning tool. If the academic year you wish to add is not available, please go to the next page. 17
Adding Max Year Type the year (ending in the Summer term) you wish to add. E.g., AY 2022-23, type 2023. The grid will add that AY and you can add additional courses using the planning tool. List View Option You can select a term by clicking the appropriate calendar. (E.g., Autumn 2021 is highlighted here) Then follow the same directions for selecting a course when in Grid View.
Removing a Planned Course If you want to delete a planned course while in the planning tool, just click the course you want to delete. A box will open up asking for confirmation. Click Remove to remove it. If you decide to wait until you are back in the audit, you will be able to remove the planned course by clicking the red X to the right of the course. Then click Yes in the warning box to remove it.
Planned Courses on the Audit Planned courses will stay on the degree audit until the start of the term of that planned course. Once that term begins, the planned course will automatically fall into the Unsatisfactory or Uncompleted Courses section at the very bottom of the audit. If you registered for that course, you may now move it to the section using the Move Course function. This is not an automatic feature where the actual course will replace the planned course.
Access Course History To quickly view all courses and past grades, select the Course History link located in the Home box. Once selected, a list of courses and information will appear. The list will contain course title, grade (completion status), and the term in which the course was taken. 21
Have questions or Concerns? If you have any questions or concerns regarding the degree audit system, contact us via email at registrar@tc.columbia.edu. Office Hours: Monday-Friday 9 a.m. - 5 p.m. 23


")
")


")
")