Understanding Isometric Projections and Drawings
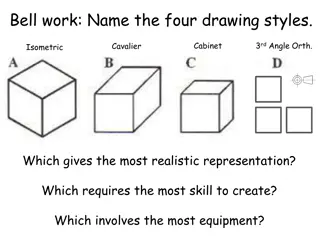
Isometric projections provide a way to represent objects in three dimensions on a two-dimensional surface, making it easier for non-technical individuals to grasp complex shapes. This article discusses the differences between orthographic and pictorial views, principles of projection, types of projection, and focuses on isometric projections and drawings, including axonometric and isometric axes.
Download Presentation

Please find below an Image/Link to download the presentation.
The content on the website is provided AS IS for your information and personal use only. It may not be sold, licensed, or shared on other websites without obtaining consent from the author. Download presentation by click this link. If you encounter any issues during the download, it is possible that the publisher has removed the file from their server.
E N D
Presentation Transcript
ISOMETRIC PROJECTIONS AND ISOMETRIC DRAWING Presented by: Ar. Manish kumar
Introduction Orthographic view shows only two dimensions in any particular view. This makes it difficult to interpret them and only technically trained person can interpret the meaning of these orthographic views. A non-technical person Can not imagine the shape of the object from orthographic projections. Whereas, pictorial projections can be easily understood even by persons Without any technical training because such views show all the three Dimensions Of an object in the same view.
But pictorial view does not show the true shape and size of any principal surface of An object and it does not show the hidden portions. Pictorial projections are easy to imagine so these are used in sales literature.
Principleof Projection : If straight lines are drawn from various points of an object to meet a plane then it is said that object is Projected on that plane. These straight linesfrom theobjectto the planearecalled projectors. The figure formed by joining the points at which the projectors meet the plane is called Projection of that object.
Types of Projection: I) Orthographic Projection II) Pictorial Projection Pictorial Projection : The projection in which the length , height And depth are shown in one view is called Pictorial Projection. Types of Pictorial Projection: I) Axonometric II) Oblique III)Perspective
Axonometric Projection: When projection is obtained on plane inclined to ll the three principal planes, then It is called Axonometric projection. ypes of Axonometric projection: sometric Dimetric rimetric
Isometric Projection : The projection is obtained on a plane which is equally inclined to all the three principal planes. Isometric Projections and Isometric drawings are represented on the plane paper or sheet by drawing isometric axes, isometric lines and isometric planes.
Isometric Axes : The three lines CB,CD and CG meeting at the point C and making angle of 120 degree with each other are called isometric axes. Isometric lines: The lines parallel to isometric axes are called isometric lines. Isometric planes: The planes represented by faces of cube are called isometric planes. Similarly any planes parallel to these planes are also called isometric planes.
Isometric drawing or isometric view: The pictorial view drawn with true scale is called Isometric drawing or isometric view. Isometric projection: The pictorial view drawn with the use of isometric scale is called Isometric projection.
L.H.S.V. F.V. X T.V.


