Mastering Google Classroom for Effective Online Teaching


Certification
Module 10
Level 1


What should I know at the end of this module?
★
How to create a class & join classes
★
How to invite students to join a class
★
How to use class codes to have students join classes
★
How to create, organize, and assign coursework
★
How to grade and return work
★
How to communicate with students inside
Classroom
Hello!
I am Jana Gerard and I am a Level 1 & Level 2 Google Certified
Educator as well as a Google Certified Trainer.
I am also the Learning Specialist in charge of the IDEA Studio
and I am here to help you become a Google Certified Educator.
You can reach me at
jgerard@lindenwood.edu
or find me on
Twitter @JanaGerard
Classroom
●
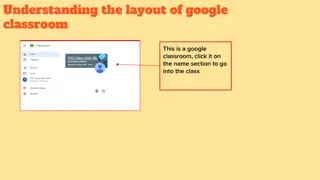
Go to Classroom through your waffle in
Drive
●
The first time you use Google Classroom
you have to pick Student or Teacher
●
To create or join classes click on the plus
sign in the upper right corner
○
If joining, click Join then enter your
code
○
If creating, click Create then enter
your class information
Invite students or Join with a class code
×
Invite students
×
Click on People (top of page in the middle)
×
Click on the Share symbol
×
Enter email then click Invite
×
Join with a class code
×
Click on Stream
×
Click on About
×
Click on to enlarge code
Create & organize Coursework
●
Click on Classwork
○
Click on CREATE
■
Use Topics to organize assignments
& materials into “modules”
■
Post Assignment, Quiz, Question,
Material, Create Topic, or Reuse
Post
Assign Coursework
❖
Click on Assignment
For allows you to assign to more than one class at a time.
All students allows you to assign work to specific students
or groups.
Title is the name of the assignment.
Instructions…
Points can be 0 to 100.
Can assign date and time.
Topic allows you to pick your “module” for your assignment.
You can assign work from your desktop, Drive, YouTube, or
a URL.
➔
Click on Assign
◆
It can be Assign(ed) immediately
➔
OR
◆
It can be Schedule(d)
➔
OR
◆
It can be Save(d as a) draft to
assign later
Assign Corsework, Continued
Assigning Coursework, Continued
❖
An important note about sharing materials or
assigning work in Classroom
➢
There are three options for sharing
■
Students can view file
■
Students can edit file
■
Make a copy for each student
➢
Students can edit file means the
whole class
has
ONE
collaborative
document that EVERYONE is
typing on!
Grading & Returning Work
❏
To Grade
❏
Click on the assignment (in Classwork)
❏
Click on
VIEW ASSIGNMENT
❏
Click on an assignment that has
been turned in and add comments if
you wish
❏
To Return
❏
Click on Return
Communicating with students in classroom
➢
Click on People
○
Scroll to student you wish to email
○
Click on the three dots on the right hand side
of the box with their name
○
Click on Email student
➢
Click on Stream (message whole class)
○
Type a message in the top box and hit Enter
Classroom Practice Tasks
Practice Tasks
Credits
Special thanks to all the people who made and
released these awesome resources for free:
×
Presentation template by
SlidesCarnival
×
Photograph by
Startupstockphotos
As a Level 1 & 2 Google Certified Educator and Trainer, I, Jana Gerard, offer guidance on creating, organizing, and managing Google Classroom effectively. Learn how to create classes, invite students, assign coursework, grade, communicate, and more. Access practical tips and step-by-step instructions to optimize your online teaching experience.

Download Presentation

Please find below an Image/Link to download the presentation.
The content on the website is provided AS IS for your information and personal use only. It may not be sold, licensed, or shared on other websites without obtaining consent from the author.If you encounter any issues during the download, it is possible that the publisher has removed the file from their server.
You are allowed to download the files provided on this website for personal or commercial use, subject to the condition that they are used lawfully. All files are the property of their respective owners.
The content on the website is provided AS IS for your information and personal use only. It may not be sold, licensed, or shared on other websites without obtaining consent from the author.
E N D
Presentation Transcript
Google Certification Module 10 Level 1
How to create a class & join classes How to invite students to join a class How to use class codes to have students join classes How to create, organize, and assign coursework How to grade and return work How to communicate with students inside Classroom
Hello! I am Jana Gerard and I am a Level 1 & Level 2 Google Certified Educator as well as a Google Certified Trainer. I am also the Learning Specialist in charge of the IDEA Studio and I am here to help you become a Google Certified Educator. You can reach me at jgerard@lindenwood.eduor find me on Twitter @JanaGerard
Google Classroom
Go to Classroom through your waffle in Drive The first time you use Google Classroom you have to pick Student or Teacher To create or join classes click on the plus sign in the upper right corner If joining, click Join then enter your code If creating, click Create then enter your class information
Invite students Click on People (top of page in the middle) Click on the Share symbol Enter email then click Invite Join with a class code Click on Stream Click on About Click on to enlarge code
Click on Classwork Click on CREATE Use Topics to organize assignments & materials into modules Post Assignment, Quiz, Question, Material, Create Topic, or Reuse Post
For allows you to assign to more than one class at a time. All students allows you to assign work to specific students or groups. Title is the name of the assignment. Instructions Points can be 0 to 100. Can assign date and time. Topic allows you to pick your module for your assignment. You can assign work from your desktop, Drive, YouTube, or a URL. Click on Assignment
Click on Assign It can be Assign(ed) immediately OR It can be Schedule(d) OR It can be Save(d as a) draft to assign later
An important note about sharing materials or assigning work in Classroom There are three options for sharing Students can view file Students can edit file Make a copy for each student Students can edit file means the whole class has ONE collaborative document that EVERYONE is typing on!
To Grade Click on the assignment (in Classwork) Click on VIEW ASSIGNMENT Click on an assignment that has been turned in and add comments if you wish To Return Click on Return
Click on People Scroll to student you wish to email Click on the three dots on the right hand side of the box with their name Click on Email student Click on Stream (message whole class) Type a message in the top box and hit Enter
Practice Tasks Classroom Practice Tasks
Special thanks to all the people who made and released these awesome resources for free: Presentation template by SlidesCarnival Photograph by Startupstockphotos