How to Manage Peachtree Software Efficiently
Learn how to efficiently start, create a company, close a company, and create users in Peachtree software. Follow step-by-step instructions with visual aids for a seamless experience. Discover essential tips for effective management.

Download Presentation

Please find below an Image/Link to download the presentation.
The content on the website is provided AS IS for your information and personal use only. It may not be sold, licensed, or shared on other websites without obtaining consent from the author. If you encounter any issues during the download, it is possible that the publisher has removed the file from their server.
You are allowed to download the files provided on this website for personal or commercial use, subject to the condition that they are used lawfully. All files are the property of their respective owners.
The content on the website is provided AS IS for your information and personal use only. It may not be sold, licensed, or shared on other websites without obtaining consent from the author.
E N D
Presentation Transcript
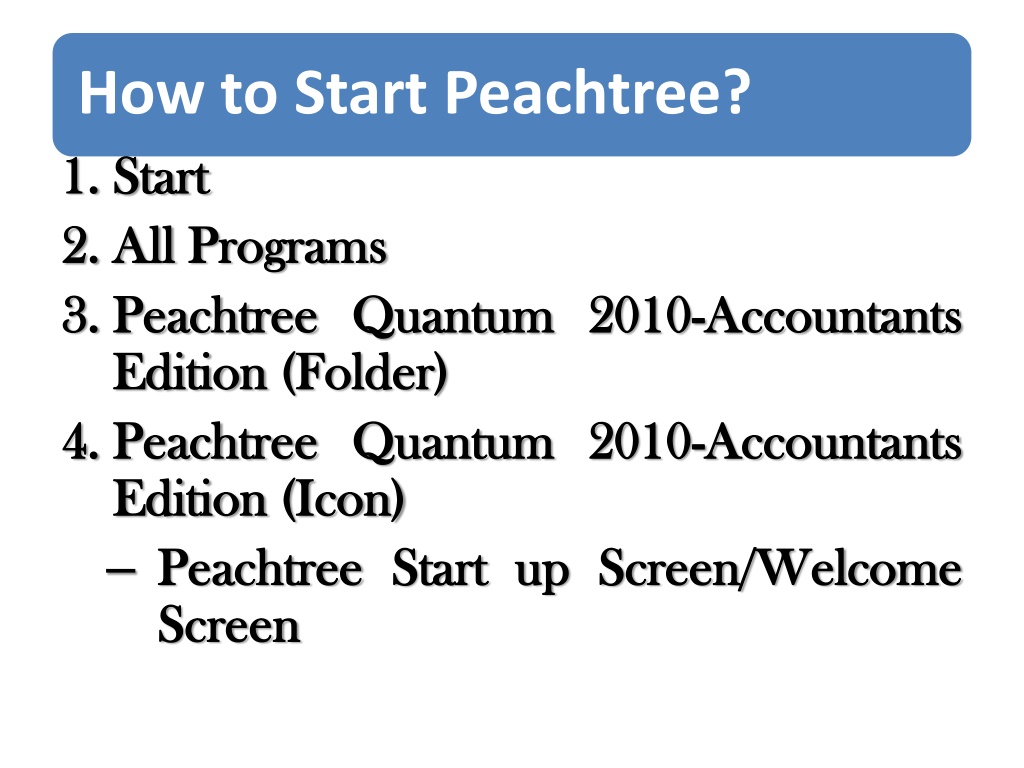
How to Start Peachtree? 1. 1. Start Start 2. 2. All All Programs Programs 3. 3. Peachtree Peachtree Quantum Quantum 2010 Edition Edition (Folder) (Folder) 4. 4. Peachtree Peachtree Quantum Quantum 2010 Edition Edition (Icon) (Icon) Peachtree Peachtree Start Start up Screen Screen 2010- -Accountants Accountants 2010- -Accountants Accountants up Screen/Welcome Screen/Welcome
How to Create Company on Peachtree? 1. 1. From From Start 2. 2. Create Create a a New 1. 1. Create Create a a New 1. 1. Next 2. 2. Create Create a a New 1. 1. Peachtree 2. 2. Next 3. 3. Create Create a a New 1. 1. Company 2. 2. Address 3. 3. 4. 4. 4. 4. Create Create a a New 1. 1. 2. 2. Start up New Company Company Wizard New Company Company- -Introduction Next New Company Company- -Choice Peachtree Premium Premium Accounting Next New Company Company Information Company Name Name: : Your Address Line Line 1 1: : Adi Adi Haqie Business Business Type Type: : Limited Limited Liability Next Next New Company Company- -Set Build Build Your Your own own chart chart of of Accounts Next Next up screen screen select select Create Create a a new Wizard Introduction new company company Button Button Choice of of Peachtree Accounting 2010 Peachtree Company 2010 Company Information Your name name Haqie Liability Company Company Set up up Accounts
How to Create Company on Peachtree? How to Create Company on Peachtree? 5. 5. Create Create a a New 1. 1. No, No, I I do 2. 2. Next Next Create Create a a New 1. 1. Accrual Accrual 2. 2. Next Next Create Create a a New 1. 1. Real Real Time 2. 2. Next Next Create Create a a New 1. 1. 12 12 monthly monthly accounting 2. 2. Next Next Create Create a a New New Company 1. 1. January January 2019 2019 2. 2. Next Next 10. Create Create a a New New Company 1. 1. Finish Finish New Company Company- -Define do not not want want to to use Define Account Account Segments use Account Account Masking Segments Masking 6. 6. New Company Company- -Accounting Accounting Method Method 7. 7. New Company Company - -Posting Time Posting Method Method 8. 8. New Company Company- -Accounting accounting periods Accounting Periods periods per Periods per Year Year 9. 9. Company- -Fiscal Fiscal Year Year 10. Company- -Finish Finish
How to Close a Company? How to Close a Company? 1. 1. From From the 2. 2. Start Start up displayed displayed the File File Menu, up Screen Screen /Welcome Menu, select /Welcome Screen select close close company company Screen will will be be How How to to Open 1. 1. From From the the Start company company 2. 2. Open Open an an Existing Existing Company 1. 1. Select Select your your Company 2. 2. Ok Ok Open a a Company? Company? Start Up Up Screen, Screen, Select Select open open an an existing existing Company Company
How to Create Users? How to Create Users? 1. 1. Maintain Maintain Menu 2. 2. Users Users 1. 1. Set Set Up 3. 3. User User Security Security--- ---Window 1. 1. New New User User Button 2. 2. Create Create Administrator Administrator 1. 1. User User Name 2. 2. Password Password: : your 3. 3. Save Save 4. 4. Close Close Note Note: : Close Close your Menu Up security security Window Button Name your your password your name name password your company company and and Reopen Reopen
How to Set up General Ledger Chart of Accounts? How to Set up General Ledger Chart of Accounts? 1. 1. 2. 2. 3. 3. Maintain Maintain Menu Chart Chart of of Accounts Accounts option Maintain Maintain chart chart of of Accounts Menu option Accounts Window Window Account Account ID (Write) (Write) ID Description Description (Write) (Write) Account Type Account Type (Select) (Select) Click Click on on 1110 1110 Cash In Bank Cash In Bank Cash Cash Save Save 1140 1140 Account Receivables Account Receivables Account Receivables Account Receivables Save Save 1141 1141 Allowance for Uncollectable Allowance for Uncollectable Account Receivables Account Receivables Save Save 1145 1145 Inventory Inventory Inventory Inventory Save Save 2110 2110 Accounts Payable Accounts Payable Accounts Payable Accounts Payable Save Save 2115 2115 Income Taxes Payable Income Taxes Payable Other Current Liabilities Other Current Liabilities Save Save 3110 3110 Common Stock Common Stock Equity Equity - -doesn t Close doesn t Close Save Save 3115 3115 Dividend Dividend Equity Equity- -gets closed gets closed Save Save 3220 3220 Retained Earnings Retained Earnings Equity Equity- -Retained Retained Earnings Earnings Save Save 4110 4110 Sales and Other Income Sales and Other Income Income Income Save Save 5110 5110 Cost of Cost of Goods Sold Goods Sold Cost of Sales Cost of Sales Save Save 6110 6110 Miscellaneous Expense Miscellaneous Expense Expense Expense Save Save
How to Enter General Ledger Beginning Balance? How to Enter General Ledger Beginning Balance? Maintain Maintain Menu Chart Chart of of Accounts Accounts Option Maintain Maintain Chart Chart of of Accounts 1. 1. Account Account Beginning 2. 2. Select Select Period Period Window 1. 1. Know Know the 2. 2. Always Always select 3. 3. Ok Ok 4. 4. Chart Chart of of Accounts Account ID ID Description Description 1. 1. 2. 2. 3. 3. Menu Option Accounts Window Beginning Balances Balances Window the current current period select the the Previous Window period [From Previous Period [From 2 2/ /1 1/ /19 Period [From 19 through through 2 2/ /29 [From 1 1/ /1 1/ /16 29/ /19 through 1 1/ /31 19] ] 16 through 31/ /16 16] ] Accounts Beginning Beginning Balances Account Type Account Type Balances Window Window Account Assets, Expenses Assets, Expenses Liabilities, Equity, Income Liabilities, Equity, Income 1110 1110 Cash In Bank Cash In Bank Cash Cash 10,000 10,000 1140 1140 Account Receivables Account Receivables Account Receivables Account Receivables 16,800 16,800 1141 1141 Allowance for Allowance for Uncollectibles Uncollectibles Account Receivables Account Receivables - -3,100 3,100 1145 1145 Inventory Inventory Inventory Inventory 12,000 12,000 2110 2110 Accounts Payable Accounts Payable Accounts Payable Accounts Payable 6,000 6,000 2115 2115 Income Taxes Payable Income Taxes Payable Other Current Liabilities Other Current Liabilities 500 500 3110 3110 Common Stock Common Stock Equity Equity - -doesn t Close doesn t Close 19,200 19,200 3115 3115 Dividend Dividend Equity Equity- -gets closed gets closed 3220 3220 Retained Earnings Retained Earnings Equity Equity- -Retained Retained Earnings Earnings 10,000 10,000 4110 4110 Sales and Other Income Sales and Other Income Income Income 5110 5110 Cost of Cost of Goods Sold Goods Sold Cost of Sales Cost of Sales 6110 6110 Miscellaneous Expense Miscellaneous Expense Expense Expense
How to take a Backup of company data files? How to take a Backup of company data files? 1. 1. File File Menu 2. 2. Back Back up 3. 3. Back Back up 1. 1. Include name name 2. 2. Back Back up 4. 4. Save Save Back 1. 1. Save Save in in: : Choose 2. 2. Save Save Butt 3. 3. OK OK Menu up option option up Company Company Window Include Company Company name Window name in in the the back back up up file file up Button Button Back up up for Choose Desktop Butt ton ton for ---- ----as as window window Desktop or or Flash Flash
How to Restore [open] a company data file? How to Restore [open] a company data file? 1. 1. 2. 2. 3. 3. File File Menu Menu Restore Restore option Restore Restore Wizard 1. 1. Browse Browse 1. 1. option Wizard- -Select Select Back Back up up file file Open Open Back 1. 1. Look Look in in : : Desktop 2. 2. Locate Locate and 3. 3. Open Open Next Next Restore Wizard Wizard- -Select 1. 1. A A new new company company 2. 2. Next Next Restore Restore Wizard Wizard- -Restore 1. 1. Next Next Restore Restore Wizard Wizard- -Confirmation 1. 1. Finish Finish Back up up File File Window Window Desktop or or Flash and select select back Flash up file back up file 2. 2. 4. 4. Restore Select Company Company 5. 5. Restore Options Options 6. 6. Confirmation
How to Maintain Customer [A/R] Subsidiary Ledger? How to Maintain Customer [A/R] Subsidiary Ledger? 1. 1. 2. 2. 3. 3. Maintain Maintain Menu Customers/Prospects Customers/Prospects option Maintain Maintain Customers/Prospects Customers/Prospects window 1. 1. Customer Customer ID ID: : C C01 2. 2. Name Name: : K K 3. 3. General General Folder Folder Tab 1. 1. Billing Billing Address Address: : Ayder 4. 4. Sales Sales Info Info Folder Folder Tab 1. 1. GL GL Sales Sales Account 5. 5. Save Save 6. 6. Customer Customer ID ID: : C C02 7. 7. Name Name: : B B 8. 8. General General Folder Folder Tab 1. 1. Billing Billing Address Address: : Ketema 9. 9. Sales Sales Info Info Folder Folder Tab 1. 1. GL GL Sales Sales Account 10. 10. Save Save Menu option window: : 01 Tab Ayder Tab Account: :4110 4110 02 Tab Ketema Tab Account: :4110 4110
How to enter Customer Beginning Balance? How to enter Customer Beginning Balance? 1. 1. 2. 2. 3. 3. Maintain Maintain Menu Customers/Prospects Customers/Prospects option Maintain Maintain Customers/Prospects Customers/Prospects window 1. 1. History History Folder Folder Tab 1. 1. Customer Customer Beginning 2. 2. Customer Customer Beginning 1. 1. Customer Customer Balances 2. 2. C C01 01 3. 3. Invoices Invoices for 4. 4. Invoice Invoice No 5. 5. Date Date: : January 6. 6. Amount Amount: : 7 7, ,300 7. 7. Customer Customer Balances 8. 8. C C02 02 9. 9. Invoices Invoices for 10. 10. Invoice Invoice No 11. 11. Date Date: : January 12. 12. Amount Amount: :9 9, ,500 13. 13. Save Save Menu option window Tab Beginning Balances Beginning Balances Balances Folder Balances Button Balances Window Folder Tab Button Window Tab for : : C C01 No: :51 51 January 31 300 Balances Folder 01 K K Folder Folder Tab Tab 31, , 2019 2019 Folder Tab Tab for : : C C02 No: :52 52 January 31 500 02 B B Folder Folder Tab Tab 31, , 2019 2019
How to Maintain Vendor [A/P] Subsidiary Ledger? How to Maintain Vendor [A/P] Subsidiary Ledger? 1. 1. 2. 2. 3. 3. Maintain Maintain Menu Vendors Vendors option Maintain Maintain Vendors 1. 1. Vendor Vendor ID 2. 2. Name Name: : E E 3. 3. General General Folder 1. 1. Mailing Mailing Address 2. 2. Expense Expense Account 3. 3. Save Save 4. 4. Vendor Vendor ID ID: : V V02 5. 5. Name Name: : P P 6. 6. General General Folder 1. 1. Mailing Mailing Address 2. 2. Expense Expense Account 7. 7. Save Save Menu option Vendors window ID: : V V01 01 window: : Folder Tab Address: : Kuha Account: :1145 Tab Kuha 1145 02 Folder Tab Address: : Awuzin Account: :1145 Tab Awuzin 1145
How to enter Vendor Beginning Balance? How to enter Vendor Beginning Balance? 1. 1. 2. 2. 3. 3. Maintain Maintain Menu Vendors Vendors option Maintain Maintain Vendors 1. 1. History History Folder 1. 1. 2. 2. 1. 1. 2. 2. 3. 3. 4. 4. 5. 5. 6. 6. 7. 7. 8. 8. 9. 9. Menu option Vendors window Folder Tab Vendor Vendor Beginning Beginning Balances Vendor Vendor Beginning Beginning Balances Vendor Vendor Balances Balances Folder V V01 01 Invoices Invoices for for : : V V01 Invoice Invoice No No: :91 Date Date: : January January 31 Amount Amount: : 3 3, ,600 Vendor Vendor Balances Balances Folder V V02 02 Invoices Invoices for for : : V V02 10. 10. Invoice Invoice No No: :92 11. 11. Date Date: : January January 31 12. 12. Amount Amount: :2 2, ,400 13. 13. Save Save window Tab Balances Button Balances Window Folder Tab Button Window Tab 01 P P Folder Folder Tab Tab 91 31, , 2019 2019 600 Folder Tab Tab 02 P P Folder Folder Tab Tab 92 31, , 2019 2019 400
How to Maintain Inventory Items? How to Maintain Inventory Items? 1. 1. Maintain Maintain Menu 2. 2. Inventory Inventory Items 3. 3. Maintain Maintain Inventory 1. 1. Item Item ID 2. 2. Description Description: : B B 3. 3. Item Item Class 4. 4. Price Price Level 5. 5. Last Last Unit 6. 6. Cost Cost Method 7. 7. Stocking Stocking U/M 8. 8. GL GL Sales Sales Acct 9. 9. GL GL Inventory Inventory Acct 10. 10. GL GL Cost Cost of of Sales 11. 11. Save Save Menu Items option Inventory Items ID: : M M01 01 option 12. 12. Item Item ID 13. 13. Description Description: : H H 14. 14. Item Item Class Item Item 15. 15. Price Price Level 16. 16. Last Last Unit Unit cost 17. 17. Cost Cost Method Method: : FIFO 18. 18. Stocking Stocking U/M 19. 19. GL GL Sales Sales Acct 20. 20. GL GL Acct Acct: :1145 1145 21. 21. GL GL Cost Cost of of Sales Acct Acct: :5110 5110 22. 22. Save Save ID: : M M02 02 Items window window Class: : Stock Stock Level 1 1: :55 cost: :25 55 25 FIFO Each 4110 Inventory Inventory Class: : Stock Level 1 1: :400 Unit cost cost: :200 Method: : FIFO U/M: : Cartoon Acct: : 4110 Stock Item 400 200 FIFO Cartoon 4110 Acct: :1145 Sales Acct Acct: :5110 Item U/M: : Each Acct: : 4110 Sales 1145 5110
How to Enter Inventory Items Beginning Balances? How to Enter Inventory Items Beginning Balances? 1. 1. Maintain Maintain Menu 2. 2. Inventory Inventory Items 3. 3. Maintain Maintain Inventory 1. 1. Beginning Beginning Balances 2. 2. Inventory Inventory Beginning 3. 3. Select Select : : M M01 1. 1. Quantity Quantity: :35 2. 2. Unit Unit Cost 4. 4. Select Select: : M M02 1. 1. Quantity Quantity: :200 2. 2. Unit Unit Cost 5. 5. OK OK Menu Items option Inventory Items Balances Button Beginning Balances 01 35 Cost: :200 200 02 200 Cost: :25 25 option Items window window Button Balances Window Window
1. Purchase Orders Tasks 1. Purchase Orders Tasks 1. 1. Tasks Tasks Menu 2. 2. Purchase Purchase Orders 3. 3. Purchase Purchase Orders 1. 1. Vendor Vendor ID 2. 2. Date Date: : February 3. 3. PO PO No 4. 4. Quantity Quantity: : 20 5. 5. Item Item: : M M01 6. 6. Unit Unit Price 7. 7. Journal Journal 1. 1. Accounting Accounting Behind 2. 2. OK OK 8. 8. Save Save 9. 9. List List Menu Orders option Orders window ID: : V V01 01 February 1 1, ,2019 No.: .: P P1 1 20 01 Price: :250 250 option window 2019 Behind Screens Screens
2. Purchases/Receive Inventory Tasks 2. Purchases/Receive Inventory Tasks 1. 1. Tasks Tasks Menu 2. 2. Purchases/Receive Purchases/Receive Inventory 3. 3. Purchases/Receive Purchases/Receive Inventory 1. 1. Vendor Vendor ID ID: : V V01 2. 2. Date Date: : February February 4 4, ,2019 3. 3. Invoice Invoice No No.: .: GRN 4. 4. Apply Apply to to Purchase 5. 5. Received Received: :20 6. 6. Journal Journal 1. 1. Accounting Accounting Behind 2. 2. OK OK 7. 7. Save Save 8. 8. List List Menu Inventory option Inventory window 01 2019 GRN1 1 Purchase Order Order No 20 option window No: : P P1 1 Behind Screens Screens
3. Purchases/Receive Inventory Tasks 3. Purchases/Receive Inventory Tasks 1. 1. Tasks Tasks Menu 2. 2. Purchases/Receive Purchases/Receive Inventory 3. 3. Purchases/Receive Purchases/Receive Inventory 1. 1. Vendor Vendor ID ID: : V V03 1. 1. + + 2. 2. Maintain Maintain Vendors 1. 1. Vendor Vendor ID 2. 2. GL GL Expense Expense Account 3. 3. Save Save 4. 4. Close Close Menu Inventory option Inventory window 03 (Add (Add New) New) option window Vendors Window ID: : V V03 03 Account: :1145 Window 1145
2 2. . Vendor Vendor ID 3 3. . Date Date: : February 4 4. . Invoice Invoice No 5 5. . Apply Apply to to Purchases 6 6. . Quantity Quantity: :150 7 7. . Item Item: : M M01 8 8. . Journal Journal 1. 1. Accounting Accounting Behind 2. 2. OK OK 9 9. . Save Save 10 10. . List List ID: : V V03 February 8 8, ,2019 No.: .: GRN GRN3 3 Purchases 150 01 03 2019 Behind Screens Screens
4. Payments Tasks 4. Payments Tasks 1. 1. Tasks Tasks Menu 2. 2. Payments Payments option 3. 3. Payments Payments window 1. 1. Vendor Vendor ID 2. 2. Check Check no 3. 3. Date Date: : February 4. 4. Apply Apply to to Invoices 5. 5. Invoice Invoice 1. 1. GRN GRN1 1: : Pay 6. 6. Journal Journal 1. 1. Accounting Accounting Behind 2. 2. OK OK 7. 7. Save Save 8. 8. List List Menu option window ID: : V V01 no: : CPV CPV 001 February 10 Invoices 01 001 10, ,2019 2019 Pay Behind Screens Screens
5. Payments Tasks 5. Payments Tasks 1. 1. Tasks Tasks Menu 2. 2. Payments Payments option 3. 3. Payments Payments window 1. 1. Vendor Vendor ID 2. 2. Check Check no 3. 3. Date Date: : February 4. 4. Apply Apply to to Invoices 5. 5. Invoice Invoice 1. 1. 91 91: : Amount 6. 6. Journal Journal 1. 1. Accounting Accounting Behind 2. 2. OK OK 7. 7. Save Save 8. 8. List List Menu option window ID: : V V02 no: : CPV CPV 002 February 11 Invoices 02 002 11, ,2019 2019 Amount Paid Paid: : 1 1, ,200 200 Behind Screens Screens
6. Payments Tasks 6. Payments Tasks 1. 1. Tasks Tasks Menu 2. 2. Payments Payments option 3. 3. Payments Payments window 1. 1. Pay Pay to to the 1. 1. Name Name: : ELPCO 2. 2. Check Check no 3. 3. Date Date: : February February 15 4. 4. Apply Apply to to Expenses 5. 5. Quantity Quantity: :1 1 6. 6. Description Description: : Utility Menu option window the order order of of ELPCO no: : CPV CPV 003 003 15, ,2019 2019 Expenses Utility Expense Expense
7 7. . GL GL Account Account: :6120 1. 1. + + 2. 2. Account Account ID 3. 3. Description Description: : Utility 4. 4. Account Account Type 5. 5. Save Save 6. 6. Close Close 8 8. . Unit Unit Price Price: : 150 9 9. . Journal Journal 1. 1. Accounting Accounting Behind 2. 2. OK OK 10 10. . Save Save 11 11. . List List 6120 (Add (Add New) New) ID: :6120 6120 Utility Expense Type: : Expenses Expenses Expense 150 Behind Screens Screens
7. Payments Tasks 7. Payments Tasks 1. 1. Tasks Tasks Menu 2. 2. Payments Payments option 3. 3. Payments Payments window 1. 1. Vendor Vendor ID 2. 2. Check Check no 3. 3. Date Date: : February 4. 4. Prepayment Prepayment 5. 5. Description Description: : Purchase 6. 6. Amount Amount: :2 2, ,000 7. 7. Journal Journal 1. 1. Accounting Accounting Behind 2. 2. OK OK 8. 8. Save Save 9. 9. List List Menu option window ID: : V V02 no: : CPV CPV 004 February 17 Purchase 000 02 004 17, ,2019 2019 Behind Screens Screens
8. Quotes Tasks 8. Quotes Tasks 1. 1. Tasks Tasks Menu 2. 2. Quotes/Sales Quotes/Sales orders/Proposals 3. 3. Quotes Quotes window window 1. 1. Customer Customer ID 2. 2. Date Date: : February February 21 3. 3. Quote Quote No No.: .: Q Q1 1 4. 4. Quantity Quantity: :130 130 5. 5. Items Items: :M M01 01 6. 6. Journal Journal 1. 1. Accounting Accounting Behind 2. 2. OK OK 7. 7. Save Save 8. 8. List List Menu orders/Proposals option option ID: : C C01 01 21, ,2019 2019 Behind Screens Screens
9. Sales Order Tasks [Outstanding Quote] 9. Sales Order Tasks [Outstanding Quote] 1. 1. Tasks Tasks Menu 2. 2. Quotes/Sales Quotes/Sales orders/Proposals 3. 3. Quotes Quotes window window 1. 1. List List 2. 2. Select Select and and Open Open Q Q1 1 3. 3. Convert Convert Button Button 4. 4. Convert Convert Quote Quote Window 1. 1. Convert Convert this 1. 1. Sales Sales Order Order 2. 2. SO SO # #: : S S1 1 3. 3. OK OK Menu orders/Proposals option option Window this quote quote to to a a
5 5. . Tasks Tasks Menu 1. 1. Quotes/Sales Quotes/Sales Orders/Proposals 2. 2. Sales Sales Orders Orders 3. 3. Sales Sales Orders Orders Window 4. 4. List List 5. 5. Select Select and and Open Open Sales 6. 6. Date Date: : February February 23 6 6. . Journal Journal 1. 1. Accounting Accounting Behind Behind Screens 2. 2. OK OK 7 7. . Save/OK/SAVE Save/OK/SAVE 8 8. . List List Menu Orders/Proposals Window Sales order 23, , 2019 2019 order : : S S1 1 Screens
10. Sales Order Tasks [New order] 10. Sales Order Tasks [New order] 1. 1. Tasks Tasks Menu 2. 2. Quotes/Sales Quotes/Sales Orders/Proposals 3. 3. Sales Sales Orders Orders 4. 4. Sales Sales Orders Orders Window Window 1. 1. Customer Customer ID 2. 2. Date Date: : February February 24 3. 3. SO SO No No.: .: S S2 2 4. 4. Quantity Quantity: :30 30 5. 5. Item Item: : M M01 01 6. 6. Journal Journal 1. 1. Accounting Accounting Behind 2. 2. OK OK 7. 7. Save/OK/SAVE Save/OK/SAVE 8. 8. List List Menu Orders/Proposals ID: : C C02 02 24, , 2019 2019 Behind Screens Screens
11. Sales/Invoicing Tasks 11. Sales/Invoicing Tasks 1. 1. Tasks Tasks Menu 2. 2. Sales/Invoicing Sales/Invoicing 3. 3. Sales Sales Invoicing Invoicing Window 1. 1. Customer Customer ID 2. 2. Date Date: : February February 25 3. 3. Invoice Invoice No 4. 4. Apply Apply to to Sales 5. 5. Shipped Shipped: :130 6. 6. Journal Journal 1. 1. Accounting Accounting Behind 2. 2. OK OK 7. 7. Save/YES Save/YES 8. 8. List List Menu Window ID: : C C01 25, , 2019 No.: .: CSI CSI1 1 Sales Order Order No 130 01 2019 No.: .: S S1 1 Behind Screens Screens
12. Sales/Invoicing Tasks 12. Sales/Invoicing Tasks 1. 1. 2. 2. 3. 3. Tasks Tasks Menu Sales/Invoicing Sales/Invoicing Sales Sales Invoicing Invoicing Window 1. 1. Customer Customer ID 2. 2. Date Date: : February February 27 3. 3. Invoice Invoice No 4. 4. Apply Apply to to Sales 5. 5. Quantity Quantity: : 30 6. 6. Item Item: :M M01 7. 7. Quantity Quantity: :50 8. 8. Item Item: : M M02 9. 9. Journal Journal 1. 1. Accounting Accounting Behind 2. 2. OK OK 10. 10. Save/YES Save/YES 11. 11. List List Menu Window ID: : C C02 02 27, , 2019 2019 CSI3 3 Sales.: .: S S1 1 30 01 50 02 No.: .: CSI Behind Screens Screens
13. Receipts Tasks 13. Receipts Tasks 1. 1. 2. 2. 3. 3. Tasks Tasks Menu Receipts Receipts Receipts Receipts Window 1. 1. Deposit Deposit Ticket 2. 2. Customer Customer ID 3. 3. Reference Reference: : R R01 4. 4. Receipt Receipt No 5. 5. Date Date: : February 6. 6. Apply Apply to to Invoices 1. 1. Invoice Invoice CSI 2. 2. Pay Pay 7. 7. Journal Journal 1. 1. Accounting Accounting Behind 2. 2. OK OK 8. 8. Save/YES Save/YES 9. 9. List List Menu Window Ticket ID ID: : C C01 ID: : DT 01 DT01 01 01 CR1 1 No.: .: CR February 28 Invoices 28, , 2019 2019 CSI 1 1 Behind Screens Screens
14. General Journal Entry Tasks 14. General Journal Entry Tasks 1. 1. Tasks Tasks Menu 2. 2. General General Journal 3. 3. General General Journal 1. 1. Date Date: : February 2. 2. Reference Reference: :M M01 3. 3. GL GL Account 4. 4. Description Description: : Dividend 5. 5. Debit Debit: :30 30, ,000 6. 6. GL GL Account Account: :3220 7. 7. Description Description: : Common 8. 8. Credit Credit: : 30 9. 9. Save Save 10. 10. List List Menu Journal Entry Journal Entry February 28 Entry Entry Window Window 28, , 2019 2019 01 3115 Dividend 000 3220 Common Stock 30, ,000 000 Account: :3115 Stock
15. Receipts Tasks 15. Receipts Tasks 1. 1. 2. 2. 3. 3. Tasks Tasks Menu Receipts Receipts Receipts Receipts Window 1. 1. Deposit Deposit Ticket 2. 2. Customer Customer ID 3. 3. Reference Reference: : R R02 4. 4. Receipt Receipt No 5. 5. Date Date: : February 6. 6. Apply Apply to to Invoices 1. 1. Invoice Invoice 51 2. 2. Pay Pay 7. 7. Journal Journal 1. 1. Accounting Accounting Behind 2. 2. OK OK 8. 8. Save Save 9. 9. List List Menu Window Ticket ID ID: : C C01 ID: : DT 01 DT02 02 02 CR2 2 No.: .: CR February 28 Invoices 28, , 2019 2019 51 Behind Screens Screens
29. Account Reconciliation Tasks 29. Account Reconciliation Tasks 1. 1. Tasks Tasks Menu 2. 2. Account Account Reconciliation Reconciliation 3. 3. Account Account Reconciliation Reconciliation Window 1. 1. Account Account to to reconcile reconcile: : 1110 2. 2. Statement Statement Date Date: : February 3. 3. Statement Statement Ending Ending Balance 4. 4. Status Status DT DT01 01: : 5. 5. Status Status DT DT02 02: : 6. 6. Foreign Foreign Deposits Deposits Adjust 1. 1. Interest Interest Income Income: :200 2. 2. Date Date: : February February 29 3. 3. Account Account: :4110 Menu Window 1110 February 29 Balance: : 60 29, ,2019 2019 60, ,650 650 Adjust (Short 200 29, ,2016 2016 (Short path) path) 4110
001: : 002: : 003: : 004: : Charge Adjust 500 29, ,2016 7 7. . Status Status CPV 8 8. . Status Status CPV 9 9. . Status Status CPV 10 10. . Status Status CPV 11 11. . Bank Bank Service 1. 1. Service Service Charges 2. 2. Date Date: : February 3. 3. Account Account: : 6110 12 12. . Un Un reconciled reconciled difference 13 13. . OK OK CPV001 CPV002 CPV 003 CPV 004 Service Charge Charges: :500 February 29 6110 Adjust (Short (Short path) path) 2016 difference: :0 0
Reports & Forms Reports & Forms 1. 1. Reports Reports & & Forms 2. 2. Financial Financial Statements 3. 3. Select Select a a Report Report or or Form 1. 1. <Standard> <Standard> Income 2. 2. Display Display : :(Net 3. 3. <Standard> <Standard> Retained 4. 4. Display Display : : (Ending 5. 5. <Standard> <Standard> Balance 6. 6. Display Display : :(Total 7. 7. <Standard> <Standard> Cash 8. 8. Display Display: : (Net Forms Menu Statements Menu Form Window Window Income Stmnt Stmnt (Net Income Income: : 29 Retained Earnings (Ending Retained Retained Earnings Balance Sheet Sheet (Total Asset Asset: : 102 102, ,300 Cash Flow Flow (Net increase increase <decrease> 29, ,300 300) ) Earnings Earnings: :9 9, ,300 300) ) 300) ) <decrease> in in cash cash: : 50 50, ,650 650) )


![[PDF READ ONLINE] LAS VEGAS TRAVEL GUIDE 2023: DISCOVERING THE EXCITEMENT AND BE](/thumb/2060/pdf-read-online-las-vegas-travel-guide-2023-discovering-the-excitement-and-be.jpg)


![textbook$ What Your Heart Needs for the Hard Days 52 Encouraging Truths to Hold On To [R.A.R]](/thumb/9838/textbook-what-your-heart-needs-for-the-hard-days-52-encouraging-truths-to-hold-on-to-r-a-r.jpg)