Understanding Blood Groups, Clotting Time, and Bleeding Time in Medical Practice

This informative material delves into the significance of determining blood groups, clotting time, and bleeding time in medical settings. From explaining the ABO and Rhesus systems to outlining the practical objectives and procedures for the assessments, this resource aims to enhance understanding of hemostasis and its applications in clinical scenarios.

Download Presentation

Please find below an Image/Link to download the presentation.
The content on the website is provided AS IS for your information and personal use only. It may not be sold, licensed, or shared on other websites without obtaining consent from the author. Download presentation by click this link. If you encounter any issues during the download, it is possible that the publisher has removed the file from their server.
E N D
Presentation Transcript
Blood Groups Clotting Time and Bleeding Time Dr.Felwah Al-Zaid
Aims of the Practical To determine: 1. Blood groups. 2. Clotting time. 3. Bleeding time.
Objectives At the end of this lab you should be able to: 1. Understand and practice the method used in determining blood groups (ABO and Rhesus (Rh) systems). 2. Determine your own Bleeding and clotting time compared to normal range of values expected for the bleeding and clotting time. 3. Recognize the importance of bleeding time and clotting time in haemostasis.
ABO Blood Groups ABO System: Group A: antigen A on RBC membrane antiB in plasma. Group B: Antigen B on RBC membrane AntiA in plasma. Group AB: Antigen A and B on RBC membrane NO antibodies in plasma. Group O: NO antigen on RBC membrane both AntiA and AntiB in plasma.
Rhesus Blood Group Rhesus antigen D: 1. Rhesus positive (Rh+ve): Antigen D on RBC (96-98%). 2. Rhesus negative (Rh-ve): NO Antigen D on RBC (2-4%).
Materials High titer anti-A, anti-B and anti-D sera. A grease pencil. Microscope slides. Alcohol swab and stylette.
Procedure Prick a finger and place one drop of blood in each of the compartments A, B and D (these are clearly labeled on the microscope slides provided). Quickly add a drop of anti-A, anti-B and anti-D sera to compartments A, B and D respectively. Mix the serum with the drop of blood by moving the slides gently for a minute or two. Examine the mixtures for signs of RBC agglutination or clump formation.
Clinical Applications Important in the following conditions: Blood transfusion. Hemolytic disease of the newborn (HDN). Blood products.
Clotting Time The time required for blood to form a clot. The normal coagulation time in glass tubes is 5 to 15 minutes. The whole blood clotting time is a rough measure of all intrinsic clotting factors in the absence of tissue factors. This simple test has been used to diagnose hemophilia. Its chief application is in monitoring anti- coagulant therapy.
Materials Capillary tubes of uniform size. A petri-dish. Alcohol swabs. Cotton wool. Plasticine. A water bath set at 37 C.
Procedure Clean finger with alcohol swap, prick it with lancet and note the time that the prick is made. Wipe away the first drop of blood. Then while the blood is still flowing freely place one end of a capillary tube in the blood. Holding the tube horizontally let it fill by capillary action, fill more than one tube. Close the end of the capillary tube with plasticine. Place the tube in the water bath.
Procedure Two minutes after making the puncture, break a capillary tube and separate the two halves slowly. Repeat the procedure at 30 second intervals with the remaining tubes. When the blood forms a continuous thread-like clot between the broken ends of the tube, the end-point has been reached, note the time. The time from pricking the finger to the appearance of the clot is the . clotting time
Results Usually the clotting time measured by this method is in the range 5-15 minutes. Prolong clotting time seen in deficiencies in the intrinsic coagulation pathway. Example: hemophilia due to deficiency of Factor VIII (8).
Clotting Time using Test Tube Method Place 2 ml blood into non heparinized test tube incubated in water bath. Every 30 second invert gentle to check for clot formation. Time from pricking finger to clot formation is clotting time.
Clotting Time using Test Tube Method Clot formed No Clotting
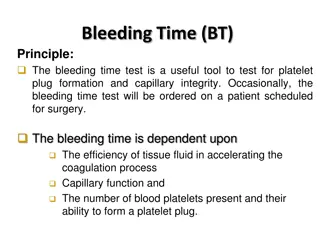
Bleeding Time Bleeding time is a test of platelet function. The time it takes for bleeding to stop (time for a platelet plug to form). Two methods are used: - Duke method. - Ivy method (The Standardized Template Method).
Duke Method Materials : Alcohol swabs. Filter paper. A stop-watch. A stylette to prick an ear lobe.
Procedure Clean the lobe of the ear with an alcohol swab. When it is dry, make a single puncture with a stylette (about 3mm deep). Note the time at which the puncture is made. The skin of the ear should not be touched once the puncture has been made until the experiment is over.
Procedure cont. Apply a piece of filter paper to the blood- drop every 30 seconds until the bleeding stops. The bleeding time estimated by this method of a normal subject is: 2-5 minutes.
The Standardized Template Method (Ivy method) A sphygmomanometer cuff is applied to the subject s arm and inflated to 40mmHg. The volar surface is cleaned with 70% alcohol. A sterile metal template with a linear slit (11mm long) is pressed firmly against the skin. A scalpel blade, with a guard, is carefully introduced so that it protrudes 1mm through the template slit. An incision, 1mm deep and 9mm long can then be made. Blood is gently, but completely removed with filter paper at 15 second intervals until the bleeding stops. Normal bleeding times determined with this method are in the range 2.5-9.5 minutes.
The Standardized Template Method (Ivy method)
Note If the bleeding time exceeds 15 minutes: - stop the procedure. - apply pressure to stop the bleeding. - report as greater than 15 min.
Clinical Application Bleeding time is prolonged in the following conditions: Platelet dysfunction. Blood vessel wall disorders. Von Willebrand Disease. Thrombocytopenia. Vitamin K deficiency. Medications: Aspirin.


")
")