Azure Support Tips and Recommendations
Learn essential tips for managing Azure subscriptions effectively, including how to increase quotas, transfer ownership, and view invoices. Discover recommended steps and best practices for a smooth Azure support experience.

Download Presentation

Please find below an Image/Link to download the presentation.
The content on the website is provided AS IS for your information and personal use only. It may not be sold, licensed, or shared on other websites without obtaining consent from the author. Download presentation by click this link. If you encounter any issues during the download, it is possible that the publisher has removed the file from their server.
E N D
Presentation Transcript
First Aid Kit for Azure Support Scenarios October 2017
Subscription Management Support
Good to know Know the Service-specific quota limits Very large quota requests may take more than a day to be processed Depending on how many cores are requested, a simple credit check initiated by the Support Team may be required Recommended approach Step 1: Visit the Azure Portal and click on Help + Support and open a new support request. How do I increase Azure Quota? Step 2: Click Quotas under Issue Type and select the type of subscription for which you want to change the quota. Step 3: Choose the resource type where you want to increase the quota. Example 1: Increase number of cores Example 2: Increase Storage Step 4: Enter your preferred contact method and contact information and create the support case January 2017
Recommended approach Step 1: Sign in at https://account.windowsazure.com/Subscriptions. Step 2: Select the subscription to transfer. Step 3: Click the Transfer Subscription option. Step 4: Specify the recipient (the recipient will automatically get an email with a acceptance link). Step 5: Instruct the recipient to clicks on the link and follow the instructions, including entering their payment information. Good to know How do I transfer ownership? Azure also offers self-serve account ownership transfer for Pay-As-You-Go MSDN, Action Pack, and BizSpark customers, removing the need to open a support case for this process For those not using these self-serve options, please contact support for free assistance with your desired source and destination subscription details There will be no impact to service during a subscription transfer For more information you can visit this blog If the subscription is a member-offer with associated benefits, it can only be transferred to an account with the same member-offer with associated benefits (such as MSDN, BizSpark etc.). For information on transferring an EA subscription visit this quick guide Important CSP subscriptions require a support request through the Partner Center. Ownership transfers are only allowed between CSPs. An agreement document (available on the Partner Center) must be signed by both providers. January 2017
Recommended approach Step 1: Sign into Azure Portal, select Billing, select the relevant subscription and click on Invoices to view its billing information Step 2: View your invoice a) Email: Click on Email invoice , then choose Opt in b) Download: Click on Download invoice to open a PDF copy of the selected period s statement How do I view my invoice? Good to know Invoice Summary: Lists the total amount currently owed, including this month s charges, any previous balances, discounts, credits etc. Important For daily break downs of usage charges for each resource and more details about the .CSV file, please see the How do I understand my Detailed Usage report scenario. For more details about your bill, visit this doc If you need additional support or have additional questions about your bill, open a support ticket under Billing
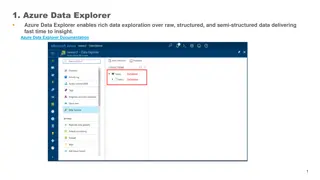
Recommended approach Step 1: Sign into Azure Account Center as Account Administrator. Step 2: Select the subscription for which you want usage information Step 3: Select BILLING HISTORY Step 4: Select View Current Statement to see an estimate of your charges at the time the estimate was generated Step 5: Select Download Usage to download the daily usage as a CSV file Good to know There are two versions of the detailed file. Both versions include a monthly and daily usage table with a row for each billable resource. Version 2 contains the same information as Version 1, yet with added fields and slight name variance for additional clarity. Version 2 is shown below. For more information and full list of field definitions, please visit this blog. 1 2 How do I view my Detailed Usage report? 3 Version 2 monthly usage table Version 2 daily usage table 1 2 4 5 Consumed Quantity: Contains the amount of the resource that has been consumed for this month/day. 2 Meter name: The unit of measure for the resource being consumed (compute hours, database units etc.). 1 Resource Group: New column addition. The resource group in which the deployed resource is running in. Refer to this article for more details. 4 Overage Quantity: If the Consumed amount exceeds the included amount, this column displays the difference. You are billed for this amount. For Pay-As-You-Go offers with no amount included with the offer, this total will be the same as the Consumed quantity 3 Tags: New resource types in Azure allow you to add custom tags, e.g. "Production", "Testing", "E-shop project", "Marketing Department etc. Refer to this article for more details. 5
Recommended approach Introduction: The Service Level Agreement (SLA) describes Microsoft s commitments for uptime and connectivity. A service incident is reported when Azure services experience an issue that impacts uptime or connectivity, often referred to as an outage. If we do not achieve and maintain the Service Levels for each Service as described in the SLA, then you may be eligible for a credit towards a portion of your monthly service fees. Step 1: Log on to the Azure Portal. If you have multiple accounts, make sure you use the one that was affected by Azure downtime (this helps Support automatically collect the necessary background information and resolve the case faster). Step 2: Create a new support request Step 3: Select Billing under Issue type Step 4: Select Refund Request under Problem type Step 5: Add details to specify that you re asking for an SLA credit, mentioning the date/time/time-zone as well as the impacted services (VMs, Web Sites, etc.) Step 6: Check your contact details and click Create to submit your request How do I request SLA credit for a service incident? Good to know SLA threshold varies by service e.g. 99.9% for SQL Web Tier, 99.95% for VMs, 99.99% for SQL Standard Tier For some services, there are conditions in the SLA e.g. Virtual Machines need to have two or more instances deployed in the same Availability Set For more information please visit the SLA documentation page and the SLA summary page for Azure services
Recommended approach Step 1: Visit Azure Resource Health to check the health of the VM and Azure status. Step 2:Learn about boot diagnostics for Windows and Linux. Step 3: Open a Support ticket under Technical and select Problem type: Management and Category: Virtual machine restarts. Good to know Unexpected reboots are generally a result of one of the following: Planned maintenance: Azure periodically performs updates to improve the reliability, performance, and security of the host infrastructure for virtual machines. For more info, please read the following content for both Linux and Windows. To understand more about how customers are notified and actions that they can take, please read the following Windows and Linux content. Unplanned maintenance: Occurs when the hardware or physical infrastructure underlying your virtual machine has faulted in some way. This may include local network failures, local disk failures, or other rack level failures. When such a failure is detected, the Azure platform will automatically migrate your virtual machine from the unhealthy physical machine hosting your virtual machine to a healthy physical machine. Such events are rare, but may also cause your virtual machine to reboot. Learn more about managing availability here. Learn how to easily diagnose and recover your Virtual Machines from boot failures for Windows and Linux. Important What is the root cause of my VM restart? Proactive maintenance: customers (administrator/co-administrator) are sent notifications of upcoming planned maintenance (by AZCOMM). Customers also have portal toast notifications of planned maintenance. Be aware of Guest OS updates that can be enabled or disabled. If a VM is restarting, the status, (listed in the Azure Management Portal) will be shown as Starting. After a restart, restart details can be found in the Azure Management Portal under Management Services (click Operations logs). View Reboot Logs is available on Classic VMs in the Dashboard of the Cloud Service in current portal and in Boot Diagnostics in Ibiza Portal. Boot Diagnostics is available for RM VMs
Recommended approach After each troubleshooting step below, try reconnecting to the VM: After each troubleshooting step below, try reconnecting to the VM: 1. Reset your RDP connection. Select your VM in the Azure portal. Click Support + Troubleshooting near bottom of list. Click Reset Password button. Set the Mode to Reset Configuration only and then click Update. 2. Verify Network Security Group rules. See Using Effective Security Rules to troubleshoot VM traffic flow 3. Review VM boot diagnostics. See Boot Diagnostics for VMs 4. Review the NIC for the VM. See how to reset NIC for Azure Windows VM 5. Check the VM Resource Health. Select your VM in the Azure portal. Click Support + Troubleshooting near bottom of list. Click the Resource health button. A healthy VM reports as being Available. 6. Reset user credentials. Select your VM in the Azure portal. Click Support + Troubleshooting near bottom of list. Click Reset Password button. Set the Mode to Reset Password and then enter your username and new password. Finally, click the Update button. 7. Restart your VM. Select your VM in the Azure portal and click the Overview tab. Click the Restart button. 8. Redeploy your VM. Select your VM in the Azure portal. Click Support + Troubleshooting near bottom of list. Click the Redeploy button and then click Redeploy. I can t connect to my VM Good to know Best practice: Ensure the VM is backed up through the Backup blade before Windows Update, Software Update and In-Place OS upgrades to allow direct reboot of the VM in case of issues. Deep dive troubleshooting guides: Troubleshoot Remote Desktop connections to Windows VMs Troubleshoot SSH connections to a Linux-based VM Troubleshoot an application running on Azure VMs Additional information: Learn about the new Boot Diagnostics feature that can be very helpful in these situations For Windows: read more about troubleshooting Remote Desktop connections and how to reset Remote Desktop service For Linux: read more about how to reset the SSH configuration Use WaAppAgent.log to check if a NIC was presented to the VM; learn how to present a NIC
Recommended approach Step 1: Start with the fundamentals Make sure you are aware of different VM sizes Configure a VM for optimal storage performance design, scalability and Performance targets. Optimize your Linux VM on Azure . Step 2a: Learn about Azure PerfInsights For Guest VM Perf analysis use Perfinsights to analyze and troubleshoot resource bottlenecks. Step 2b: Learn about Azure diagnostics Learn about general diagnostic extensions and enable diagnostics for your VM to collect telemetry Use PowerShell to enable Azure Diagnostics in a VM running Windows I have VM performance issues, what do I do? Step 3: Learn about troubleshooting Use metrics and tools to troubleshoot Windows or Linux VM Performance issues. Explore end-to-end troubleshooting options using Azure Storage Metrics and Logging, AzCopy, and Message Analyzer Try Advanced Troubleshooting for Azure Storage Good to know The number one root cause of VM performance issues is related to wrong storage configuration. Another common issue is that the amount of storage is a limiting factor for the workload. Read this article for generic troubleshooting info for VMs running on Linux or Windows.
Before you start Ensure that you have both a Premium storage account and Premium Storage capable VMs Download a tool such as AzCopy or PowerShell to upload the VHD into the storage account If you are creating an Azure Resource Manager VM from a specialized VHD Disk, please refer to this template for deploying Resource Manager VM using existing disk Recommended approach If you are migrating existing Azure VMs to Azure Premium Storage: How do I migrate my Azure VMs to Premium Storage? Step 1: Prepare VHDs for migration If needed, generalize VHD using sysrep utility For data disks, make sure the VM is shut down Step 2: Create the destination for your VHD Go to Azure Portal Fill out the storage information Step 3: Copy VHD with AzCopy or PowerShell Find container path and storage account key in Azure Portal > Storage Copy using AzCopy or PowerShell. See public documentation for more details.
Before you start Ensure that you have both a Premium storage account and Premium Storage capable VMs Download a tool such as AzCopy or PowerShell to upload the VHD into the storage account If you are creating an Azure Resource Manager VM from a specialized VHD Disk, please refer to this template for deploying Resource Manager VM using existing disk Recommended approach ? If you are migrating VMs from other platforms to Azure Premium Storage: Step 1: Export VHD to a local directory and have the complete source path of the local directory where VHD is stored handy How do I migrate my non- Azure VMs to Premium Storage? Step 2: Create the destination for your VHD Go to Azure Portal Fill out the storage information Step 3: Upload the VHD to Azure Storage Find container path and storage account key Upload using AzCopy or PowerShell Other upload options: Azure Storage Copy Blob API, Azure Storage Explorer, or Azure Import/Export service
Recommended approach Solution 1: Stop all ARM VMs in same Availability Set and retry the deployment. Azure Platform will be able to move all VMs into a cluster with more capacity. Solution 2: Wait and try again. The Azure Platform continuously adjusts compute capacity in order to best accommodate customer needs. By waiting and reattempting a deployment, you may find that there is additional space to accommodate the VM deployment request. Solution 3: Attempt to deploy the VMs in a new region. The new region may be more readily equipped to store the VMs at that time. If the allocation error persists, then open a support ticket. I just got an allocation error. What do I do? Good to know Allocation errors can occur when you: Create a VM Restart stopped (de-allocated) VMs Resize a VM1 Deploy Cloud Services in Azure Visit these articles to learn about troubleshooting allocation failures: Windows Linux 1. Availability Sets pin VMs to a particular cluster that may only support certain sizes. If a customer tries to resize a VM to an unsupported one, they will receive an error that notes: The requested VM size may not be available in the resources supporting the existing allocation. Please try again later, try with a different VM size or create a VM with a new availability set or no availability set binding. However, ARM is able to move Availability Sets to a different cluster that supports that size but they must be the same series as the other VMs in the Availability Set.
Recommended approach Note: Azure has two different resource deployment models: Classic (v1) and Resource Manager (v2). This article covers the image capture process for the Classic (v1) deployment model. Step 1: Prepare the guest OS by either running sysprep and selecting Generalize + Shutdown + OOBE options (Windows) or using sudo waagent deprovision+user (Linux). Step 2: If your VM was prepared on-premises, upload the VHD to Azure. Step 3: Capture the image in Azure, ensuring that you check the I have run sysprep box (Windows) or I have run waagent deprovision+user box (Linux) when entering the Name and Description. Visit the links below for detailed information on the processes for Windows and Linux: Upload a VHD and capture: Windows guidelines Linux guidelines Capture an image from an existing VM: Windows guidelines Linux guidelines Good to know There s a provision failure for my custom v1 (classic) VM image, what should I do? Provision failures may result in two common errors: 1. VM failed to provision: Restart the VM and retry connection, if error persists open a Support case. 2. VM stuck at OOBE (Out-of-the-box experience) screen, VM started but can t RDP: Run Boot Diagnostics to check the VM status. If that doesn t help then recapture the image following the steps above or open a Support case. Important Learn about the benefits and limitations of sysprep here Troubleshoot common deployment issues in Linux and Windows For an on-premises VHD, read this article to review other potential steps
Recommended approach Note: Azure has two different resource deployment models: Classic (v1) and Resource Manager (v2). This article covers the image capture process for the Resource Manager (v2) deployment model. Step 1: Prepare the guest OS by either running sysprep and checking the Generalize box (Windows) or using sudo waagent deprovision+user (Linux). Step 2: If your VM was prepared on-premises, upload the VHD to Azure. Step 3: Capture the image in Azure, ensuring that you have first marked your VM as Generalized in Azure through PowerShell or the Command Line Interface. Visit the links below for detailed information on the processes for Windows and Linux. Upload a VHD and capture: Use the Add-AzureRMVhd cmdlet Use the CLI command for Linux Capture an image from an existing VM: Windows guidelines Linux guidelines There s a provision failure for my custom v2 (ARM) VM image, what should I do? Good to know Provision failures may result in two common errors: 1. VM failed to provision: Restart the VM and retry connection, if error persists open a Support case. 2. VM stuck at OOBE (Out-of-the-box experience) screen, VM started but can t RDP: Run Boot Diagnostics to check the VM status. If that doesn t help then recapture the image following the steps above or open a Support case. Important Learn about the benefits and limitations of sysprep here Troubleshoot common deployment issues in Linux and Windows For an on-premises VHD, read this article to review other potential steps
Recommended approach Step 1: Plan and design your VPN connection There are two VPN types: Policy-based (previously called static routing gateways) Route-based (previously called dynamic routing gateways) Step 2: Configure your site-to-site VPN connection Visit the general how to guide for creating site-to-site VPN connections through the Azure Portal Step 3: Review guides for specific appliances Find detailed step-by-step configuration processes here: How do I configure my security system with an Azure VPN? Checkpoint Cisco ASA Fortinet Dell SonicWall Palo Alto Networks Juniper SSG Juniper SRX Good to know For more information, screenshots and specific commands for each step visit this Github documentation or the Azure documentation about VPN gateways.
Recommended approach Step 1: Check the status of Azure Visit the Service Health Dashboard and Reliability Site to ensure that Azure is not experiencing an outage that may be causing the error Step 2: Troubleshoot your customer s application to find the root cause Step 2a: Review the web server HTTP logs to determine the HTTP sub-status code This gives more context that can help isolate a cause of the error. Application logging can be helpful in determining where a problem exists in application code. More information on enabling logs here. For details on sub-status codes, visit this page. Step 2b: Troubleshoot the long-running request to resolve the issue if the SLA timeout module times out a request for taking too long (sub-status code 121 ) Step 2c: Disable Friendly HTTP Error Messages in Internet Explorer if there is an application failure Read this for more information Step 2d: Read about how to remote debug here for remote debugging in Visual Studio, which can help determine the cause of an HTTP 500 error Why am I seeing a 500 error in my Web App? Step 3: If necessary, open a Support ticket In the Azure Portal select Technical Problem type: Performance, Errors and Other Application Issues and Category: Run-time error. Important Don t assume that an HTTP 500 error is an application error. There are situations where a problem in Azure can cause this. For example, if a customer s code access Azure Storage and there is an LSI occurring in Storage, a customer s app may expose this as a 500 if they are not properly handling errors. Giving customers guidance on best-practices for cloud applications is a good step in these cases. The Azure Resiliency Technical Guide is a good resource. Customers can configure Azure Traffic Manager to avoid problems due to an Azure LSI. You can find guidance on that here.
Before you start Migration can be performed through either PowerShell or Command-Line Interface (CLI) Check for unsupported features or configurations Review the doc on planning migration of IaaS resources To preserve the public IP address, reserve it before triggering the prepare operation. Plan migration during non-business hours to accommodate for any unexpected failures that might happen during migration. Download the current configuration of the VMs by using PowerShell, command-line interface (CLI) commands, or REST APIs to make it easier for validation. Update your automation/operationalization scripts to handle the Resource Manager deployment model before starting the migration. Evaluate the RBAC policies that are configured and plan for after the migration is complete. Recommended approach How do I migrate my VMs from Classic to ARM? Use the appropriate PowerShell or CLI commands to perform the following steps: 1. Validate: Ensure that all resources are capable of migration 2. Prepare: Simulate the transformation of the IaaS resources from classic to Resource Manager resources and present this side by side for you to visualize 3. Check (manual or scripted): Optionally use PowerShell or CLI script to check that the migration looks correct. Alternatively, sign in to the portal and spot check the properties and resources to validate that metadata migration looks good. 4. Abort: Optional step to revert changes to the classic deployment model and stop the migration 5. Commit: Once you complete this step resources do not appear anymore in classic and are available only in the Resource Manager deployment model. The migrated resources can be managed only in the new portal. Important Details on the migration workflow and FAQs Lessons Learned, Recommend Practices and Additional insights gained from enterprise customer migrations How to mitigate common errors Find full set of docs on migration here
Recommended approach Step 1:Log into the EA Portal with the initial Enterprise Administrator account information Step 2: Click Manage from the left navigation and click on the Account tab Step 3: Hover over the account you wish to change to make the action items appear on the right, then click the transfer subscriptions icon (the icon on the far right) EA EA EA EA Step 5: Choose the target account, then click the Submit button to confirm Step 4: Choose the subscriptions you wish to transfer, then click the Next button to confirm How do I transfer my EA subscription? Good to know Good to know Supported transfers: Work/School account to another Work/School account Microsoft account to a Work/School account Microsoft account to another Microsoft account (Please note: the target Microsoft Account must have created an Azure subscription in order for it to be a valid target account. If the account is empty, please ask the Microsoft Account owner to first create an empty Azure subscription before attempting the transfer of subscriptions to the account) Unsupported transfers: Work/School account to Microsoft account Before processing a subscription transfer, the account owner is advised to visit the Azure Portal to take a screenshot of the subscription s current service administrator and co-administrators. After the transfer of subscription(s) is complete, the new account owner needs to log on to the Azure Portal, click into the relevant subscription and select the edit subscription details option on the right to either add or revoke service administrator and co-administrator access as appropriate.
Recommended approach Step 1:Log into the EA Portal with the initial Enterprise Administrator account information Step 2: Click Manage from the left navigation and click on the Account tab Step 3: Hover over the account you wish to change to make the action icons appear on the right, then click on the change account owner icon (the third icon from the left) Step 4: Select the new account owner Step 6: Review the confirmation page How do I change account owners? Step 5: Click the Next button Step 7: Click the Submit button Test Test Example Good to know The selection box will highlight eligible transfer candidates in dark bold text. Candidates are made eligible by being active and having created at least one subscription. EA Account Owners cannot use the same login for the EA and other Azure offers. Doing so will convert the other Azure subscriptions (e.g. MSDN Benefits, BizSpark, MPN etc) that they own into EA.
Recommended approach Step 1:Log into the EA Portal with the initial Enterprise Administrator account information Step 2: Click Manage from the left navigation and click on the Account tab Step 3: Click +Add Account in the top right corner of the screen Step 4: To create a new account, enter the account owner email address (if the account owner has an active Pay as You Go/MOSP account, this will transition the account and its subscriptions to the EA account) Step 5: Confirm ownership by signing in to the EA Portal with the account owner email address Good to know How do I add an account? The association of an account and its subscriptions happens on the day the account owner signs into the enterprise portal and thereby confirms association of the account owner email address Existing subscriptions transferred to an Enterprise Enrollment will be immediately transitioned to billing on the Enterprise Enrollment on that day The account owner is responsible for paying any outstanding charges on the payment instrument prior to the association date All usage on transferred accounts will be billed based on terms of the Enterprise Enrollment. Subscriptions that were using a different offer type for payment, like Pay As You Go on a credit card, will be converted to Enterprise Offers. The automated process will rename the subscription appending the words converted to EA to the end of the subscription name so that you know it has made that transition. Important If an account has subscriptions with special pricing (including no charge services), once transferred, the account will begin incurring costs based on the terms of the Azure Amendment to the Enterprise Enrollment.
Recommended approach Before you start: The Account Owner is the user role that can add new subscriptions on the EA Portal Step 1: Log into the EA Portal with the Account Owner credentials Step 2: Select the Admin tab and navigate to Subscription on the top ribbon Step 3: Click +Add subscription Step 4: Click Purchase PLEASE NOTE: The first time you add a new subscription to your enrollment from the enterprise portal, you will be asked to accept the MOSA agreement and Rate Plan. These sections are NOT Applicable to EA customers, but are necessary to provision the subscription. Step 5: Fill out contact information and click the How do I add a new subscription? Sign Up button Good to know Subscription creation can take a few minutes so tutorials are offered while you wait When the subscription is ready, you will see a link to the management portal. You will need to come back to the account portal to customize the subscription name or sign up for preview features All new subscriptions will be added with the default Microsoft Azure Enterprise name. Therefore it is important to update the subscription name so that it is recognizable on reports at the enterprise level