Effective Troubleshooting Process Overview
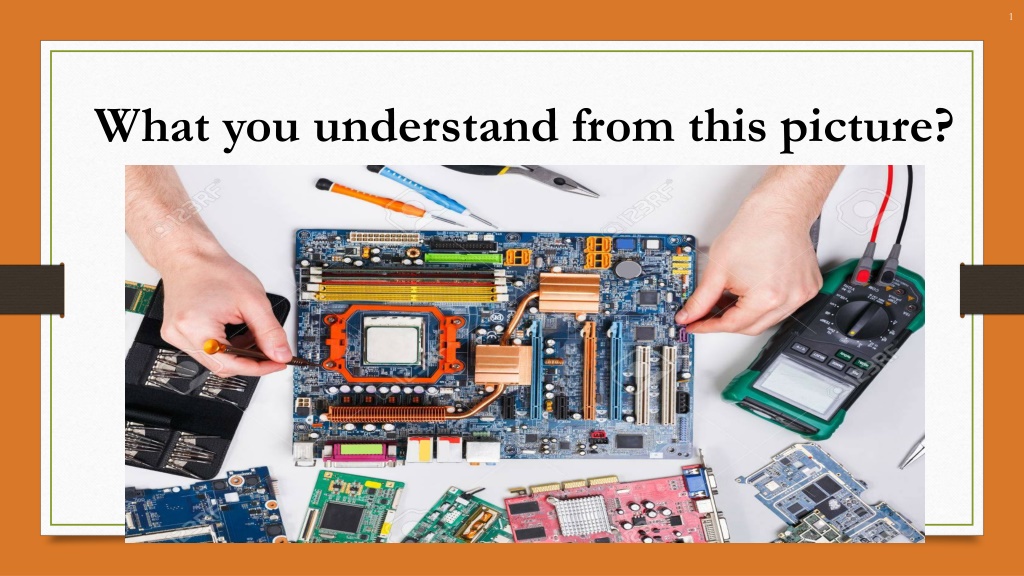

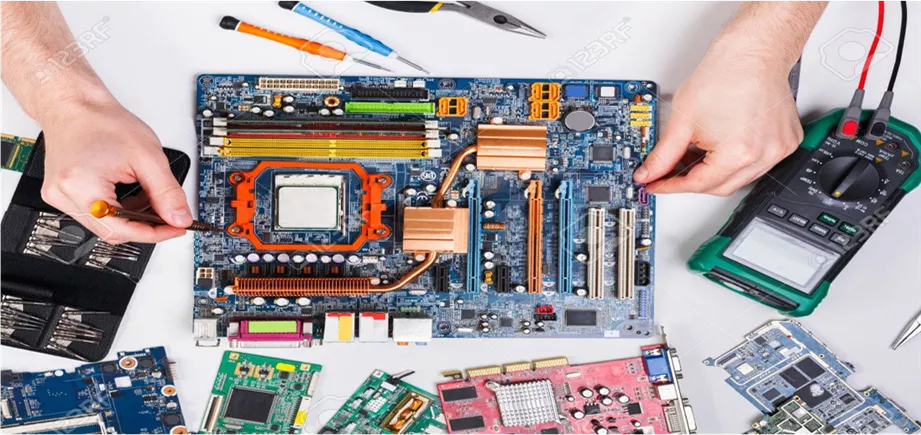
What you understand from this picture?
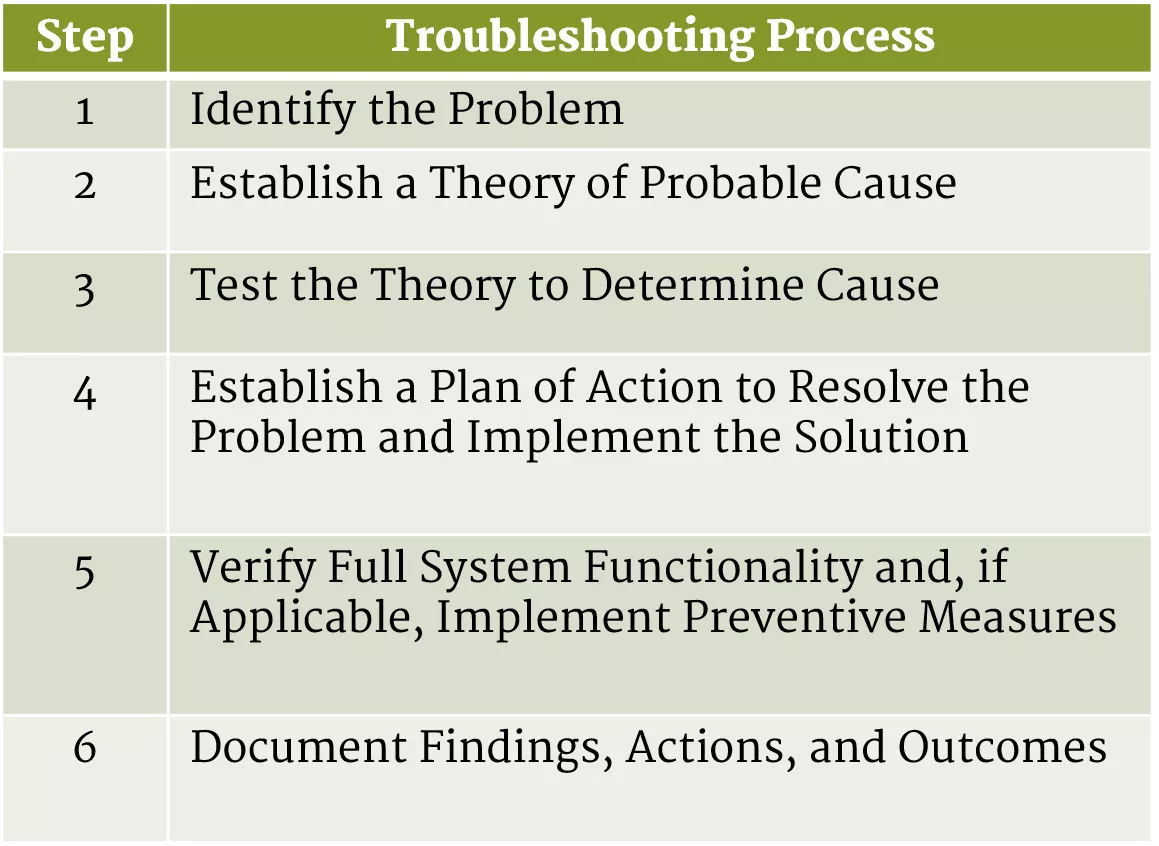
1

The Troubleshooting Process
Follow an organized and
logical procedure.
Eliminate variables one at a
time.
Troubleshooting is a skill that
is refined over time.
The first and last steps
involve effectively
communicating with the
customer.
2
Data Protection
Before troubleshooting problems,
always
follow the necessary precautions to
protect data on a computer.
If unsure that a backup has been done, do not attempt any troubleshooting
activities until the following are verified:
o
Date of the last backup
o
Contents of the backup
o
Data integrity of the backup
o
Availability of all backup media for data restore
If no backup can be created, ask customer to sign a
release form
.
Troubleshooting Process Steps
Step 1 - Identify the problem
During the troubleshooting process, gather as much information from the customer as possible,
but
always be
respectful
.
Use the following strategy during this step:
1.
Question the user.
Ask the person who reported the problem detailed questions about the
issue.
2.
Identify any changes made to the computer.
Look at the computer. See if any new
hardware has been installed or plugged in.
3.
Review log files.
Review any and all log files that you have access to that can tell you more
information about the problem.
4.
Inquire as to any environmental or infrastructural change.
Perhaps there was a change
on the computer network, or a new authentication scheme is in place.
5.
Review documentation.
Your company might have electronic or written documentation that
logs past problems and solutions.
Troubleshooting Process Steps
Step 2 - Establish a theory of probable cause
Create a list of the most common reasons why the error would occur.
Start with the easiest or most obvious causes at the top.
Troubleshooting Process Steps
Step 3 – Test the Theory to Determine cause
Determine the exact cause by testing the theories of probable cause one at a time,
starting with the quickest and easiest.
After identifying an exact cause of the problem, determine the steps to resolve the
problem.
If the exact cause of the problem has not been determined after all theories have
been tested, establish a new theory of probable causes and test it.
Troubleshooting Process Steps
Step 4 – Establish a Plan of Action to Resolve the Problem and Implement the
solution
After the exact cause of the problem is determined, establish a plan of action to resolve the
problem and implement the solution.
Sometimes quick procedures can determine the exact cause of the problem or even
correct the problem.
Troubleshooting Process Steps
Step 5 – Verify Full System Functionality and, If Applicable,
Implement Preventive Measures
Verify full system functionality and implement any preventive
measures if needed.
Ensure that you have not created another problem while
repairing the computer.
Troubleshooting Process Steps
Step 6 – Document Findings, Actions, and Outcomes
•
Discuss the solution with the customer
•
Have the customer confirm that the problem has been solved.
Document the process:
•
Problem description
•
Steps to resolve the problem
•
Components used in the repair
Troubleshoot Problems Related To
Motherboards, Ram, Cpus, And Power
Troubleshooting Motherboards
1. First and probably the most common of these rarities are
UEFI/BIOS firmware issues.
-
Need to flash the motherboard’s BIOS to the latest version.
-
For example, a new CPU or RAM might not be recognized at the correct
clock speeds.
-
An adapter card might not be seen properly. Or perhaps Windows isn’t
working as it should be with the hardware in the system.
-
Updating the BIOS can fix many of these issue
Troubleshoot Problems Related To
Motherboards, Ram, Cpus, And Power
Troubleshooting Motherboards
2. Electrostatic discharge (ESD) and other electrical issues.
-
These might present themselves intermittently.
-
For example, the computer reboots out of nowhere or you receive random stop errors, also
known as Blue Screens of Death (BSODs).
-
Swap out the motherboard with a known good one to see if the issue happens again when
running through the same processes.
-
Be sure to use a surge suppressor or uninterruptible power supply (UPS) to protect your
equipment and, of course, implement antistatic measures whenever you work inside a system.
Troubleshoot Problems Related To
Motherboards, Ram, Cpus, And Power
Troubleshooting Motherboards
3. Component failures.
It is possible that a single component of the motherboard (for example, the
SATA controller) can fail, but the rest of the motherboard works fine.
-
To fix a problem such as a SATA controller failure, a separate PCIe SATA
controller card can be purchased.
-
Then can connect the hard drives to the new controller and disable the
original integrated SATA controller in the BIOS.
Troubleshoot Problems Related To Motherboards,
Ram, Cpus, And Power
Troubleshooting Motherboards
4. Manufacturing defects and failed motherboard components.
-
Printed circuit boards (PCBs), such as motherboards, are mass-produced at high speeds.
-
Problems might be found immediately when receiving a motherboard.
-
If you suspect a manufacturing defect, you should return the motherboard.
-
Motherboard component failure can also manifest itself over time, such as in the form of
distended capacitors.
-
This is when a capacitor becomes swollen and possibly leaks electrolytic material; this bulging can
cause the system to unexpectedly restart or shut down, cause a BSOD, or cause other errors.
-
The affected capacitor(s) should be replaced right away.
Troubleshoot Problems Related To Motherboards,
Ram, Cpus, And Power
Troubleshooting CPUs
1.
Always check the power first, just in case—the main power connections and the 8 or 4-pin
CPU power connection.
2.
Fan is connected and functional:
Some motherboards have a safeguard that disables
booting if the fan is defective or not plugged in.
3.
Check other major components:
Remember that the CPU is a part of a bigger system;
one in which other components are more likely to be the cause of many problems.
4.
Heat sink is connected properly:
Make sure that the heat sink is flush with the CPU cap
and that it is securely fastened to the motherboard (or socket housing).
5.
CPU is installed properly:
Make sure it was installed flush into the socket and that it was
oriented correctly.
Troubleshoot Problems Related To
Motherboards, Ram, Cpus, And Power
Troubleshooting RAM
- A lot of the issues because a user has purchased and installed a memory stick that
is not compatible, or is semi-compatible, with the motherboard: wrong speed,
incorrect capacity, improper configuration, and so on.
- Check the RAM compatibility against the motherboard.
Verify compatibility of RAM with
the motherboard when
troubleshooting!
Troubleshoot Problems Related To Motherboards,
Ram, Cpus, And Power
Troubleshooting RAM
Here are some possible symptoms of a RAM issue and corresponding
troubleshooting techniques:
1.
Computer will not boot/intermittently shuts down:
If there is no RAM in the
computer, or if the RAM is damaged or not installed securely, it can prevent the
computer from doing anything at all (aside from draining electricity from your AC
outlet).
2.
BIOS indicates a memory error:
The BIOS can indicate a memory error through
a gray message on the screen and a flashing cursor or by beeping. If it beeps, you
need to reference your motherboard documentation for the specific beep codes.
Troubleshoot Problems Related To
Motherboards, Ram, Cpus, And Power
Troubleshooting RAM
3. Stop error, aka BSOD or Blue Screen of Death:
This is a critical system
error that causes the operating system to shut down. Most of the time, these
are due to device driver errors (poor code), but they can be associated with a
physical fault in memory.
Troubleshoot Problems Related To Motherboards,
Ram, Cpus, And Power
Troubleshooting Power Supply Issues
Here are several of the issues might encounter with power supplies:
• Fan failure
• Fuse failure
• Quick death
• Slow death.
- Your best friends when troubleshooting power supplies are going to be a power supply tester,
and your eyes and ears.
- Always make sure that the power supply cable connects from the power supply itself to a
properly wired AC outlet properly before troubleshooting further.
Troubleshoot Problems Related To Motherboards,
Ram, Cpus, And Power
Troubleshooting Power Supply Issues
-
Check all of the internal power connections.
Make sure they are connected firmly. To test
these connections, use a power supply tester.
-
If there are error readings, error lights, no
lights, or missing lights for specific voltages
on the tester, you should consider replacing
the power supply; or if it is modular, replace
that particular power cable.
PSU Tester Testing the 24-pin ATX
power connector.
Troubleshoot Problems Related To Motherboards, Ram,
Cpus, And Power
Troubleshooting Power Supply Issues
-
Remember that connections sometimes can be jarred loose inside and
outside the computer.
-
Check the IEC cord on both ends and all power connections inside the
computer. This includes the main motherboard connector as well as
the CPU, Molex, SATA, and PCIe connectors.
-
Any single loose connector can have “interesting” results on your
computer.
Troubleshoot Problems Related To Hard Drives And Raid
Arrays
Troubleshooting Hard Drives
1.
BIOS does not “see” the drive:
If the BIOS doesn’t recognize the drive
you have installed, you can check a few things.
-
First, make sure the power cable is firmly connected and oriented properly.
-
Next, make sure SATA data cables are fully seated in the ports, and weren’t
accidentally installed upside down; if you find one that was, consider
replacing it because it might be damaged due to incorrect installation.
2.
Windows does not “see” a second drive:
There are several reasons why
Windows might not see a second drive. Maybe a driver needs to be installed for
the drive or for its controller.
Troubleshoot Problems Related To Hard Drives
And Raid Arrays
Troubleshooting Hard Drives
3.
Slow reaction time:
If the system runs slow, it can be because the drive has become
fragmented or has been infected with a virus or spyware. Analyze and defragment the drive.
4.
Missing files at startup:
If you get a message such as BOOTMGR Is Missing, the file
needs to be written back to the hard drive.
-
In severe cases, this can mean that the drive is physically damaged and needs to be replaced.
-
If this happens, the drive needs to be removed from the computer and slaved off to another
drive on another system.
-
Then the data must be copied from the damaged drive to a known good drive (which might
require a third-party program), and a new drive must be installed to the affected computer
Troubleshoot Problems Related To Hard
Drives And Raid Arrays
Troubleshooting Hard Drives
5.
Other missing/corrupted files:
Missing or corrupted files could be the result of hard
drive failure, operating system failure, malware infection, user error, and so on.
-
If this happens more than once, be sure to back up the rest of the data on the drive, and
then use the preventative methods mentioned previously, especially defragmenting and
scanning for malware.
6.
Noisy drive/lockups:
If your SATA magnetic disk drive starts getting noisy, it’s a sure sign
of impending drive failure.
-
Need to connect the drive to another computer immediately and copy the data to a good
drive.
R
e
m
i
n
d
e
r
!
h
a
r
d
d
r
i
v
e
s
w
i
l
l
f
a
i
l
,
s
o
i
t
i
s
i
m
p
o
r
t
a
n
t
t
o
m
a
k
e
b
a
c
k
u
p
s
o
f
y
o
u
r
d
a
t
a
.
T
h
e
b
a
c
k
u
p
m
e
d
i
a
o
f
c
h
o
i
c
e
w
i
l
l
v
a
r
y
d
e
p
e
n
d
i
n
g
o
n
t
h
e
o
r
g
a
n
i
z
a
t
i
o
n
.
I
t
c
o
u
l
d
b
e
t
h
e
c
l
o
u
d
,
a
s
e
c
o
n
d
a
r
y
s
y
s
t
e
m
,
D
V
D
-
R
O
M
d
i
s
c
s
,
e
v
e
n
U
S
B
f
l
a
s
h
d
r
i
v
e
s
.
I
t
d
i
f
f
e
r
s
b
a
s
e
d
o
n
t
h
e
s
c
e
n
a
r
i
o
.
Troubleshoot Problems Related To Hard
Drives And Raid Arrays
Troubleshooting RAID Arrays
-
They might stop working or the OS could have trouble finding them. If you see an
issue like this, check whether the hard drives are securely connected to the controller
and that the controller (if an adapter card) is securely connected to the motherboard.
-
Also, if you use a RAID adapter card or external enclosure, and the motherboard also
has built-in RAID functionality of its own, make sure you disable the motherboard
RAID within the BIOS—it could cause a conflict.
-
Verify that the driver for the RAID device is installed and updated.
-
Finally, check if any of the hard drives or the RAID controller has failed. If a RAID
controller built into a motherboard fails, you will have to purchase a RAID adapter
card.
Troubleshoot Problems Related To
Hard Drives And Raid Arrays
Troubleshooting RAID Arrays
-
To configure Intel RAID a technician needs
to press CTRL + I when the system first
boots up, perhaps even before the BIOS on
some systems. From there, the RAID array
can be configured as shown in picture.
-
There is a RAID 1 Mirror, but that the status
is “Degraded”. That means that the array has
failed, or has been deconstructed in some way.
Intel RAID Configuration
Screen
Troubleshoot Problems Related To
Hard Drives And Raid Arrays
•
Troubleshooting RAID Arrays
-
One way to check the status of a
RAID array is to use S.M.A.R.T.
For example, in picture you can see
the S.M.A.R.T. information screen
for one of the disks in a RAID 1
mirror of a NAS device.
S.M.A.R.T. Information and
Status of a NAS Hard Drive
Troubleshoot Video, Projector, And
Display Issues
Video Troubleshooting
1. Connections
-
If nothing is showing up on the display, first make sure that the monitor is
plugged into the video card properly (and to the correct video port), and then
verify whether the monitor is connected to the AC outlet and is powered on.
-
Check which video port the monitor is configured to use by accessing the on-
screen display (OSD) with the appropriate button on the monitor.
-
If necessary, try removing the video card and reseating it carefully. Poor
connectivity of cables or the video card can also cause screen flicker.
Troubleshoot Video, Projector, And
Display Issues
Video Troubleshooting
2. Power cycle the computer, display, and any power protection equipment
-
Power cycling the equipment can fix all kinds of problems and is an easy
solution to implement.
-
Problems such as video memory (image retention) and stuck pixels might be
easily repaired by a power cycle of the display, the computer, and any surge
suppressor that the equipment is plugged into.
-
You might also need to leave a display off for a couple of hours to fix a video
memory problem.
Troubleshoot Video, Projector, And
Display Issues
3. Check for an onboard video setting in the UEFI/BIOS
-
If you install a new video card to a computer that previously used onboard video, always
check that the onboard video setting is disabled in the UEFI or BIOS.
-
It can conflict with the new video card. And, of course, be sure to plug the monitor into the
new video card—not the old onboard connection.
4. Resolution and refresh settings
-
If the resolution was set too high or was set to a resolution not supported by the monitor,
you might get a distorted image or no image at all.
-
Boot into low-resolution VGA mode or Safe Mode. This starts the computer with a
resolution of 640×480.
-
Then modify the resolution setting in the Screen Resolution window.
Troubleshoot Video, Projector, And
Display Issues
5. Check the driver
-
Maybe the driver failed, or perhaps the wrong driver was installed during
installation, or maybe an update is necessary.
-
Driver failures could also be the cause of BSODs
.
6. Check the version of DirectX
-
DirectX is a Windows technology that includes video, animation, and sound
components.
-
It helps a computer get more performance out of multimedia, games, and
movies. .
Troubleshoot Video, Projector, And Display Issues
7. Check the temperature threshold of the video card
-
High-end video cards are intensely used by gamers and designers, and they can be the hottest
component in a computer.
-
If the temperature surpasses the safeguards in place, it might cause the card to throttle back the
GPU speed.
8. Use software to check and repair stuck or dead pixels
-
When a single pixel fails, it can be irritating.
-
But there are third-party software programs that can be used to identify stuck pixels and
possible dead pixels and attempt to fix them (search “LCD repair,” “dead pixel repair,” or
similar terms).
-
Always try power-cycling the device as well. If you can’t repair the stuck or dead pixel, you
might have to bring the display in for repair or for replacement, or if it is a laptop, replace it
yourself!
Troubleshoot Video, Projector, And Display Issues
9. Calibrate the monitor
-
If you see artifacts (image distortions) or you notice incorrect color patterns, or the display just
doesn’t seem to look quite as good as it used to, try calibrating the monitor by either resetting it
with the OSD or by adjusting the contrast, brightness, and color level.
-
Also try adjusting the color depth in Windows, and check the screen resolution.
10. Use a filter on the monitor
-
Sometimes a user will complain of eye strain. This might not be a video issue at all; it could be
due to glare. Consider using an antiglare filter.
11. Check for newly installed applications
-
New applications could cause the display to malfunction or stop working altogether. Check the
application manufacturer’s website for any known hardware compatibility issues.
Troubleshoot Video, Projector, And Display Issues
12. Check inside the computer
-
Check whether the card is seated properly. In areas in which the temperature and
humidity change quickly, the card could be unseated due to thermal expansion and
contraction.
-
If the computer was moved recently, it could cause the card to come out of the
slot slightly.
-
Verify that the power connections and other cables are not loose.
-
Check all other connections inside the PC to make sure it isn’t a video problem.
Understanding the troubleshooting process is essential for resolving technical issues efficiently. This includes steps such as identifying the problem, establishing probable causes, testing theories, and implementing solutions. Prioritizing data protection and effective communication with customers are key aspects. Following a structured approach and gathering relevant information is crucial for successful troubleshooting.

Download Presentation

Please find below an Image/Link to download the presentation.
The content on the website is provided AS IS for your information and personal use only. It may not be sold, licensed, or shared on other websites without obtaining consent from the author. Download presentation by click this link. If you encounter any issues during the download, it is possible that the publisher has removed the file from their server.
E N D
Presentation Transcript
1 What you understand from this picture?
2 The Troubleshooting Process Troubleshooting Process Identify the Problem Establish a Theory of Probable Cause Step 1 2 Follow an organized and logical procedure. Eliminate variables one at a time. Troubleshooting is a skill that is refined over time. The first and last steps involve effectively communicating with the customer. 3 Test the Theory to Determine Cause 4 Establish a Plan of Action to Resolve the Problem and Implement the Solution 5 Verify Full System Functionality and, if Applicable, Implement Preventive Measures 6 Document Findings, Actions, and Outcomes
Data Protection Before troubleshooting problems, always follow the necessary precautions to protect data on a computer. If unsure that a backup has been done, do not attempt any troubleshooting activities until the following are verified: o Date of the last backup o Contents of the backup o Data integrity of the backup o Availability of all backup media for data restore If no backup can be created, ask customer to sign a release form.
Troubleshooting Process Steps Step 1 - Identify the problem During the troubleshooting process, gather as much information from the customer as possible, but always be respectful. Use the following strategy during this step: 1. Question the user. Ask the person who reported the problem detailed questions about the issue. 2. Identify any changes made to the computer. Look at the computer. See if any new hardware has been installed or plugged in. 3. Review log files. Review any and all log files that you have access to that can tell you more information about the problem. 4. Inquire as to any environmental or infrastructural change. Perhaps there was a change on the computer network, or a new authentication scheme is in place. 5. Review documentation. Your company might have electronic or written documentation that logs past problems and solutions.
Troubleshooting Process Steps Step 2 - Establish a theory of probable cause Create a list of the most common reasons why the error would occur. Start with the easiest or most obvious causes at the top.
Troubleshooting Process Steps Step 3 Test the Theory to Determine cause Determine the exact cause by testing the theories of probable cause one at a time, starting with the quickest and easiest. After identifying an exact cause of the problem, determine the steps to resolve the problem. If the exact cause of the problem has not been determined after all theories have been tested, establish a new theory of probable causes and test it.
Troubleshooting Process Steps Step 4 Establish a Plan of Action to Resolve the Problem and Implement the solution After the exact cause of the problem is determined, establish a plan of action to resolve the problem and implement the solution. Sometimes quick procedures can determine the exact cause of the problem or even correct the problem.
Troubleshooting Process Steps Step 5 Verify Full System Functionality and, If Applicable, Implement Preventive Measures Verify full system functionality and implement any preventive measures if needed. Ensure that you have not created another problem while repairing the computer.
Troubleshooting Process Steps Step 6 Document Findings, Actions, and Outcomes Discuss the solution with the customer Have the customer confirm that the problem has been solved. Document the process: Problem description Steps to resolve the problem Components used in the repair
Troubleshoot Problems Related To Motherboards, Ram, Cpus, And Power Troubleshooting Motherboards 1. First and probably the most common of these rarities are UEFI/BIOS firmware issues. - Need to flash the motherboard s BIOS to the latest version. - For example, a new CPU or RAM might not be recognized at the correct clock speeds. - An adapter card might not be seen properly. Or perhaps Windows isn t working as it should be with the hardware in the system. - Updating the BIOS can fix many of these issue
Troubleshoot Problems Related To Motherboards, Ram, Cpus, And Power Troubleshooting Motherboards 2. Electrostatic discharge (ESD) and other electrical issues. - These might present themselves intermittently. - For example, the computer reboots out of nowhere or you receive random stop errors, also known as Blue Screens of Death (BSODs). - Swap out the motherboard with a known good one to see if the issue happens again when running through the same processes. - Be sure to use a surge suppressor or uninterruptible power supply (UPS) to protect your equipment and, of course, implement antistatic measures whenever you work inside a system.
Troubleshoot Problems Related To Motherboards, Ram, Cpus, And Power Troubleshooting Motherboards 3. Component failures. It is possible that a single component of the motherboard (for example, the SATA controller) can fail, but the rest of the motherboard works fine. - To fix a problem such as a SATA controller failure, a separate PCIe SATA controller card can be purchased. - Then can connect the hard drives to the new controller and disable the original integrated SATA controller in the BIOS.
Troubleshoot Problems Related To Motherboards, Ram, Cpus, And Power Troubleshooting Motherboards 4. Manufacturing defects and failed motherboard components. - Printed circuit boards (PCBs), such as motherboards, are mass-produced at high speeds. - Problems might be found immediately when receiving a motherboard. - If you suspect a manufacturing defect, you should return the motherboard. - Motherboard component failure can also manifest itself over time, such as in the form of distended capacitors. - This is when a capacitor becomes swollen and possibly leaks electrolytic material; this bulging can cause the system to unexpectedly restart or shut down, cause a BSOD, or cause other errors. - The affected capacitor(s) should be replaced right away.
Troubleshoot Problems Related To Motherboards, Ram, Cpus, And Power Troubleshooting CPUs 1. Always check the power first, just in case the main power connections and the 8 or 4-pin CPU power connection. 2. Fan is connected and functional: Some motherboards have a safeguard that disables booting if the fan is defective or not plugged in. 3. Check other major components: Remember that the CPU is a part of a bigger system; one in which other components are more likely to be the cause of many problems. 4. Heat sink is connected properly: Make sure that the heat sink is flush with the CPU cap and that it is securely fastened to the motherboard (or socket housing). 5. CPU is installed properly: Make sure it was installed flush into the socket and that it was oriented correctly.
Troubleshoot Problems Related To Motherboards, Ram, Cpus, And Power Troubleshooting RAM - A lot of the issues because a user has purchased and installed a memory stick that is not compatible, or is semi-compatible, with the motherboard: wrong speed, incorrect capacity, improper configuration, and so on. - Check the RAM compatibility against the motherboard. Verify compatibility of RAM with the motherboard when troubleshooting!
Troubleshoot Problems Related To Motherboards, Ram, Cpus, And Power Troubleshooting RAM Here are some possible symptoms of a RAM issue and corresponding troubleshooting techniques: 1. Computer will not boot/intermittently shuts down: If there is no RAM in the computer, or if the RAM is damaged or not installed securely, it can prevent the computer from doing anything at all (aside from draining electricity from your AC outlet). 2. BIOS indicates a memory error: The BIOS can indicate a memory error through a gray message on the screen and a flashing cursor or by beeping. If it beeps, you need to reference your motherboard documentation for the specific beep codes.
Troubleshoot Problems Related To Motherboards, Ram, Cpus, And Power Troubleshooting RAM 3. Stop error, aka BSOD or Blue Screen of Death: This is a critical system error that causes the operating system to shut down. Most of the time, these are due to device driver errors (poor code), but they can be associated with a physical fault in memory.
Troubleshoot Problems Related To Motherboards, Ram, Cpus, And Power Troubleshooting Power Supply Issues Here are several of the issues might encounter with power supplies: Fan failure Fuse failure Quick death Slow death. - Your best friends when troubleshooting power supplies are going to be a power supply tester, and your eyes and ears. - Always make sure that the power supply cable connects from the power supply itself to a properly wired AC outlet properly before troubleshooting further.
Troubleshoot Problems Related To Motherboards, Ram, Cpus, And Power Troubleshooting Power Supply Issues - Check all of the internal power connections. Make sure they are connected firmly. To test these connections, use a power supply tester. - If there are error readings, error lights, no lights, or missing lights for specific voltages on the tester, you should consider replacing the power supply; or if it is modular, replace that particular power cable. PSU Tester Testing the 24-pin ATX power connector.
Troubleshoot Problems Related To Motherboards, Ram, Cpus, And Power Troubleshooting Power Supply Issues - Remember that connections sometimes can be jarred loose inside and outside the computer. - Check the IEC cord on both ends and all power connections inside the computer. This includes the main motherboard connector as well as the CPU, Molex, SATA, and PCIe connectors. - Any single loose connector can have interesting results on your computer.
Troubleshoot Problems Related To Hard Drives And Raid Arrays Troubleshooting Hard Drives 1. BIOS does not see the drive:If the BIOS doesn t recognize the drive you have installed, you can check a few things. - First, make sure the power cable is firmly connected and oriented properly. - Next, make sure SATA data cables are fully seated in the ports, and weren t accidentally installed upside down; if you find one that was, consider replacing it because it might be damaged due to incorrect installation. 2. Windows does not see a second drive: There are several reasons why Windows might not see a second drive. Maybe a driver needs to be installed for the drive or for its controller.
Troubleshoot Problems Related To Hard Drives And Raid Arrays Troubleshooting Hard Drives 3. Slow reaction time: If the system runs slow, it can be because the drive has become fragmented or has been infected with a virus or spyware. Analyze and defragment the drive. 4. Missing files at startup: If you get a message such as BOOTMGR Is Missing, the file needs to be written back to the hard drive. - In severe cases, this can mean that the drive is physically damaged and needs to be replaced. - If this happens, the drive needs to be removed from the computer and slaved off to another drive on another system. - Then the data must be copied from the damaged drive to a known good drive (which might require a third-party program), and a new drive must be installed to the affected computer
Troubleshoot Problems Related To Hard Drives And Raid Arrays Troubleshooting Hard Drives 5. Other missing/corrupted files: Missing or corrupted files could be the result of hard drive failure, operating system failure, malware infection, user error, and so on. - If this happens more than once, be sure to back up the rest of the data on the drive, and then use the preventative methods mentioned previously, especially defragmenting and scanning for malware. 6. Noisy drive/lockups: If your SATA magnetic disk drive starts getting noisy, it s a sure sign of impending drive failure. - Need to connect the drive to another computer immediately and copy the data to a good drive. Reminder! hard drives will fail, so it is important to make backups of your data. The backup media of choice will vary depending on the organization. It could be the cloud, a secondary system, DVD- ROM discs, even USB flash drives. It differs based on the scenario.
Troubleshoot Problems Related To Hard Drives And Raid Arrays Troubleshooting RAID Arrays - They might stop working or the OS could have trouble finding them. If you see an issue like this, check whether the hard drives are securely connected to the controller and that the controller (if an adapter card) is securely connected to the motherboard. - Also, if you use a RAID adapter card or external enclosure, and the motherboard also has built-in RAID functionality of its own, make sure you disable the motherboard RAID within the BIOS it could cause a conflict. - Verify that the driver for the RAID device is installed and updated. - Finally, check if any of the hard drives or the RAID controller has failed. If a RAID controller built into a motherboard fails, you will have to purchase a RAID adapter card.
Troubleshoot Problems Related To Hard Drives And Raid Arrays Troubleshooting RAID Arrays - To configure Intel RAID a technician needs to press CTRL + I when the system first boots up, perhaps even before the BIOS on some systems. From there, the RAID array can be configured as shown in picture. - There is a RAID 1 Mirror, but that the status is Degraded . That means that the array has failed, or has been deconstructed in some way. Intel RAID Configuration Screen
Troubleshoot Problems Related To Hard Drives And Raid Arrays Troubleshooting RAID Arrays - One way to check the status of a RAID array is to use S.M.A.R.T. For example, in picture you can see the S.M.A.R.T. information screen for one of the disks in a RAID 1 mirror of a NAS device. S.M.A.R.T. Information and Status of a NAS Hard Drive
Troubleshoot Video, Projector, And Display Issues Video Troubleshooting 1. Connections - If nothing is showing up on the display, first make sure that the monitor is plugged into the video card properly (and to the correct video port), and then verify whether the monitor is connected to the AC outlet and is powered on. - Check which video port the monitor is configured to use by accessing the on- screen display (OSD) with the appropriate button on the monitor. - If necessary, try removing the video card and reseating it carefully. Poor connectivity of cables or the video card can also cause screen flicker.
Troubleshoot Video, Projector, And Display Issues Video Troubleshooting 2. Power cycle the computer, display, and any power protection equipment - Power cycling the equipment can fix all kinds of problems and is an easy solution to implement. - Problems such as video memory (image retention) and stuck pixels might be easily repaired by a power cycle of the display, the computer, and any surge suppressor that the equipment is plugged into. - You might also need to leave a display off for a couple of hours to fix a video memory problem.
Troubleshoot Video, Projector, And Display Issues 3. Check for an onboard video setting in the UEFI/BIOS - If you install a new video card to a computer that previously used onboard video, always check that the onboard video setting is disabled in the UEFI or BIOS. - It can conflict with the new video card. And, of course, be sure to plug the monitor into the new video card not the old onboard connection. 4. Resolution and refresh settings - If the resolution was set too high or was set to a resolution not supported by the monitor, you might get a distorted image or no image at all. - Boot into low-resolution VGA mode or Safe Mode. This starts the computer with a resolution of 640 480. - Then modify the resolution setting in the Screen Resolution window.
Troubleshoot Video, Projector, And Display Issues 5. Check the driver - Maybe the driver failed, or perhaps the wrong driver was installed during installation, or maybe an update is necessary. - Driver failures could also be the cause of BSODs. 6. Check the version of DirectX - DirectX is a Windows technology that includes video, animation, and sound components. - It helps a computer get more performance out of multimedia, games, and movies. .
Troubleshoot Video, Projector, And Display Issues 7. Check the temperature threshold of the video card - High-end video cards are intensely used by gamers and designers, and they can be the hottest component in a computer. - If the temperature surpasses the safeguards in place, it might cause the card to throttle back the GPU speed. 8. Use software to check and repair stuck or dead pixels - When a single pixel fails, it can be irritating. - But there are third-party software programs that can be used to identify stuck pixels and possible dead pixels and attempt to fix them (search LCD repair, dead pixel repair, or similar terms). - Always try power-cycling the device as well. If you can t repair the stuck or dead pixel, you might have to bring the display in for repair or for replacement, or if it is a laptop, replace it yourself!
Troubleshoot Video, Projector, And Display Issues 9. Calibrate the monitor - If you see artifacts (image distortions) or you notice incorrect color patterns, or the display just doesn t seem to look quite as good as it used to, try calibrating the monitor by either resetting it with the OSD or by adjusting the contrast, brightness, and color level. - Also try adjusting the color depth in Windows, and check the screen resolution. 10. Use a filter on the monitor - Sometimes a user will complain of eye strain. This might not be a video issue at all; it could be due to glare. Consider using an antiglare filter. 11. Check for newly installed applications - New applications could cause the display to malfunction or stop working altogether. Check the application manufacturer s website for any known hardware compatibility issues.
Troubleshoot Video, Projector, And Display Issues 12. Check inside the computer - Check whether the card is seated properly. In areas in which the temperature and humidity change quickly, the card could be unseated due to thermal expansion and contraction. - If the computer was moved recently, it could cause the card to come out of the slot slightly. - Verify that the power connections and other cables are not loose. - Check all other connections inside the PC to make sure it isn t a video problem.