Understanding the Components of a Light Microscope
A light microscope is an essential instrument for examining small objects. It utilizes visible light and magnifying lenses to reveal details not visible to the naked eye. Learn about the different types of light microscopes and their components, such as the ocular lens, nosepiece, objective lenses, stage, and more. Enhance your understanding of microscopy for various applications in science and biology.
Download Presentation

Please find below an Image/Link to download the presentation.
The content on the website is provided AS IS for your information and personal use only. It may not be sold, licensed, or shared on other websites without obtaining consent from the author. Download presentation by click this link. If you encounter any issues during the download, it is possible that the publisher has removed the file from their server.
E N D
Presentation Transcript
Microscope Preparation assistant teacher Amal almosawi
The Microscope A microscope is an instrument that uses visible light and magnifying lenses to examine small objects not visible to the naked eye, the word of microscope is combination of two words; "micro" meaning small and "scope" meaning view. Magnification power= Magnification power of ocular piece Magnif. power of objective lens of micriscope
Types of Microscopes 1- The light microscope (compound microscope). 2- The fluorescent microscope. 3- The Electron microscope. Biology 4- The dissecting microscope.
The light microscope The common light microscope use in the laboratory for diagnosis and study structures the microscopic organisms, the light microscope is called a compound microscope because it contains two types of lenses that function to magnify an object. The lens closest to the eye is called the ocular, while the lens closest to the object is called the objective.
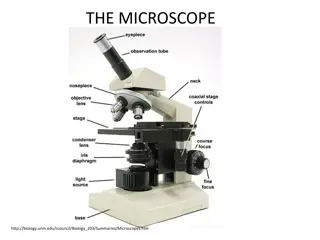
The light microscope components: 1- Ocular lens (eyepiece): it is use for look through to see image of the specimen. 2- Body tube: the long tube that holds the eyepiece and connect it to the objectives. 3- Nosepiece: the rotation part of the microscope at the bottom of the body tube and it holds the objectives. 4-Objective lenses: A compound light microscope often contains four, the scanning lens (4X), the low-power lens (10X), the high-power ens (40 X), and the oil-immersion lens (100 X). With an ocular lens that magnifies 10 times. 5- Arm: part of the microscope is attach to the foot and supports the body tube.
The light microscope components: 6- Coarse adjustment knob: large, round knob on the side of the microscope used for focusing the specimen; it may move either the stage or the upper part of the microscope. 7- Fine adjustment knob: small, round knob on the side of the microscope used to clear the focus of the specimen after using the coarse adjustment knob. 8- Stage: large, flat area under the objectives; it has a hole in it that allows light through; the specimen slide is placed on the stage for viewing.
The light microscope components: 8- Stage: large, flat area under the objectives; it has a hole in it that allows light through; the specimen slide is placed on the stage for viewing. 9- Stage clips: shiny, clips on the top of the stage which hold the slide in place. 10- Aperture: the hole in the stage that allows light through for better viewing of the specimen. 11- Condenser: It is a vital part of the microscope, act on collect, control and concentrate light from the lamp into the specimen. 12- Condenser height control knob: This knob is use to precisely regulate the vertical height of the condenser
The light microscope components: 13- Iris diaphragm control: regulate amount of light going through the aperture. 14- Light or lamp: source of light usually found near the base of the microscope: the light source makes the specimen easier to see .
How to use a microscope 1. Put the microscope on flat table where the handle toward you. 2. Clean the microscope lenses by special papers and don't touch lenses by hands. 3. Put the slide on the stage carefully and make sure the cover glass on the slide. 4. Examine the sample by low objective lens (10 ) then by high objective lens (40 ) with fine adjustment but without using coarse adjustment to avoid the breaking of slide. 5. Avoid the use of immersion oil lens without oil and directly clean the lens and slide from oil after the use. 6. Don't use one eye during the examination of sample. 7. After the finish of examining rise the slide from stage carefully then clean it and clean the microscope lenses then cover the microscope to keep out it from dust
