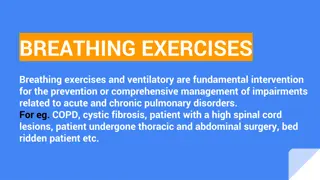
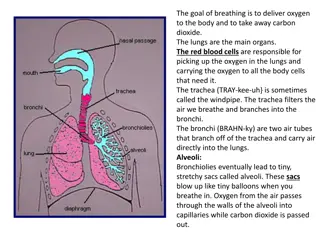
The Importance of Breathing Exercises in Respiratory Management

BREATHING
EXERCISES

•
Also
called
as ventilatory
training.
•
An
aspect
of
management
to
improve pulmonary
status
and
to
increase
a
patient’s
overall
endurance
and
function
during
daily
living
activities.
•
They
are
fundamental
interventions
for
the
prevention
or
comprehensive
management
of
impairments
related
to
acute
or
chronic pulmonary
disorders.
•
Simply,
Breathing
exercises
are
designed
to retrain
the
muscles
of
respiration, improve ventilation,
lessen
the
work
of
breathing,
and
improve
gaseous
exchange
and
patient’s
overall
function
in
daily
living
activities.
•
Depending on
a
patient’s
underlying
pathology
and
impairments,
exercises
to
improve
ventilation
often
are
combined
with
medication,
airway
clearance,
the
use
of
respiratory
therapy
devices,
and
a graded
exercise
(aerobic
conditioning)
program.
Goals
of
Breathing
Exercises
and
Ventilatory
Muscle
Training
1.
•
Improve
or
redistribute
ventilation.
2.
•
Increase
the effectiveness
of
the
cough
mechanism and
promote
airway
clearance.
3.
•
Prevent
postoperative
pulmonary
complications.
4.
•
Improve
the
strength,
endurance,
and
coordination of
the
muscles
of
ventilation.
5.
•
Maintain
or
improve
chest
and
thoracic
spine
mobility.
6.
•
Correct inefficient
or
abnormal
breathing
patterns
and
decrease
the
work
of
breathing.
7.
•
Promote
relaxation
and
relieve
stress.
8.
•
Teach
the
patient
how
to
deal
with
episodes
of
dyspnea.
9.
•
Improve
a
patient’s
overall
functional
capacity
for daily
living,
occupational,
and
recreational
activities.
10.
Aid
in
bronchial
hygiene---Prevent accumulation
of
pulmonary
secretions,
mobilization of
these
secretions,
and
improve
the
cough
mechanism.
Indications
of
breathing
exercises
1.
Cystic
fibrosis
2.
Bronchiectasis
3.
Atelectasis
4.
Lung
abscess
5.
Neuromuscular
diseases
6.
Pneumonias
in
dependent
lung
regions.
7.
Acute
or
chronic
lung
disease
8.
COPD
9.
For
patients
with
a
high
spinal
cord
lesion/
Deficits
in
CNS:
spinal
cord
injury,
myopathies
etc.
10.
Prophylactic
care
of
preoperative
patient
with
history
of
pulmonary
problems
11.
After
surgeries
(thoracic
or
abdominal
surgery)
12.
Airway obstruction due
to retained
secretions.
13.
For
patients
who
must
remain
in
bed
for
an
extended
period
of
time.
14.
As
relaxation procedure.
Guidelines
for
Teaching
Breathing
Exercises
•
If
possible,
choose
a
quiet area
for instruction
in
which
you
can
interact
with
the
patient
with
minimal
distractions.
•
Explain
to
the
patient
the
aims
and
rationale
of breathing
exercises
or
ventilatory
training
specific
to
his
or
her
particular
impairments
and
functional
limitations.
•
Have
the
patient
assume
a
comfortable,
relaxed position
and
loosen
restrictive
clothing.
Initially,
a
semi-Fowler’s
position
with
the
head
and
trunk
elevated
approximately
45,
is
desirable.
By
supporting the
head
and trunk,
flexing
the
hips
and
knees,
and
supporting the
legs
with
a
pillow,
the
abdominal
muscles
remain
relaxed.
•
Other
positions,
such
as
supine,
sitting,
or
standing, may
be
used
initially
or
as
the
patient
progresses
during
treatment.
•
Observe
and
assess
the patient’s spontaneous
breathing
pattern
while
at
rest
and
later
with
activity.
•
Determine
whether
ventilatory
training
is
indicated.
•
Establish
a
baseline
for
assessing
changes,
progress,
and
•
outcomes of
intervention.
•
If
necessary,
teach
the
patient
relaxation
techniques.
This
relaxes
the
muscles of
the
upper
thorax, neck, and
shoulders
to
minimize
the
use
of
the
accessory
muscles
of
ventilation.
•
Pay
particular
attention
to
relaxation of
the
sternocleidomastoids,
upper
trapezius,
and
levator
scapulae
muscles.
•
Depending on
the patient’s
underlying
pathology
and
impairments,
determine
whether
to emphasize the
inspiratory
or
expiratory
phase
of
ventilation.
•
Demonstrate
the
desired
breathing
pattern
to
the
patient.
•
Have
the
patient
practice the
correct
breathing
pattern
in
a
variety
of
positions
at
rest
and
with
activity.
PR
E
C
A
UTIONS:
•
When
teaching
breathing exercises,
be aware
of
the
following
precautions:
1.
Never
allow
a patient
to
force
expiration.
Expiration
should
be
relaxed
or
lightly controlled.
Forced
expiration
only
increases
turbulence
in
the
airways,
leading
to
bronchospasm
and
increased
airway
restriction.
2.
Do
not
allow
a patient
to
take
a
highly
prolonged
expiration.
This
causes
the
patient
to
gasp
with
the
next
inspiration.
The
patient’s
breathing
pattern
then
becomes
irregular
and
inefficient.
3.
Do
not
allow
the
patient
to
initiate
inspiration
with
the
accessory
muscles
and
the
upper
chest.
Advise
the
patient
that
the
upper
chest
should
be
relatively quiet
during
breathing.
4.
Allow
the
patient
to
perform
deep
breathing
for
only
three
or
four
inspirations
and
expirations
at
a
time
to
avoid
hyperventilation.
CONTRAINDICATIONS:
•
Increased
ICP
•
Unstable
head
or
neck
injury
•
Active
hemorrhage
with
hemodynamic
instability
or
hemoptysis
•
Recent
spinal
injury
•
Empyma
•
Bronchoplueral
fistula
•
Flail
chest
•
Uncontrolled
hypertension
•
Anticoagulation
•
Rib
or
vertebral
fractures
or
osteoporosis
•
Acute asthma
or
tuberculosis
•
Patients
who
have
recently
experienced
a
heart
attack.
•
Patients
with
skin
grafts
or
spinal
fusions
will
have
undue
stress
placed
on
areas
of
repair.
•
Bony
metastases,
brittle
bones,
bronchial hemorrhage,
and
emphysema
are
contraindications for
undue
stress
to
the
thoracic
area.
•
Verify
that
patient
has not
eaten
for
at
least
one
hour.
•
Severe
Obesity
•
Recent
(within
one
hour)
meal
or
tube
feed
•
Untreated
pneumothorax
•
Chest
tubes.
TYPES
OF
BREATHING
EXERCISES:
1.
Diaphragmatic
breathing
2.
Pursed
lip
breathing
3.
Segmental
breathing(costal
expansion
exercise)
a)Apical
breathing
b)lateral
costal
expansion
c)Posterior
basal
expansion
4.
Sustained
maximal
inspiration
(deep
breathing)
DIAPHRAGMATIC
BREATHING
The
semireclining
(as shown)
and
semi-
Fowler’s
positions
are
comfortable,
relaxed positions
in
which
to
teach
diaphragmatic
breathing.
•
When
the
diaphragm
is
functioning
effectively
in
its role
as the
primary
muscle
of
inspiration,
ventilation
is
efficient
and
the
oxygen
consumption
of
the
muscles
of
ventilation
is
low
during
relaxed
(tidal)
breathing.
•
When
a patient
relies
substantially
on
the
accessory
muscles
of
inspiration,
the
mechanical
work
of
breathing
(oxygen
consumption)
increases
and
the
efficiency
of ventilation
decreases.
•
Although
the
diaphragm
controls
breathing
at
an
involuntary
level,
a patient
with
primary
or
secondary
pulmonary
dysfunction
can
be
taught
how
to
control
breathing
by
optimal
use
of
the
diaphragm
and
decreased
use
of
accessory
muscles.
•
GOALS
OF
DIAPHRAGMATIC
BREATHING:
•
To
improve
the
efficiency
of
ventilation
and
oxygenation
•
Decrease
the
work
of
breathing
•
Increase
the
excursion
(descent
or
ascent)
of
the
diaphragm
•
Improve
gas
exchange
and
oxygenation.
•
Diaphragmatic
breathing
exercises
also
are
used
during
postural
drainage
to mobilize
lung
secretions.
•
Reduces
work
of
breathing
•
Reduces
the
incidence
of
post operative
pulmonary
complications
•
Improve
ventilation
•
Eliminates
accessory
muscle
activity
•
Decrease
respiratory
rate
•
Increase
tidal
ventilation
•
Improve
distribution
of
ventilation
•
PROCEDURE/
TECHNIQUE:
1.
Prepare
the
patient
in
a
relaxed
and
comfortable position
in
which
gravity
assists
the
diaphragm,
such
as
a
semi-
Fowler’s
position.
2.
The
patient
initiates the
breathing
pattern
with
the
accessory
muscles of inspiration
(shoulder
and
neck
musclulature),
start
instruction
by
teaching
the
patient
how
to
relax
those
muscles
(shoulder rolls
or
shoulder shrugs coupled
with
relaxation).
3.
Diaphragmatic
breathing enhance
diaphragmatic
descent
during inspiration
and
diaphragmatic
ascent
during
expiration
4.
Physiotherapist
assist
diaphragmatic
ascent
by
directing the
patient to
allow
the
abdomen
to
retract
gradually during
exhalation
or
by
contracting
abdominal
muscles
actively
5.
Diaphragmatic
descent is assisted by
directing
the
patient to
protract the
abdomen
gradually during
inhalation.
6.
Place
your
hand(s)
on
the
rectus
abdominis
just
below
anterior
costal
margin.
Ask
the
patient
to breathe
in
slowly
and
deeply
through
the
nose.
7.
Have
the
patient
keep
the
shoulders
relaxed
and
upper
chest
quiet,
allowing the
abdomen
to
rise
slightly.
Then
tell the
patient to
relax
and
exhale
slowly
through
the
mouth.
8.
Have
the
patient
practice
this
three
or
four times
and
then
rest.
Do
not
allow
the
patient
to
hyperventilate.
9.
If
the
patient
is
having
difficulty
using
the
diaphragm
during
inspiration, have
the
patient
inhale
several
times
in
succession
through
the nose
by
using
a
sniffing
action
This
action usually
facilitates
the
diaphragm.
10.
To
learn
how
to
self-monitor
this
sequence,
have
the
patient
place
his
or
her
own
hand
below
the
anterior costal
margin
and
feel
the
movement.
The
patient’s
hand
should
rise
slightly
during
inspiration
and
fall
during
expiration.
11.
After
the
patient
understands
and
is
able
to control
breathing
using
a
diaphragmatic pattern,
keeping
the
shoulders
relaxed,
practice
diaphragmatic
breathing
in
a
variety
of
positions
(sitting,
standing)
and
during
activity
(walking,
climbing
stairs).
•
RE EDUCATION
OF
DIAPHRAGM:
•
As
other
skeletal
muscles,
diaphragm
also
shares
the
property
of
skeletal
muscle
•
Place
the
index
and
middle
finger
below
the
lower
costal
margin
anteriorly
in
half
lying
position
over
the
insertion
of
diaphragm
(central
tendon)
•
At
the
end of expiration
when
diaphragm
is
relaxed,
stretch
stimulus
is
given
to the
diaphragm
to
elicit
Stretch
reflex
of
the
diaphragm
and
patient
is
instructed
to
take
breath
in.
Resisted
diaphragmatic
breathing
Manual
resistance
by therapist
over
the
abdomen
Placing
appropriate
weight over
abdomen
in
By
slightly
elevating the
foot
end of
the
bed
*procedure- same
as
breathing
ex
*CONTRAINDICATIONS-
SAME
AS
BREATHING
PURSED
LIP
BREATHING
•
Pursed-lip
breathing
is
a
strategy
that involves lightly pursing
the lips
together
during
controlled
exhalation.
•
USES
OF
PURSED
LIP
BREATHING/
INDICATIONS:
•
This
breathing
pattern
often
is
adopted spontaneously
by
patients
with
COPD
to deal
with
episodes
of
dyspnea.
•
Improves
ventilation
•
Releases
trapped
air
in
the
lungs
•
Keeps
the
airways
open longer
and
decreases
the
work
of
breathing
•
Prolongs exhalation
to
slow
the
breathing
rate
•
Improves
breathing
patterns
by
moving
old
air
out
of
the
lungs
and
allowing
for
new
air
to
enter
the
lungs
•
Relieves
shortness
of
breath
•
Causes
general
relaxation
•
It
can
be
applied:
-
as
a
3-5
minutes
“rescue exercise”
or
an
Emergency
Procedure
to
counteract acute exacerbations
or
dyspnea
(shortage
of
air
or
breathlessness)
in
COPD
and
asthma.
•
Pursed-lip
breathing
reduces
hyperventilation-induced
broncho-
constriction.
•
PRINCIPLE:
Many
therapists
believe
that
gentle
pursed-lip
breathing
and
controlled
expiration
is
a
useful
procedure,
particularly
to
relieve
dyspnea
if
it
is
performed
appropriately.
It
is
thought
to
keep airways
open
by
creating
back-pressure
in
the
airways.
•
Studies
suggest
that
pursed-lip
breathing
decreases
the
respiratory
rate
and
the
work
of breathing
(oxygen
consumption),
increases
the
tidal
volume,
and
improves
exercise
tolerance.
•
PRECAUTIONS
:
•
The
use
of
forceful expiration during
pursed-lip breathing
must
be
avoided.
Forceful
expiration
while
the lips
are
pursed
can
increase
the
turbulence
in
the
airways
and
cause further
restriction
of
the
small
bronchioles.
•
Therefore, if
a
therapist
elects
to teach this
breathing
strategy,
it
is
important
to emphasize
with
the
patient
that expiration
should
be
performed
in
a
controlled
manner
but
not
forced.
•
PROCEDURE/TECHNIQUE:
•
Have
the
patient
assume a
comfortable position
and
relax
as
much
as
possible.
•
Have
the
patient
breathe
in
slowly
and
deeply
through
the nose
and
then
breathe
out
gently
through
lightly
pursed
lips
as
if
blowing
on
and
bending
the
flame
of a candle but
not
blowing
it
out.
•
Explain
to the
patient
that expiration
must
be
relaxed
and
that
contraction of
the
abdominals
must
be
avoided.
•
Place
your
hand
over
the patient’s
abdominal
muscles
to
detect
any
contraction of
the
abdominals.
SEGMENTAL
BREATHING
•
Performed
on
a segment of
lung,
or
a
section
of
chest
wall
that
needs increased
ventilation
or
movement.
•
It’s
questionable
whether
a patient
can
be
taught
to
expand
localized areas
of
the
lung
while
keeping
other
areas
quiet.
•
Hypoventilation
does
occur
in
certain
areas
of
the
lungs
because
of
pain and
muscle
guarding
after
surgery,
atelectasis
and
pneumonia.
•
Therefore,
it
will be
important
to
emphasize
expansion
of
problems
areas
of
the
lungs
and
chest
wall
under
certain
conditions.
•
USES/
INDICATIONS:
•
post
thoracotomy,
•
trauma
to chest
wall,
•
pneumonia,
•
post
mastectomy
scar,
•
post chest
radiation-fibrosis.
•
ADVANTAGES
OF
SEGMENTAL
BREATHING:
•
Prevent
accumulation
of pleural
fluid
•
Prevent
accumulation
of
secretions
•
Decreases
paradoxical
breathing
•
Decrease
panic
•
Improve
chest
mobility
Lateral
costal
expansion
•
This
is
sometimes called lateral
basal
expansion
and
may
be
done unilaterally
or
bilaterally.
•
The
patient
may
be
sitting
or
in
a
hook
lying
position.
•
Place
your
hands
along
the lateral
aspect
of
the
lower
ribs
to
fix
the patient’s
attention
to
the
areas
which
movement
is
to
occur.
•
Ask
the
patient
to
breathe
out,
and
feel the
rib
cage
move
downward
and
inward.
•
As
the
patient
breathes
out,
place
firm
downward pressure
into
the
ribs
with
the
palms
of
your
hands.
•
Just
prior
to
inspiration,
apply a quick
downward
and
inward
stretch
to the
chest. This
places
a quick
stretch
on
the external intercostals
to
facilitate
their
contraction.
These
muscles
move
the
ribs
outward
and
upward
during
inspiration.
•
Apply
light
manual
resistance
to
the
lower
ribs
to
increase
sensory
awareness
as
the
patient
breathes
in
deeply
and
the chest
expands
and
ribs
flare.
Then,
as
the
patient
breathes
out,
assist by
gently
squeezing
the
rib
cage
in
a
downward
and
inward
direction.
•
Tell
the
patient
to
expand
the
lower
ribs
against
your
hand
as
he
or
she
breathes
in.
•
Apply
gentle
manual
resistance to the
lower
rib area to increase
sensory
awareness
as
the
patient
breathes
in
and
the
chest
expands
and
ribs
flare.
•
Then,
again,
as
the
patient
breathes
out,
assist
by
gently
squeezing
the
rib
cage
in
a
down ward
and
inward
direction.
•
The
patient
may
then
be
taught
to
perform
the
maneuver
independently.
He
or
She
may
place
the
hand
(s)
over
the
ribs
or
apply
resistance
using
a
belt.
Posterior
basal
expansion
•
Deep
breathing
emphasizing
posterior
basal
expansion
is
important
for
the
postsurgical
patient
who
is
confined
to
bed
in
a
semireclining
position for
an
extended
period
of
time
because
secretions
often
accumulate
in
the
posterior
segments
of
the
lower
lobes.
•
Have
the
patient
sit
and
lean
forward
on
a
pillow,
slightly
bending
the
hips.
•
Place
your
hands
over
the
posterior
aspect
of
the
lower
ribs.
•
Follow
the
same
procedure as
described
above.
•
This
form
of
segmental
breathing
is
important
for
the
post
surgical
patient
who
is
confined
to
bed
in
a
semi upright
position
for
an
extended
period
of
time.
Secretions
often
accumulate
in
the
posterior
segments
of
the
lower
lobes.
Belt
exercises
reinforce
lateral
costal
breathing
(
A)
by
applying
resistance
during
inspiration
and
(
B)
by
assisting
with
pressure
along
the
rib
cage
during
expiration.
Right
middle
lobe
or
lingula
expansion
•
Patient
is
sitting.
•
Place
your
hands
at
either
the
right
or
the left
side
of
the patient’s
chest,
just
below
the
axilla.
•
Follow
the
same
procedure
as
described
for lateral basal
expansion.
Apical
expansion
•
Patient
in
sitting
position.
•
Apply
pressure
(usually
unilaterally)
below
the clavicle
with
the
fingertips.
•
This
pattern
is
appropriate
in
an
apical
pneumothorax
after
a
lobectomy.
*Precautions-
same
as
general
GLOSSOPHARYNGEAL
BREATHING
•
Glossopharynegal
breathing
is
a
means
of increasing a
patient’s
inspiratory
capacity
when
there
is
severe
weakness
of
the
muscles
of
inspiration.
•
The
first report
of
GPB
was
published
by
Dail
in
1951
in
patients
with
poliomyelitis
paralysis.
•
It
is
a technique that
is
performed
by
using
the
muscles
of
mouth,
cheeks,
lips,
tongue,
soft
palate,
larynx
and
pharynx
to
piston
boluses
of
air
into
the
lungs.
•
The
tongue
is the
main
organ of this
breathing
technique.
•
The
tongue
is
pushed
upwards
and
backwards
forcing
the
air
into
the
pharynx.
•
The
larynx
opens
and
the
air
passes
into
the
trachea
where
it
is
trapped
by
closure
of
larynx.
•
This
pistoning
action
is
mechanism
of each
gulp.
•
A
gulp
is
defined
as
boluses
of
air
projected
into
the
trachea
by
pistoning
action
of
the
tongue.
•
INDICATIONS:
•
It
is
taught
to
patients
who
have
difficulty
taking
in
a
deep
breath,
for
example,
in
preparation
for
coughing.
•
It
is used
primarily
by
patients
who
are
ventilator-dependent
because
of
absent
or
incomplete
innervation
of
the
diaphragm
as
the
result
of
a
high
cervical-level
spinal
cord lesion
or
other
neuromuscular
disorders.
•
Glossopharyngeal breathing
can
reduce
ventilator
dependence
•
Also can
be
used
as
an
emergency
procedure when
a
malfunction
of a
patient’s
ventilator
occur.
•
It
also
can
be
used
to
improve
the
force
(and
therefore
the
effectiveness)
of
a
cough
•
It
is used
to increase
the
volume
of
the
voice.
•
Procedure
•
Glossopharyngeal breathing involves taking
several
“gulps”
of
air,
usually
6
to
10
gulps
in
series,
to
pull
air
into
the
lungs
when
action of
the inspiratory
muscles
is
inadequate.
•
After
the
patient
takes several
gulps of
air,
the
mouth
is
closed.
•
The
tongue
pushes
the
air
back
and
traps
it
in
the
pharynx.
•
The
air
is
then
forced
into
the
lungs
when
the
glottis
is
opened.
•
This
increases
the
depth
of
the
inspiration
and
the
patient’s
inspiratory
and
vital
capacities
COUGHING
•
An
effective
cough
is
necessary
to
eliminate
respiratory
obstructions
and
keep
the
lungs
clear.
•
Airway
clearance
is
an
important
part
of
management
of
patients
with
acute
or
chronic
respiratory
conditions.
•
The
Normal
Cough
Pump
•
A
cough
may
be
reflexive
or
voluntary.
•
When
a
person
coughs,
a
series
of actions
occurs as
follows:
•
Deep
inspiration
occurs-------Glottis
closes------vocal
cords
tighten------
Abdominal
muscles
contract-------diaphragm
elevates-------causing
an
increase
in
intrathoracic
and
intra-abdominal pressures-------Glottis
opens-----Explosive
expiration of
air
occurs.
•
Under
normal
conditions,
the
cough
pump
is
effective
to the
seventh
generation of
bronchi.
(There are
a
total
of
23
generations
of
bronchi
in
the
tracheobronchial
tree.)
•
Ciliated
epithelial
cells
are present
up
to
the
terminal
bronchiole
and
raise
secretions
from
the smaller
to
the
larger airways
in
the absence
of
pathology.
•
Factors
that
Decrease
the
Effectiveness
•
of
the
Cough
Mechanism
and
Cough
Pump
•
The
effectiveness
of
the
cough
mechanism
can
be
compromised
for
a
number
of
reasons
including
the
following:
1.
Decreased
inspiratory
capacity
2.
Inability
to forcibly
expel
air
3.
Decreased action
of
the
cilia
in
the
bronchial
tree.
4.
Increase
in
the
amount
or
thickness
of
mucus.
1.
Decreased
inspiratory
capacity:
•
Inspiratory
capacity
can
be
reduced
because
of:
Pain
due to acute
lung
disease
Rib
fracture
Trauma
to
the
chest
Recent
thoracic
or
abdominal
surgery
Weakness
of
the
diaphragm
or
accessory
muscles
of
inspiration
as
a
result
of a
high
spinal
cord injury
or
neuropathic
or
myopathic
disease
Postoperatively,
the
respiratory
center
may
be
depressed
as
the
result
of
general
anesthesia,
pain,
or
medication.
2.
Inability
to
forcibly
expel
air:
•
The
following factors contribute
to
a
weak
cough:
A
spinal
cord
injury
above
T12
and
myopathic
disease,
such
as
muscular
dystrophy,
cause
weakness
of
the
abdominal
muscles,
which
are
vital
for
a
strong
cough.
Excessive
fatigue
as the result
of
critical
illness
A
chest
wall
or
abdominal
incision causing
pain
A
patient
who
has
had
a
tracheostomy,
even
when
the
tracheostomy
site
is
covered.
3.
Decreased action of
the
cilia
in
the
bronchial
tree:
•
Action
of
the
ciliated
cells
may
be
compromised
because
of:
Physical
interventions
such
as
general
anesthesia
and
intubation
Pathologies such
as
COPD
including
chronic
bronchitis
Smoking
also
depresses
the
action of
the
cilia.
4.
Increase
in
the
amount
or
thickness
of
mucus:
•
Occurs
in:
Pathologies
(e.g.,
cystic
fibrosis, chronic
bronchitis)
and
pulmonary
infections
(e.g.,
pneumonia)
Intubation
irriates
the
lumen
of
the
airways
and
causes
increased
mucus
production
Dehydration
thickens
mucus.
•
Teaching
an
Effective
Cough
•
Because
an
effective
cough
is
an
integral
component
of
airway
clearance,
a patient
must
be
taught
the
importance of
an
effective
cough,
how
to produce
an
efficient
and
controlled voluntary
cough,
and
when
to
cough.
•
The
following
sequence
and
procedures are
used
when
teaching
an
effective
•
cough.
1.
Assess the patient’s voluntary
or
reflexive
cough.
2.
Have
the
patient
assume
a
relaxed,
comfortable
position
for
deep
breathing
and
coughing.
3.
Sitting
or
leaning
forward
usually
is
the
best
position
for
coughing.
4.
The
patient’s
neck should
be
slightly
flexed
to
make
coughing
more
comfortable.
5.
Teach
the
patient
controlled
diaphragmatic breathing,
emphasizing
deep
inspirations.
6.
Demonstrate
a
sharp,
deep,
double
cough.
7.
Demonstrate
the
proper
muscle action
of
coughing
(contraction of
the
abdominals).
Have
the
patient
place the
hands
on
the
abdomen
and make
three
huffs
with
expiration
to
feel the
contraction of
the
abdominals.
Have
the
patient
practice
making
a
“K”
sound
to experience
tightening
the vocal
cords,
closing
the
glottis,
and
contracting
the
abdominals.
8.
When
the
patient
has put
these
actions
together,
instruct the
patient
to
take
a
deep
but
relaxed
inspiration,
followed by
a
sharp double
cough.
9.
The
second
cough during
a single
expiration
is
usually more
productive.
10.
Use
an
abdominal
binder
or
glossopharyngeal
breathing
in
selected
patients
with
inspiratory
or
abdominal
muscle
weakness
to
enhance
the
cough,
if
necessary.
•
Precautions
for
Teaching
an
Effective
Cough
•
Never
allow
a
patient
to
gasp
in
air,
because
this
increases
the
work
(energy
expenditure)
of
breathing,
causing
the
patient
to
fatigue
more
easily.
It
also
increases
turbulence
and
resistance
in
the
airways,
possibly
leading
to
increased
bronchospasm
and
further
constriction of
airways.
•
A
gasping
action
also
may
push
mucus
or
a
foreign
object
deep
into
air
passages.
•
Avoid
uncontrolled
coughing
spasms
(
paroxysmal
coughing).
•
Avoid
forceful
coughing if
a patient
has
a
history
of a
cerebrovascular
accident
or
an
aneurysm.
Have
these
patients
huff
several
times
to
clear
the
airways,
rather
than
cough.
•
Be
sure
that
the
patient
coughs
while
in
a
somewhat
erect
or
side-lying
posture.
•
Additional
Techniques
to
Facilitate
a
Cough
and
Improve
Airway
Clearance
•
To
maximize
airway
clearance,
several
techniques
can
be
used
to
stimulate
a
stronger
cough,
make
coughing
more
comfortable
or
improve
the
clearance
of
secretions.
•
Manual-Assisted
Cough
•
If
a patient
has
abdominal
weakness
(e.g.,
as
the
result
of a
mid-thoracic
or
cervical
spinal
cord
injury),
manual
pressure
on
the
abdominal
area
assists
in
developing
greater
intra-abdominal
pressure
for
a
more
forceful
cough.
Manual
•
Therapist-Assisted
Techniques
•
With
the
patient
in
a
supine
or
semireclining
position,
the
therapist
places the
heel
of
one
hand
on
the patient’s
abdomen
at the epigastric
area
just
distal
to
the
xiphoid
process.
•
The
other
hand
is
placed
on
top
of
the
first,
keeping
the fingers
open
or
interlocking
them
•
After
the
patient
inhales
as deeply as
possible,the therapist
manually
assists
the
patient
as
he
or
she
attempts
to
cough.
The
abdomen
is
compressed
with
an
inward
and
upward
force,
which
pushes the
diaphragm
upward
to
cause
a
more
forceful
and
effective
cough.
•
This
same
maneuver can
be
performed
with
the
patient
in
a
chair
•
The
therapist
or
family
member
can
stand
in
back
of
the
patient
and
apply
manual
pressure
during
expiration.
•
P
R
E
C
A
U
T
I
O
N
:
Avoid
direct
pressure
on
the
xiphoid
process
during
the
maneuver.
•
Self-Assisted
Technique
•
While in
a
sitting
position,
the
patient
crosses
the
arms
across
the
abdomen
or
places the
interlocked
hands
below
the
xiphoid
process
•
After a
deep
inspiration,
the
patient pushes inward
and
upward
on
the
abdomen
with
the
wrists
or
forearms
and
simultaneously
leans
forward
while
attempting
to
cough.
Breathing exercises, also known as ventilatory training, play a crucial role in improving pulmonary status, enhancing endurance, and increasing overall functionality in daily activities. These exercises help retrain respiratory muscles, improve ventilation, reduce breathing effort, enhance gas exchange, and boost patient well-being. They are essential for managing acute and chronic pulmonary disorders, aiming to address various impairments and promote pulmonary health. The goals, indications, and guidelines for teaching breathing exercises are outlined in this comprehensive guide.

Download Presentation

Please find below an Image/Link to download the presentation.
The content on the website is provided AS IS for your information and personal use only. It may not be sold, licensed, or shared on other websites without obtaining consent from the author. Download presentation by click this link. If you encounter any issues during the download, it is possible that the publisher has removed the file from their server.
E N D
Presentation Transcript
Also called as ventilatory training. An aspect of management to improve pulmonary status and to increase a patient s overall endurance and function during daily livingactivities. They are fundamental interventions for the preventionor comprehensive management of impairments related to acute or chronic pulmonarydisorders. Simply,Breathing exercises are designed to retrain the muscles of respiration, improve ventilation, lessen the work of breathing, and improve gaseous exchange and patient s overall function indaily livingactivities. Depending on a patient s underlying pathology and impairments, exercises to improve ventilation often are combined with medication, airway clearance, the use of respiratory therapy devices, and a graded exercise(aerobic conditioning)program.
Goals of Breathing Exercisesand Ventilatory MuscleTraining 1. 2. Improve or redistributeventilation. Increase the effectiveness of the cough mechanism andpromote airway clearance. Prevent postoperative pulmonarycomplications. Improve the strength, endurance, and coordination of the muscles ofventilation. Maintain or improve chest and thoracic spinemobility. Correct inefficient or abnormal breathing patterns and decrease the work ofbreathing. Promote relaxation and relievestress. Teach the patient how to deal with episodes ofdyspnea. Improve a patient s overall functional capacity for daily living, occupational, and recreational activities. 10. Aid in bronchial hygiene---Prevent accumulation of pulmonary secretions, mobilization of these secretions, and improve the cough mechanism. 3. 4. 5. 6. 7. 8. 9.
Indications of breathingexercises 1. 2. 3. 4. 5. 6. 7. 8. 9. Cysticfibrosis Bronchiectasis Atelectasis Lungabscess Neuromuscular diseases Pneumonias in dependent lungregions. Acute or chronic lungdisease COPD For patients with a high spinal cord lesion/ Deficits in CNS: spinal cord injury, myopathies etc. Prophylactic care of preoperative patient with history of pulmonary problems After surgeries (thoracic or abdominalsurgery) Airway obstruction due to retainedsecretions. For patients who must remain in bed for an extended period oftime. As relaxation procedure. 10. 11. 12. 13. 14.
Guidelines for TeachingBreathing Exercises If possible, choose a quiet area for instruction in which you can interact with the patient with minimal distractions. Explain to the patient the aims and rationale of breathing exercises or ventilatory training specific to his or her particular impairments and functional limitations. Have the patient assume a comfortable, relaxed position and loosen restrictive clothing. Initially, a semi-Fowler s position with the head and trunk elevated approximately 45, is desirable. By supporting the head and trunk, flexing the hips and knees, and supporting the legs with a pillow, the abdominal muscles remain relaxed. Other positions, such as supine, sitting, or standing, may be used initially or as the patient progresses during treatment.
Observe and assess the patients spontaneousbreathing pattern while at rest and later withactivity. Determine whether ventilatory training isindicated. Establish a baseline for assessing changes, progress,and outcomes of intervention. If necessary, teach the patient relaxation techniques. This relaxes the muscles of the upper thorax, neck, and shoulders to minimize the use of the accessory musclesof ventilation. Pay particular attention to relaxation of the sternocleidomastoids, upper trapezius, andlevator scapulae muscles. Depending on the patient s underlying pathology and impairments, determine whether to emphasize the inspiratory or expiratory phase ofventilation. Demonstrate the desired breathing pattern to thepatient. Have the patient practice the correct breathing pattern ina variety of positions at rest and withactivity.
PRECAUTIONS: When teaching breathing exercises, be aware of thefollowing precautions: Never allow a patient to force expiration. Expiration should be relaxed or lightly controlled. Forced expiration only increases turbulence in the airways, leading to bronchospasm andincreased airway restriction. Do not allow a patient to take a highly prolonged expiration. This causes the patient to gasp with the next inspiration. Thepatient s breathing pattern then becomes irregular andinefficient. Do not allow the patient to initiate inspiration with the accessory musclesandtheupper chest.Advisethepatientthat theupper chest should be relatively quiet duringbreathing. Allowthepatienttoperform deepbreathing for onlythreeor four inspirations and expirations at a time to avoidhyperventilation. 1. 2. 3. 4.
CONTRAINDICATIONS: Increased ICP Unstable head or neck injury Active hemorrhage with hemodynamic instability or hemoptysis Recent spinal injury Empyma Bronchoplueral fistula Flail chest Uncontrolled hypertension Anticoagulation Rib or vertebral fractures or osteoporosis Acute asthma or tuberculosis Patients who have recently experienced a heart attack. Patients with skin grafts or spinal fusions will have undue stress placed on areas ofrepair.
Bony metastases, brittle bones, bronchial hemorrhage, and emphysema are contraindications for undue stress to the thoracic area. Verify that patient has not eaten for at least one hour. Severe Obesity Recent (within one hour) meal or tube feed Untreated pneumothorax Chest tubes.
TYPES OF BREATHINGEXERCISES: 1.Diaphragmaticbreathing 2.Pursed lipbreathing 3.Segmental breathing(costal expansion exercise) a)Apical breathing b)lateral costal expansion c)Posterior basalexpansion 4.Sustained maximal inspiration (deep breathing)
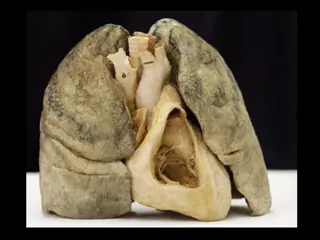
DIAPHRAGMATICBREATHING When the diaphragm is functioning effectively in its role as the primary muscle of inspiration, ventilation is efficient andthe oxygen consumption of the muscles of ventilation is low during relaxed (tidal) breathing. When a patient relies substantially onthe accessory muscles of inspiration, the mechanical work of breathing (oxygen consumption) increases and the efficiency of ventilationdecreases. Although the diaphragm controlsbreathing at an involuntary level, a patient with primary or secondary pulmonary dysfunction can be taught how tocontrol breathing by optimal use of thediaphragm and decreased use of accessorymuscles. The semireclining (as shown) andsemi- Fowler s positionsare comfortable, relaxed positions in whichto teach diaphragmaticbreathing.
GOALS OF DIAPHRAGMATICBREATHING: To improve the efficiency of ventilation andoxygenation Decrease the work ofbreathing Increase the excursion (descent or ascent) ofthe diaphragm Improve gas exchange andoxygenation. Diaphragmatic breathing exercises also are usedduring postural drainage to mobilize lungsecretions. Reduces work ofbreathing Reduces the incidence of post operativepulmonary complications Improveventilation Eliminates accessory muscleactivity Decrease respiratoryrate Increase tidalventilation Improve distribution ofventilation
PROCEDURE/TECHNIQUE: 1. Prepare the patient in a relaxed and comfortable position in which gravity assists the diaphragm, such as a semi- Fowler s position. 2. The patient initiates the breathing pattern with the accessory muscles of inspiration (shoulder and neck musclulature), start instruction by teaching the patient how to relax those muscles (shoulder rolls or shoulder shrugs coupled withrelaxation). 3. Diaphragmatic breathing enhance diaphragmatic descent during inspiration and diaphragmatic ascent during expiration 4. Physiotherapist assist diaphragmatic ascent by directing the patient to allow the abdomen to retract gradually during exhalation or by contracting abdominal muscles actively 5. Diaphragmatic descent is assisted by directing the patient to protract the abdomen gradually during inhalation.
6. Place your hand(s) on the rectus abdominis just below anterior costal margin. Ask the patient to breathe in slowly and deeply through the nose. Havethe patient keep the shoulders relaxed and upper chest quiet, allowing the abdomen to rise slightly. Then tell the patient to relax andexhale slowly throughthe mouth. Have the patient practice this three or four times and then rest. Do not allow the patient tohyperventilate. If the patient is having difficulty using the diaphragm during inspiration, have the patient inhale several times in succession through the nose by using a sniffing action This action usually facilitates the diaphragm. 10. To learn how to self-monitor this sequence, have the patient place his or her own hand below the anterior costal margin and feel the movement. The patient s hand should rise slightly during inspiration and fall during expiration. 11. After the patient understands and is able to control breathing using a diaphragmatic pattern, keeping the shoulders relaxed, practice diaphragmatic breathing in a variety of positions (sitting, standing) and during activity (walking, climbing stairs). 7. 8. 9.
RE EDUCATION OF DIAPHRAGM: As other skeletal muscles, diaphragm also shares the property of skeletal muscle Place the index and middle finger below the lower costal margin anteriorly in half lying position over the insertion of diaphragm (central tendon) At the end of expiration when diaphragm is relaxed, stretch stimulus is given to thediaphragm to elicit Stretch reflex of the diaphragm and patient is instructed to take breath in.
Resisted diaphragmaticbreathing Manual resistance by therapist over theabdomen Placing appropriate weight over abdomenin By slightly elevating the foot end of thebed *procedure- same as breathing ex *CONTRAINDICATIONS-SAME AS BREATHING
PURSED LIPBREATHING Pursed-lip breathing is a strategy that involves lightly pursing the lips together during controlled exhalation. USES OF PURSED LIP BREATHING/ INDICATIONS: This breathing pattern often is adopted spontaneously by patients with COPD to deal with episodes ofdyspnea. Improves ventilation Releases trapped air in the lungs Keeps the airways open longer and decreases the work of breathing Prolongs exhalation to slow the breathing rate Improves breathing patterns by moving old air out of the lungs and allowing for new air to enter thelungs Relieves shortness of breath Causes general relaxation
It can be applied: -as a 3-5 minutes rescue exercise or an Emergency Procedureto counteract acute exacerbations or dyspnea (shortage of air or breathlessness) in COPD and asthma. Pursed-lip breathing reduces hyperventilation-induced broncho- constriction. PRINCIPLE: Many therapists believe that gentle pursed-lip breathing and controlled expiration is a useful procedure, particularly to relieve dyspnea if it is performed appropriately. It is thought to keep airways open by creating back-pressure inthe airways. Studies suggest that pursed-lip breathing decreases the respiratory rate and the work of breathing (oxygenconsumption), increases the tidal volume, and improves exercisetolerance.
PRECAUTIONS: The use of forceful expiration during pursed-lip breathing must be avoided. Forceful expiration while the lips are pursed can increase the turbulence in the airways and cause further restriction of the smallbronchioles. Therefore, if a therapist elects to teach this breathing strategy, it is important to emphasize with the patient that expiration should be performed in a controlled manner but not forced. PROCEDURE/TECHNIQUE: Have the patient assume a comfortable position and relax as much as possible. Have the patient breathe in slowly and deeply through the nose and then breathe out gently through lightly pursed lips as if blowing on and bending the flame of a candle but not blowing it out. Explain to the patient that expiration must be relaxed and that contraction of the abdominals must be avoided. Place your hand over the patient s abdominal muscles to detect any contraction of the abdominals.
SEGMENTALBREATHING Performed on a segment of lung, or a sectionof chest wall that needs increased ventilation or movement. It s questionable whether a patient can betaught to expand localized areas of the lung while keeping other areasquiet. Hypoventilation does occur in certain areas ofthe lungs because of pain and muscle guarding after surgery, atelectasis andpneumonia. Therefore, it will be important to emphasize expansion of problems areas of the lungs and chest wall under certainconditions. USES/INDICATIONS: postthoracotomy, trauma to chestwall, pneumonia, post mastectomy scar, post chest radiation-fibrosis.
ADVANTAGES OF SEGMENTALBREATHING: Prevent accumulation of pleural fluid Prevent accumulation ofsecretions Decreases paradoxical breathing Decrease panic Improve chest mobility Lateral costalexpansion This is sometimes called lateral basal expansion and may be done unilaterally or bilaterally. The patient may be sitting or in a hook lyingposition. Place your hands along the lateral aspect of the lower ribs to fix the patient s attentionto the areas which movement is tooccur. Ask the patient to breathe out, and feel the rib cage move downward andinward. As the patient breathes out, place firm downward pressure into the ribs with the palms of your hands. Justprior to inspiration, apply a quick downward andinward stretch to the chest. This places a quick stretch on the external intercostals to facilitate their contraction. These muscles move the ribs outward andupward duringinspiration. Apply light manual resistance to the lower ribs to increase sensory awareness as the patient breathes in deeply and the chest expands and ribs flare. Then, as the patient breathes out, assist by gently squeezing the rib cage in a downward and inward direction.
Tellthepatient toexpandthelower ribs againstyour handas heor she breathes in. Apply gentle manual resistance to the lower rib area to increase sensory awarenessas thepatientbreathes inandthechest expandsandribs flare. Then,again,as thepatient breathes out,assistby gentlysqueezing therib cage in a down ward and inwarddirection. The patient may then be taught to perform the maneuver independently.He or She mayplacethehand(s) overtheribs or apply resistance usinga belt. Posterior basalexpansion Deep breathing emphasizing posterior basal expansion is important for the postsurgical patient who is confined to bed in a semireclining position for an extendedperiod of timebecause secretionsoftenaccumulateintheposterior segments of the lowerlobes. Havethepatient sit andlean forward ona pillow, slightlybendingthehips. Placeyour handsovertheposterioraspectofthelower ribs. Follow the same procedure as describedabove. Thisformof segmental breathingis importantfor thepost surgicalpatient who is confined to bed in a semi upright position for an extended period of time. Secretions oftenaccumulateinthe posteriorsegmentsofthelower lobes.
Belt exercises reinforce lateral costal breathing (A) by applying resistanceduring inspiration and (B) by assisting with pressure along the rib cageduring expiration.
Right middle lobe or lingula expansion Patient is sitting. Place your hands at either the right or the left side of the patient s chest, just below theaxilla. Follow the same procedure as described for lateral basal expansion. Apical expansion Patient in sitting position. Apply pressure (usually unilaterally) below the clavicle with the fingertips. This pattern is appropriate in an apical pneumothorax after a lobectomy. *Precautions-same as general
GLOSSOPHARYNGEAL BREATHING Glossopharynegal breathing is a means of increasing a patient sinspiratory capacity when thereis severe weakness of themusclesofinspiration. The first report of GPB was published by Dail in 1951in patients with poliomyelitisparalysis. It is a technique that is performed by using themuscles of mouth, cheeks, lips, tongue,soft palate,larynx andpharynx topiston bolusesof air intothelungs. The tongue is the main organ of this breathingtechnique. Thetongueis pushedupwardsandbackwards forcingthe air intothepharynx. Thelarynx opensandtheair passes intothetrachea whereit is trappedby closure oflarynx. This pistoning action is mechanism of eachgulp. Agulpis defined as bolusesof air projectedintothetracheaby pistoningaction of thetongue. INDICATIONS: Itis taughttopatientswho havedifficulty takingina deepbreath,for example, in preparation forcoughing. Itis used primarily by patients who are ventilator-dependent because of absent or incomplete innervation of the diaphragmas the result of a highcervical-level spinal cord lesion or other neuromusculardisorders.
Glossopharyngeal breathing can reduce ventilatordependence Also can be used as an emergency procedure when a malfunction of apatient s ventilatoroccur. Italsocanbe usedtoimprovetheforce(andthereforetheeffectiveness)ofa cough It is used to increase the volume of thevoice. Procedure Glossopharyngeal breathing involves taking several gulps of air, usually 6to 10 gulps in series, to pull air into the lungs when action of the inspiratory muscles isinadequate. After the patient takes several gulps of air, the mouth isclosed. Thetonguepushes theair back andtrapsitinthepharynx. Theair is thenforcedintothelungswhen theglottisis opened. Thisincreases thedepthof theinspirationandthepatient sinspiratoryand vitalcapacities
COUGHING An effective cough is necessary to eliminate respiratory obstructions and keep the lungs clear. Airway clearance is an important part of management of patients with acute or chronic respiratory conditions. The NormalCough Pump A cough may be reflexive or voluntary. When a person coughs, a series of actions occurs asfollows: Deep inspiration occurs-------Glottis closes------vocal cords tighten------ Abdominal muscles contract-------diaphragm elevates-------causing an increase in intrathoracic and intra-abdominal pressures-------Glottis opens-----Explosive expiration of air occurs. Under normal conditions, the cough pump is effective to the seventh generation of bronchi. (There are a total of 23 generations of bronchi in the tracheobronchial tree.) Ciliated epithelial cells are present up to the terminal bronchiole and raise secretions from the smaller to the larger airways in the absence of pathology.
Factors thatDecrease theEffectiveness oftheCough Mechanism and Cough Pump The effectiveness of the cough mechanism can be compromised for a number of reasons including the following: 1. Decreased inspiratory capacity 2. Inability to forcibly expel air 3. Decreased action of the cilia in the bronchial tree. 4. Increase in the amount or thickness of mucus. 1. Inspiratory capacity can be reduced because of: Pain due to acute lung disease Ribfracture Trauma to the chest Recent thoracic or abdominal surgery Weakness of the diaphragm or accessory muscles of inspiration as a result of a high spinal cord injury or neuropathic or myopathic disease Postoperatively, the respiratory center may be depressed as the result of general anesthesia, pain, or medication. Decreased inspiratory capacity:
2. A spinal cord injury above T12 and myopathic disease, such as muscular dystrophy,cause weakness ofthe abdominalmuscles,which are vital fora strongcough. Excessive fatigue as the result of criticalillness A chest wall or abdominal incision causingpain A patient who has had a tracheostomy, even when the tracheostomy siteis covered. Inability to forcibly expelair: The following factors contribute to a weakcough: 3. Physical interventions such as general anesthesia andintubation Pathologies such as COPD including chronicbronchitis Smoking also depresses the action of thecilia. Decreased action of the cilia in the bronchialtree: Action of the ciliated cells may be compromised becauseof: 4. Pathologies (e.g., cystic fibrosis, chronic bronchitis) and pulmonaryinfections (e.g.,pneumonia) Intubationirriatesthelumenoftheairways andcauses increasedmucus production Dehydration thickensmucus. Increase in the amount or thickness ofmucus: Occursin:
Teaching anEffective Cough Because an effective cough is an integral component of airway clearance, a patient must be taught the importance of an effective cough, how to produce an efficient and controlled voluntary cough, and when tocough. The following sequence and procedures are used when teaching aneffective cough. Assess the patient s voluntary or reflexive cough. Have the patient assume a relaxed, comfortable position for deep breathing and coughing. Sitting or leaning forward usually is the best position forcoughing. The patient s neck should be slightly flexed to make coughing morecomfortable. Teach the patient controlled diaphragmatic breathing, emphasizing deepinspirations. Demonstrate a sharp, deep, double cough. Demonstrate the proper muscle action of coughing (contraction of the abdominals). Have the patient place the hands on the abdomen and make three huffs with expiration to feel the contraction of the abdominals. Have the patient practice making a K sound to experience tightening the vocal cords, closing the glottis, and contracting the abdominals. When the patient has put these actions together, instruct the patient to take a deep but relaxed inspiration, followed by a sharp doublecough. The second cough during a single expiration is usually moreproductive. Use an abdominal binder or glossopharyngeal breathing in selected patients with inspiratory or abdominal muscle weakness to enhance the cough, ifnecessary. 1. 2. 3. 4. 5. 6. 7. 8. 9. 10.
PrecautionsforTeachingan EffectiveCough Never allow a patientto gaspinair,because thisincreases thework (energy expenditure) of breathing, causing the patient to fatigue more easily. It also increases turbulence and resistance in the airways, possibly leading to increased bronchospasm and further constriction ofairways. A gasping action also may push mucus or a foreign object deep intoair passages. Avoid uncontrolled coughing spasms (paroxysmalcoughing). Avoid forceful coughing if a patient has a history of a cerebrovascularaccident or an aneurysm. Have these patients huff several times to clear the airways, rather thancough. Besurethatthepatient coughswhileina somewhaterect or side-lyingposture. AdditionalTechniquestoFacilitatea Coughand ImproveAirway Clearance To maximize airway clearance, several techniques can be used to stimulate a strongercough,makecoughingmorecomfortable or improvetheclearance of secretions. Manual-AssistedCough If a patient has abdominal weakness (e.g., as the result of a mid-thoracic or cervical spinal cord injury), manual pressure on the abdominal area assists in developing greater intra abdominal pressure for a more forcefulcough. Manual
Therapist-Assisted Techniques With the patient in a supine or semireclining position, the therapist places the heel of one hand on the patient s abdomen at the epigastric area just distal to the xiphoid process. The other hand is placed on top of the first, keeping the fingers open or interlocking them After the patient inhales as deeply as possible,the therapist manually assists the patient as he or she attempts to cough. The abdomen is compressed with an inward and upward force, which pushes the diaphragm upward to cause a more forceful and effective cough. This same maneuver can be performed with the patient in a chair The therapist or family member can stand in back of the patient and apply manual pressure during expiration. P R E C A U T I O N : Avoid direct pressure on the xiphoid process during themaneuver. Self-Assisted Technique While in a sitting position, the patient crosses the arms across the abdomen or places the interlocked hands below the xiphoid process After a deep inspiration, the patient pushes inward and upward on the abdomen with the wrists or forearms and simultaneously leans forward while attempting to cough.