Steps to Create a Computerised Accounting System Using MS Access


COMPUTERISED ACCOUNTING
SYSTEM
and
E-FILLING OF TAX RETURN
6
TH
SEMESTER
UNIT-2
DESIGNING COMPUTERISED ACCOUNTING SYSTEM (DBMS
PACKAGE)
Prepared by RAJA APUL

H
e
r
e
a
r
e
t
h
e
s
t
e
p
s
t
h
a
t
y
o
u
’
l
l
n
e
e
d
t
o
t
a
k
e
i
n
o
r
d
e
r
t
o
c
r
e
a
t
e
D
a
t
a
B
a
s
e
:
(1) The first obvious step that you’ll need to do is to open MS Access
(
2
)
C
h
o
o
s
e
t
h
e
o
p
t
i
o
n
o
f
a
B
l
a
n
k
d
a
t
a
b
a
s
e
(3) Type your desired
File Name
for your new database (ex: THK Jain College) and click on
‘
Create
’
.
H
e
r
e
a
r
e
t
h
e
s
t
e
p
s
t
o
C
r
e
a
t
e
T
a
b
l
e
:
•
Click on
‘
View
’
•
Select
‘
Design View
’
•
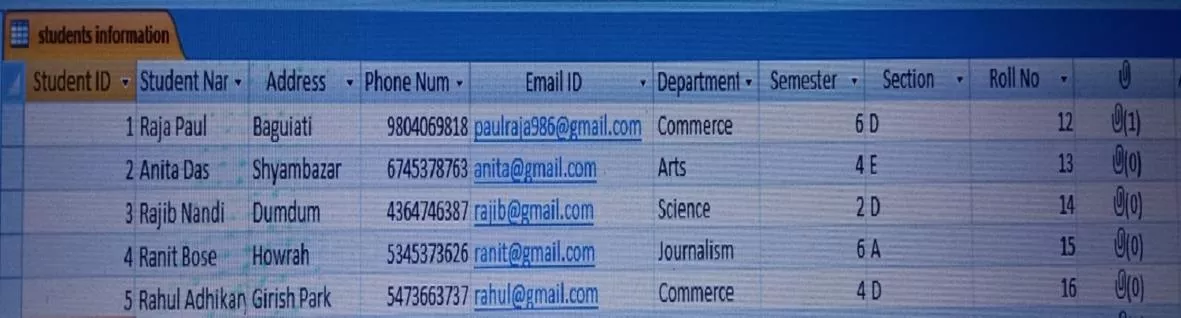
Type your desired table name (ex: Students Information) then click on
‘
Ok
’
•
Fill the desired fields accordingly and Save it

•
Now filled the table accordingly and save it
H
e
r
e
a
r
e
t
h
e
s
t
e
p
s
t
o
c
r
e
a
t
e
a
n
d
d
e
s
i
g
n
F
o
r
m
:
•
After completion of the
‘
Table
’
click on
‘
Create
’
•
Click on
‘
Form Design
’
•
Click on
‘
Add Existing Fields
’
•
Design your form accordingly by double clicking all the fields and you can drag the fields and choose position
•
Save it
•
Click on
‘
View
’
and select
‘
Form View
’
and then you can check all the forms
H
e
r
e
a
r
e
t
h
e
s
t
e
p
s
t
o
A
d
d
B
u
t
t
o
n
s
o
n
t
h
e
F
o
r
m
:
•
Go to Form Design
•
Click on
‘
Button
’
•
Drag the Button to the desired position and click once
•
Click on
‘
Record Navigation
’
•
Click on
‘
Go to First Record
’
;
‘
Go to Previous Record
’
;
‘
Go to Next Record
’
;
‘
Go to Last Record
’
•
Click on
‘
Next
’
•
Select Picture or Text
•
Click on
‘
Next
’
•
Click on
‘
Finish
’
(Create four buttons one by one through the above mentioned steps)
A
d
d
a
n
o
t
h
e
r
b
u
t
t
o
n
b
y
t
h
e
f
o
l
l
o
w
i
n
g
s
t
e
p
s
:
•
Go to Form Design
•
Click on
‘
Button
’
•
Drag the Button to the desired position and click once
•
Click on
‘
Record Operation
’
•
Click on
‘
Add New Record
’
•
Click on
‘
Next
’
•
Select Picture or Text
•
Click on
‘
Next
’
•
Click on
‘
Finish
’
•
After Completion the Form would be like this:
H
e
r
e
a
r
e
t
h
e
s
t
e
p
s
f
o
r
C
r
e
a
t
i
n
g
R
e
p
o
r
t
:
•
Click on
‘
Create
’
•
Click on
‘
Report Wizard
’
•
Select the Table
•
Select Desired Fields
•
Click on
‘
Next
’
•
Choose the Priority Column by double click (which will be shown at the top)
•
Click on
‘
Next
’
•
Choose the Ascending Field
•
Click on
‘
Next
’
•
Choose
‘
Layout as Stepped
’
and
‘
Orientation as Landscape
’
•
Click on
‘
Next
’
•
Click on
‘
Foundry
’
•
Click on
‘
Next
’
•
Select
‘
Modify the Report
’
s Design
’
•
Click on
‘
Finish
’
•
Adjust your Report
•
Click on
‘
View
’
and then Click on
‘
Report View
’
H
e
r
e
t
h
e
s
t
e
p
s
t
o
c
r
e
a
t
e
Q
u
e
r
y
a
n
d
R
u
n
Q
u
e
r
y
:
•
Click on
‘
Create
’
•
Click on
‘
Query Wizard
’
•
Select
‘
Simple Query Wizard
’
•
Click on
‘
Ok
’
•
Select the Desired Table
•
Choose Desired Fields
•
Click on
‘
Next
’
•
Choose
‘
Detail (shows every field of every record)
’
•
Click on
‘
Next
’
•
Click on
‘
Modify the Query Design
’
•
Click on
‘
Finish
’
•
The selected table will appear as a small window in the
Object Relationship pane.
In the table window, double-click
the
field names
you want to include in your query. They will be added to the
design grid
in the bottom part of the screen
•
Set the
search criteria
by clicking the cell in the
Criteria:
row of each field you want to filter. Typing criteria into more than
one field in the Criteria: row will set your query to include only results that meet all criteria. If you want to set multiple
criteria but don't need the records shown in your results to meet all of them, type the first criteria in the Criteria: row and
additional criteria in the
or:
row and the rows beneath it
•
After you have set your criteria,
run
the query by clicking the
Run
command
•
The query results will be displayed in the query's
Datasheet view,
which looks like a table. If you want,
save
your query by
clicking the
Save
c
ommand in the Quick Access Toolbar. When prompted to name it, type the desired name, then click
OK
S
t
e
p
s
t
o
C
r
e
a
t
e
P
a
y
-
s
l
i
p
i
n
M
S
A
c
c
e
s
s
:
•
The first obvious step that you’ll need to do is to open MS Access
•
C
h
o
o
s
e
t
h
e
o
p
t
i
o
n
o
f
a
B
l
a
n
k
d
a
t
a
b
a
s
e
•
Type your desired File Name for your new database (ex: Payroll) and click on ‘Create’
•
Create a table named as Pay-slip
(DA=Dearness Allowance; PF=Provident Fund; HRA=House Rent Allowance; TA=Travelling Allowance;
SA=Special Allowance)
•
Fill the First Three Columns
•
Click on ‘Create’
•
Click on ‘Query Design’
•
Add the Appropriate Table
•
Click on ‘Update’ under ‘Design’ head
•
Fill the ‘Field’ row and ‘Update to’ row each Boxes Accordingly
•
Click on ‘Update’ once and on the ‘Run!’ Button Twice
•
Then go to the Table and check all the Columns are filled accordingly or not. If not, the go to the Query and click
on the ‘Run!’ button again
•
Create Pay Sheet Details through ‘Report Wizard’
•
Create a Form to Enter data through ‘Form Design’
THANK YOU FOR
WATCHING MY
PRESENTATION
This guide provides detailed steps on designing a computerised accounting system using a DBMS package, specifically MS Access. Learn how to create a database, design tables, forms, add buttons, and generate reports efficiently. Follow the step-by-step instructions to streamline your accounting processes effectively.

Download Presentation

Please find below an Image/Link to download the presentation.
The content on the website is provided AS IS for your information and personal use only. It may not be sold, licensed, or shared on other websites without obtaining consent from the author. Download presentation by click this link. If you encounter any issues during the download, it is possible that the publisher has removed the file from their server.
E N D
Presentation Transcript
COMPUTERISED ACCOUNTING SYSTEM and E-FILLING OF TAX RETURN 6THSEMESTER UNIT-2 DESIGNING COMPUTERISED ACCOUNTING SYSTEM (DBMS PACKAGE) Prepared by RAJA APUL
Here are the steps that youll need to take in order to create Data Base: (1) The first obvious step that you ll need to do is to open MS Access (2) Choose the option of a Blank database (3) Type your desired File Name for your new database (ex: THK Jain College) and click on Create . Here are the steps to Create Table: Click on View Select Design View Type your desired table name (ex: Students Information) then click on Ok Fill the desired fields accordingly and Save it Now filled the table accordingly and save it
Here are the steps to create and design Form: After completion of the Table click on Create Click on Form Design Click on Add Existing Fields Design your form accordingly by double clicking all the fields and you can drag the fields and choose position Save it Click on View and select Form View and then you can check all the forms
Here are the steps to Add Buttons on the Form: Go to Form Design Click on Button Drag the Button to the desired position and click once Click on Record Navigation Click on Go to First Record ; Go to Previous Record ; Go to Next Record ; Go to Last Record Click on Next Select Picture or Text Click on Next Click on Finish (Create four buttons one by one through the above mentioned steps) Add another button by the following steps: Go to Form Design Click on Button Drag the Button to the desired position and click once Click on Record Operation Click on Add New Record Click on Next Select Picture or Text Click on Next Click on Finish After Completion the Form would be like this:
Here are the steps for Creating Report: Click on Create Click on Report Wizard Select the Table Select Desired Fields Click on Next Choose the Priority Column by double click (which will be shown at the top) Click on Next Choose the Ascending Field Click on Next Choose Layout as Stepped and Orientation as Landscape Click on Next Click on Foundry Click on Next Select Modify the Report s Design Click on Finish Adjust your Report Click on View and then Click on Report View
Here the steps to create Query and Run Query: Click on Create Click on Query Wizard Select Simple Query Wizard Click on Ok Select the Desired Table Choose Desired Fields Click on Next Choose Detail (shows every field of every record) Click on Next Click on Modify the Query Design Click on Finish The selected table will appear as a small window in the Object Relationship pane. In the table window, double-click the field names you want to include in your query. They will be added to the design grid in the bottom part of the screen Set the search criteria by clicking the cell in the Criteria: row of each field you want to filter. Typing criteria into more than one field in the Criteria: row will set your query to include only results that meet all criteria. If you want to set multiple criteria but don't need the records shown in your results to meet all of them, type the first criteria in the Criteria: row and additional criteria in the or: row and the rows beneath it After you have set your criteria, run the query by clicking the Run command The query results will be displayed in the query's Datasheet view, which looks like a table. If you want, save your query by clicking the Save command in the Quick Access Toolbar. When prompted to name it, type the desired name, then click OK
Steps to Create Pay-slip in MS Access: The first obvious step that you ll need to do is to open MS Access Choose the option of a Blank database Type your desired File Name for your new database (ex: Payroll) and click on Create Create a table named as Pay-slip (DA=Dearness Allowance; PF=Provident Fund; HRA=House Rent Allowance; TA=Travelling Allowance; SA=Special Allowance) Fill the First Three Columns
Click on Create Click on QueryDesign Add the Appropriate Table Click on Update under Design head Fill the Field row and Updateto row each Boxes Accordingly Click on Update once and on the Run! Button Twice Then go to the Table and check all the Columns are filled accordingly or not. If not, the go to the Query and click on the Run! button again
THANK YOU FOR WATCHING MY PRESENTATION