Setting Up SciShield Chemical Inventory Database


S
c
i
S
h
i
e
l
d
•
Welcome to the new chemical inventory database!
•
Feel free to reach out to Mike DeBord at any time to help answer your
questions. I am also happy to set up an individual training session:
•
This PowerPoint has some basic information on the program with
images to help guide usage, however, it does not cover all features of
the program.
•
You can follow the link below to access the database. It utilizes single
sign-on authentication, so if you log on to your computer using your
UA credentials, you will not have to enter a username or password for
access.


•
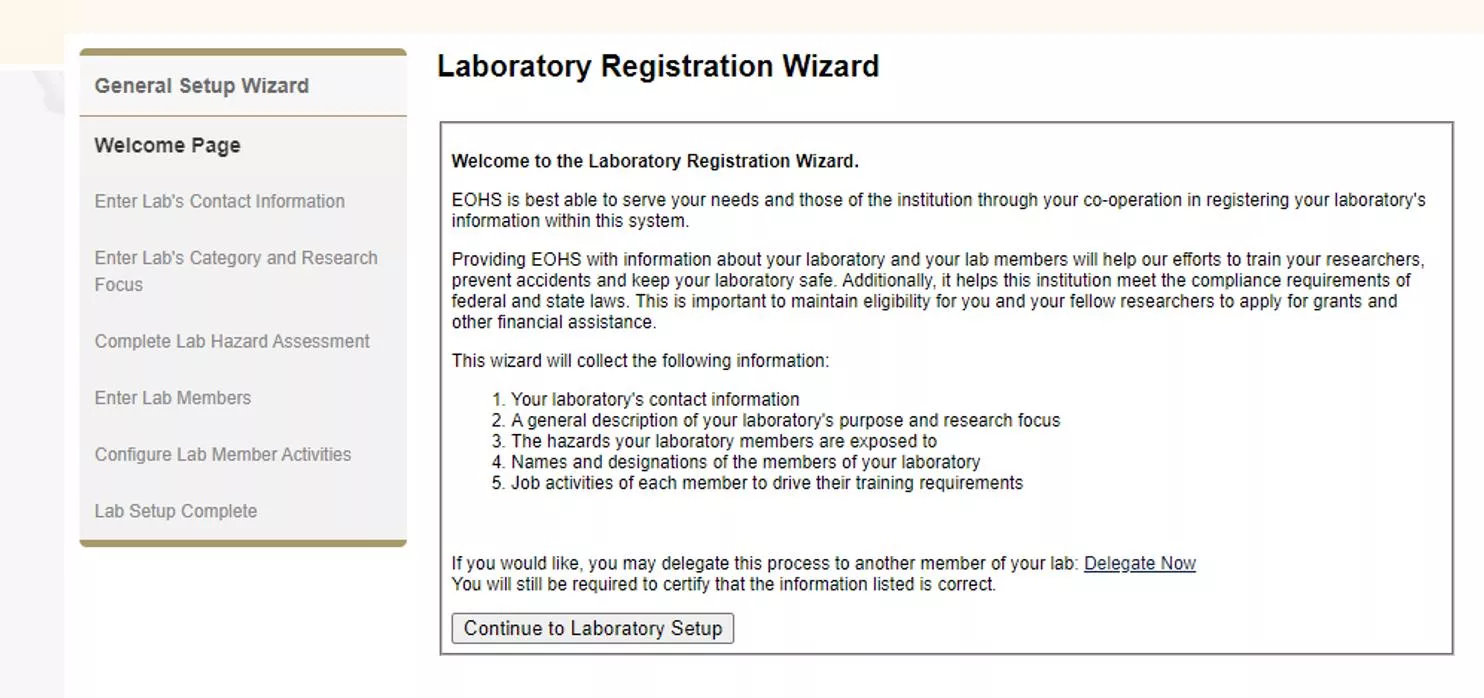
PI will be introduced to the Laboratory Registration Wizard
•
Click ‘Continue to Laboratory Setup’


•
In SciShield, a ‘laboratory’ is
defined by everything the PI
oversees.
•
‘Space’ is defined by a specific
room number.
•
Many ‘laboratories’ will
include numerous spaces.
•
You will be prompted to enter
basic laboratory contact
information.
•
Use PI office information for lab
contact information
•
Some of this may be pre-
populated
•
Check for accuracy
S
e
t
u
p
W
i
z
a
r
d
•
Enter the lab category and
provide a description for the
research and goals of the lab.
S
e
t
u
p
W
i
z
a
r
d
•
Check all boxes for the lab
hazards one might encounter in
all spaces while working under
your supervision.
S
e
t
u
p
W
i
z
a
r
d
•
Next, add all members of your
research group.
•
Simply type their name into the
search field and it should auto-
populate.
•
Middle initials do come into play.
•
Make sure to select the correct
individual and verify with their
email address
•
**Individuals can be
added/removed later as needed
S
e
t
u
p
W
i
z
a
r
d
•
This screen allows
you to list activities
each student
performs
S
e
t
u
p
W
i
z
a
r
d
•
Chose their designation, i.e.
post-doc, lab manager, grad
student, etc.
•
Edit their access controls.
Check boxes to enable
access.
•
Enabling the ‘manage group
ChemTracker inventory’ will
allow that individual to
make changes to the
chemical inventory.
S
e
t
u
p
W
i
z
a
r
d
•
This should complete
your laboratory setup.
S
e
t
u
p
W
i
z
a
r
d
G
e
t
t
i
n
g
S
t
a
r
t
e
d
•
Following the setup wizard:
•
Home screen will look slightly different.
You will have fewer tabs on the left.
•
Announcements and messages will be
shown here.
•
New safety concern form, with ability to
submit anonymously.
•
Quick SDS search for finding chemical
information.
•
Expanding (EOHS Sample Lab) Lab tab on
left allows you to manage your
laboratory:
L
a
b
P
r
o
f
i
l
e
•
Click on ‘View Lab
Profile’.
•
Allows you to make
changes to your contact
information, group
member info and
permissions, and
chemical information.
C
h
e
m
T
r
a
c
k
e
r
•
Click on ‘ChemTracker’.
•
This tab is your
chemical inventory.
•
You can search for
chemicals using a
variety of filters.
C
h
e
m
T
r
a
c
k
e
r
•
To obtain a better view of
the inventory, click on the
circled icon:
C
h
e
m
i
c
a
l
C
o
n
t
a
i
n
e
r
s
•
This provides a better view for searching chemical information.
•
Clicking on the chemical name will allow you to view more detailed
information on the specific chemical:
C
h
e
m
i
c
a
l
C
o
n
t
a
i
n
e
r
s
•
This provides a better view for searching chemical information.
•
Clicking on the chemical name will allow you to view more detailed
information on the specific chemical:
C
h
e
m
i
c
a
l
C
o
n
t
a
i
n
e
r
s
•
This provides a better view for searching chemical information.
•
If an SDS is not attached to the chemical, click on Add SDS:
C
h
e
m
i
c
a
l
C
o
n
t
a
i
n
e
r
s
•
This will search a database of SDSs
from different manufacturers.
•
Select the appropriate SDS and click
the “attach SDS” tab at the bottom
of the screen.
C
h
e
m
i
c
a
l
C
o
n
t
a
i
n
e
r
s
•
After a few moments, you should see a new link appear to view the
SDS. Clicking this link will download the PDF version of the SDS.
C
h
e
m
i
c
a
l
C
o
n
t
a
i
n
e
r
s
•
This screen also allows you to edit the chemical information or
remove it from your inventory.
C
h
e
m
i
c
a
l
C
o
n
t
a
i
n
e
r
s
•
You can edit basic
information, i.e.
amount and units.
•
Or, click on additional
details…
•
In particular,
note the
expiration date!
C
h
e
m
i
c
a
l
C
o
n
t
a
i
n
e
r
s
•
By scrolling the chemical container view to right, you will notice a
column for chemical expiration date. This should be added for as
many chemicals as possible, particularly peroxide formers or any
chemicals that can be problematic once expired.
C
h
e
m
T
r
a
c
k
e
r
•
To add inventory, click the
add inventory tab:
C
h
e
m
T
r
a
c
k
e
r
•
You must add chemical name,
location (space), amount and
units.
•
Again, click additional details
to add more information that
could be useful to your group.
•
The
Unique container ID
will
be auto-generated by the
program,
do not fill out this
field
.
•
Add expiration date
C
h
e
m
T
r
a
c
k
e
r
•
As you begin typing the
chemical name or CAS
number, the field will auto-
populate with chemicals in
the database.
C
h
e
m
T
r
a
c
k
e
r
•
You can only add chemicals to
locations that are assigned to
your lab.
•
If you need additional spaces
added to your lab, email Mike
DeBord:
mad151@uakron.edu
•
As you can see, Lincoln Building
room 204 is the only option for
the EOHS sample lab.
•
You cannot make edits to spaces
that are not in your “lab”.
C
h
e
m
T
r
a
c
k
e
r
•
The entire inventory can be
viewed using the “find
other chemicals” tab.
C
h
e
m
T
r
a
c
k
e
r
•
If you do not want other
researchers to see a
chemical container in your
lab you can change the
status of a particular
container to
hidden
.
•
If a chemical is in good
condition and you no
longer have a need for it,
you can mark the container
as
surplus
.
C
h
e
m
T
r
a
c
k
e
r
•
You can search for surplus
chemicals under the find
other chemicals tab.
•
Simply check the surplus box
and click submit.
•
If you give away or receive a
surplus chemical:
•
1) change your inventory
appropriately to reflect
changes.
•
2) Contact EOHS if the
chemical needs transported
to a different building.
Explore the new SciShield chemical inventory database with guidance from Mike DeBord. Learn about the Laboratory Registration Wizard, setting up labs, defining spaces, adding research group members, and managing access controls. Access the database easily with single sign-on authentication. Get started today for efficient chemical inventory management.

Download Presentation

Please find below an Image/Link to download the presentation.
The content on the website is provided AS IS for your information and personal use only. It may not be sold, licensed, or shared on other websites without obtaining consent from the author.If you encounter any issues during the download, it is possible that the publisher has removed the file from their server.
You are allowed to download the files provided on this website for personal or commercial use, subject to the condition that they are used lawfully. All files are the property of their respective owners.
The content on the website is provided AS IS for your information and personal use only. It may not be sold, licensed, or shared on other websites without obtaining consent from the author.
E N D
Presentation Transcript
SciShield SciShield Welcome to the new chemical inventory database! Feel free to reach out to Mike DeBord at any time to help answer your questions. I am also happy to set up an individual training session: mad151@uakron.edu or 330-972-7766 This PowerPoint has some basic information on the program with images to help guide usage, however, it does not cover all features of the program. You can follow the link below to access the database. It utilizes single sign-on authentication, so if you log on to your computer using your UA credentials, you will not have to enter a username or password for access. https://uakron.scishield.com/
PI will be introduced to the Laboratory Registration Wizard Click Continue to Laboratory Setup
Setup Wizard Setup Wizard In SciShield, a laboratory is defined by everything the PI oversees. Space is defined by a specific room number. Many laboratories will include numerous spaces. You will be prompted to enter basic laboratory contact information. Use PI office information for lab contact information Some of this may be pre- populated Check for accuracy
Setup Wizard Setup Wizard Enter the lab category and provide a description for the research and goals of the lab.
Setup Wizard Setup Wizard Check all boxes for the lab hazards one might encounter in all spaces while working under your supervision.
Setup Wizard Setup Wizard Next, add all members of your research group. Simply type their name into the search field and it should auto- populate. Middle initials do come into play. Make sure to select the correct individual and verify with their email address **Individuals can be added/removed later as needed
Setup Wizard Setup Wizard This screen allows you to list activities each student performs
Setup Wizard Setup Wizard Chose their designation, i.e. post-doc, lab manager, grad student, etc. Edit their access controls. Check boxes to enable access. Enabling the manage group ChemTracker inventory will allow that individual to make changes to the chemical inventory.
Setup Wizard Setup Wizard This should complete your laboratory setup.
Getting Started Getting Started Following the setup wizard: Home screen will look slightly different. You will have fewer tabs on the left. Announcements and messages will be shown here. New safety concern form, with ability to submit anonymously. Quick SDS search for finding chemical information. Expanding (EOHS Sample Lab) Lab tab on left allows you to manage your laboratory:
Lab Profile Lab Profile Click on View Lab Profile . Allows you to make changes to your contact information, group member info and permissions, and chemical information.
ChemTracker ChemTracker Click on ChemTracker . This tab is your chemical inventory. You can search for chemicals using a variety of filters.
ChemTracker ChemTracker To obtain a better view of the inventory, click on the circled icon:
Chemical Containers Chemical Containers This provides a better view for searching chemical information. Clicking on the chemical name will allow you to view more detailed information on the specific chemical:
Chemical Containers Chemical Containers This provides a better view for searching chemical information. Clicking on the chemical name will allow you to view more detailed information on the specific chemical:
Chemical Containers Chemical Containers This provides a better view for searching chemical information. If an SDS is not attached to the chemical, click on Add SDS:
Chemical Containers Chemical Containers This will search a database of SDSs from different manufacturers. Select the appropriate SDS and click the attach SDS tab at the bottom of the screen.
Chemical Containers Chemical Containers After a few moments, you should see a new link appear to view the SDS. Clicking this link will download the PDF version of the SDS.
Chemical Containers Chemical Containers This screen also allows you to edit the chemical information or remove it from your inventory.
Chemical Containers Chemical Containers You can edit basic information, i.e. amount and units. Or, click on additional details In particular, note the expiration date!
Chemical Containers Chemical Containers By scrolling the chemical container view to right, you will notice a column for chemical expiration date. This should be added for as many chemicals as possible, particularly peroxide formers or any chemicals that can be problematic once expired.
ChemTracker ChemTracker To add inventory, click the add inventory tab:
ChemTracker ChemTracker You must add chemical name, location (space), amount and units. Again, click additional details to add more information that could be useful to your group. The Unique container ID will be auto-generated by the program, do not fill out this field. Add expiration date
ChemTracker ChemTracker As you begin typing the chemical name or CAS number, the field will auto- populate with chemicals in the database.
ChemTracker ChemTracker You can only add chemicals to locations that are assigned to your lab. If you need additional spaces added to your lab, email Mike DeBord: mad151@uakron.edu As you can see, Lincoln Building room 204 is the only option for the EOHS sample lab. You cannot make edits to spaces that are not in your lab .
ChemTracker ChemTracker The entire inventory can be viewed using the find other chemicals tab.
ChemTracker ChemTracker If you do not want other researchers to see a chemical container in your lab you can change the status of a particular container to hidden. If a chemical is in good condition and you no longer have a need for it, you can mark the container as surplus.
ChemTracker ChemTracker You can search for surplus chemicals under the find other chemicals tab. Simply check the surplus box and click submit. If you give away or receive a surplus chemical: 1) change your inventory appropriately to reflect changes. 2) Contact EOHS if the chemical needs transported to a different building.