Magnetic Fields Through Student-Led Activities
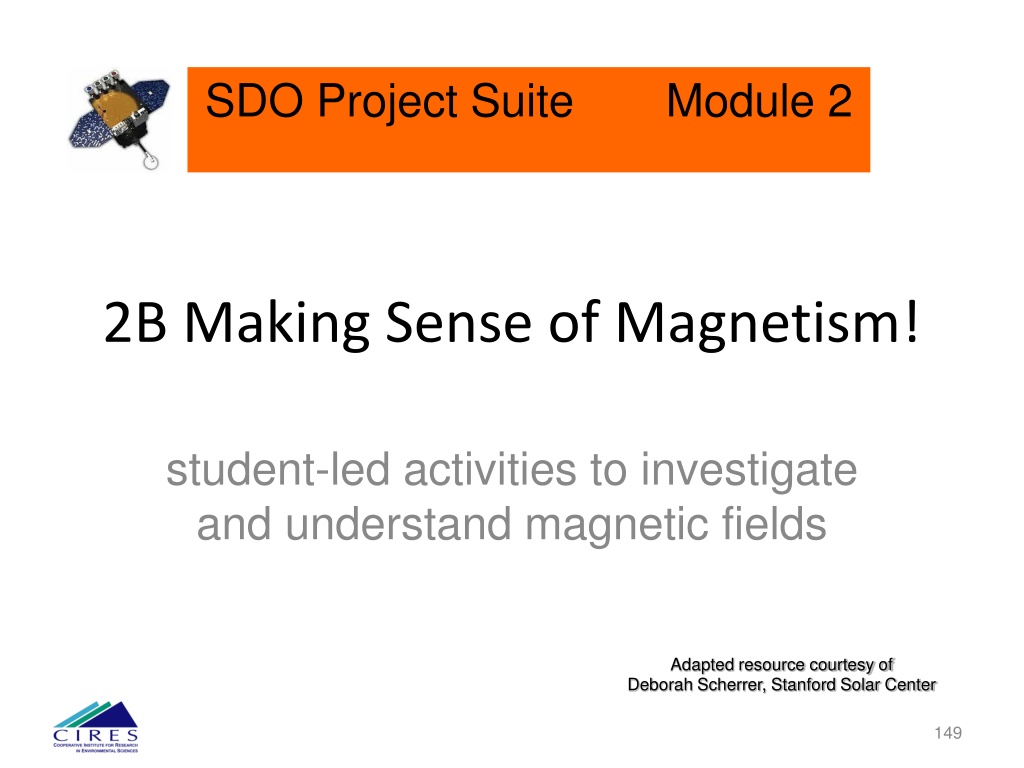
2B Making Sense of Magnetism!
student-led activities to investigate
and understand magnetic fields
149
Adapted resource courtesy of
Adapted resource courtesy of
Deborah Scherrer, Stanford Solar Center
Deborah Scherrer, Stanford Solar Center
150
M
M
a
a
t
t
e
e
r
r
i
i
a
a
l
l
s
s
:
:
E
a
c
h
t
e
a
m
n
e
e
d
s
t
h
e
f
o
l
l
o
w
i
n
g
a
c
t
i
v
i
t
y
i
t
e
m
s
:
A
c
t
i
v
i
t
y
3
:
M
a
g
n
e
t
i
c
S
u
n
s
p
o
t
s
1)
2 sunspot
field papers
2)
1 horseshoe
or 2 bar
magnets
3)
compass
4)
pencil
A
c
t
i
v
i
t
y
2
:
O
b
s
e
r
v
i
n
g
M
a
g
n
e
t
i
c
F
i
e
l
d
L
i
n
e
s
1)
4 pieces of
8.5”x11” paper
2)
tape
3)
2 bar magnets
4)
compass
5)
plastic Wrap
6)
iron filings
7)
small Box
8)
pencil
A
c
t
i
v
i
t
y
1
:
E
x
p
l
o
r
i
n
g
M
a
g
n
e
t
i
c
P
o
l
e
s
1)
magnaprobe
2)
1 bar magnet
3)
1 flat magnet
4)
3-D circle
magnet
5)
Lodestone
6)
pencil
151
M
M
a
a
g
g
n
n
e
e
t
t
s
s
o
o
n
n
E
E
a
a
r
r
t
t
h
h
Lodestones are naturally occurring magnetic rocks
with the mineral magnetite (Fe
3
O
4
). Lodestones
were discovered by the ancient Chinese and
Greeks about 3,000 years ago.
The concept of an Earth compass was
discovered by the Chinese around 2,000 years
ago
.
Meteorites were recognized as metal and may
have been recognized as being magnetic by
ancient people, too.
152
•
Magnetic dipoles are labeled as +/-,
North/South, red/blue, etc.
•
Earth’s north magnetic pole is
negative and the south pole is
positive.
(- polarity) and attracts the positive
(+ polarity) compass needle.
Magnets have at least 2 poles (a dipole):
•
Opposite poles attract:
-North & South poles attract
•
Like poles repel:
-North & North and South & South poles repel
153
M
M
a
a
g
g
n
n
e
e
t
t
i
i
c
c
F
F
i
i
e
e
l
l
d
d
L
L
i
i
n
n
e
e
s
s
Magnetic field lines represent
where the magnetic fields are
located.
Magnetic fields cannot be seen but
their effects can be detected and
measured.
A
A
c
c
t
t
i
i
v
v
i
i
t
t
y
y
1
1
:
:
E
E
x
x
p
p
l
l
o
o
r
r
i
i
n
n
g
g
M
M
a
a
g
g
n
n
e
e
t
t
i
i
c
c
P
P
o
o
l
l
e
e
s
s
Locate and identify polarity of magnetic poles
Use the Magnaprobe to explore poles in various magnetic objects. Record your
observations as a team.
1.
Where are the poles in a bar magnet?
2.
Where are the poles in a flat magnet?
3.
Where are the poles in a sphere (3-D circle) magnet?
4.
What determines where the poles are in a magnet?
5.
What happens to the poles if you break a magnet in half?
6.
Can a magnet have more than 2 poles? Try to find out!
7.
How many poles does a lodestone have?
154
A
A
c
c
t
t
i
i
v
v
i
i
t
t
y
y
2
2
:
:
O
O
b
b
s
s
e
e
r
r
v
v
i
i
n
n
g
g
M
M
a
a
g
g
n
n
e
e
t
t
i
i
c
c
F
F
i
i
e
e
l
l
d
d
L
L
i
i
n
n
e
e
s
s
Locate magnetic field lines with a magnet & compass
1.
Wrap
one
bar magnet with plastic wrap and place it in the
box.
2.
Using a compass identify which pole of the magnet is North
(-) and S (+) and
label
an “N” and “S” at the correct end of
the
magnet.
3.
Label
the correct polarity, + or -, on the N and S poles of the
magnet
.
4.
Evenly sprinkle iron filings around the box without moving
the magnet.
5.
Observe how the iron filings to arrange themselves around
the magnet
. D
o not touch the filings or magnet!
155
156
activity credit:
http://sunearthday.nasa.gov/2007/materials/magnetic_field_lines.pdf
1. Tape two pieces of 8.5”x11” paper together length-wise, then place the paper
under your magnet. Wrap the magnet in plastic wrap and tape the magnet in the
middle of the paper, as in the picture to the right.
2. What happens when you put a compass next to a magnet? What happens when
you take the compass further away? What happens when you put it close to a
different part of the magnet?
3. To trace the magnetic field lines, do the following:
•
Draw a dot somewhere near the magnet and place the center of a compass over the dot.
•
Draw a dot at the location of the arrow head (or tail) of the compass needle.
•
Draw a line to connect the two dots.
•
Move the compass center directly over the second dot, and again draw a dot at the location
of the compass needle head or tail.
•
Continue these steps, marking the direction of the needle with dots and connecting them
until the line meets the magnet or the edge of the paper. Go back to the first dot and repeat
these steps until the other end of the line also meets the magnet or the paper edge.
•
When finished with the first line, pick another spot near the magnet and repeat the process
to trace more field lines.
157
1.
Correctly label the
N (-) and S (+) poles of two
bar magnets. Wrap the magnets separately in
plastic wrap.
1.
Place the two magnets parallel to each other, with
their poles in opposite directions, on top of the
paper. Tape the magnets is place, as in the picture
at the right.
1.
Correctly trace the direction of ten magnetic
field lines, using directional arrows, between
the opposite poles of two
bar magnets
.
2
2
.
.
O
O
b
b
s
s
e
e
r
r
v
v
i
i
n
n
g
g
M
M
a
a
g
g
n
n
e
e
t
t
i
i
c
c
F
F
i
i
e
e
l
l
d
d
L
L
i
i
n
n
e
e
s
s
T
r
a
c
e
m
a
g
n
e
t
i
c
f
i
e
l
d
l
i
n
e
s
b
e
t
w
e
e
n
o
p
p
o
s
i
t
e
m
a
g
n
e
t
i
c
p
o
l
e
s
S
S
u
u
n
n
s
s
p
p
o
o
t
t
s
s
a
a
r
r
e
e
u
u
s
s
u
u
a
a
l
l
l
l
y
y
i
i
n
n
p
p
a
a
i
i
r
r
s
s
a
a
n
n
d
d
h
h
a
a
v
v
e
e
m
m
a
a
g
g
n
n
e
e
t
t
i
i
c
c
p
p
o
o
l
l
e
e
s
s
,
,
l
l
i
i
k
k
e
e
a
a
m
m
a
a
g
g
n
n
e
e
t
t
!
!
158
A
A
c
c
t
t
i
i
v
v
i
i
t
t
y
y
3
3
:
:
M
M
a
a
g
g
n
n
e
e
t
t
i
i
c
c
S
S
u
u
n
n
s
s
p
p
o
o
t
t
s
s
L
L
a
a
b
b
S
S
h
h
e
e
e
e
t
t
P
r
e
d
i
c
t
t
h
e
m
a
g
n
e
t
i
c
f
i
e
l
d
o
f
s
u
n
s
p
o
t
s
1.
Predict what the
magnetic field of a
sunspot pair might
look like.
2.
Draw your
prediction.
159
A
A
c
c
t
t
i
i
v
v
i
i
t
t
y
y
3
3
:
:
M
M
a
a
g
g
n
n
e
e
t
t
i
i
c
c
S
S
u
u
n
n
s
s
p
p
o
o
t
t
s
s
L
L
a
a
b
b
S
S
h
h
e
e
e
e
t
t
M
o
d
e
l
t
h
e
m
a
g
n
e
t
i
c
f
i
e
l
d
o
f
s
u
n
s
p
o
t
s
1.
Line up a horseshoe
magnet or two bar
magnets with the north
and south pole
designations on the
sunspot pair image.
2.
Use the compass, as
you did in Activity 2, to
draw the magnetic
field lines between the
sunspot pair.
160
1.
Explain how this activity proves that magnetic fields exist even though we can’t see them.
1.
At which pole (N or S, + or -) do the magnetic field lines start? Which pole are the magnetic field
lines attracted to (N or S, + or -)? Is this direction the same for all magnetic field lines?
1.
Describe how magnetic field lines are arranged – are they random or in a pattern? What
happens to magnetic field lines directly at the poles? Explain with evidence.
1.
Summarize the relationship between magnetic fields and sunspots. Explain how sunspots are
a
source of space weather, such as “solar storms”.
D
D
i
i
s
s
c
c
u
u
s
s
s
s
i
i
o
o
n
n
:
:
W
W
h
h
a
a
t
t
d
d
i
i
d
d
y
y
o
o
u
u
r
r
t
t
e
e
a
a
m
m
d
d
i
i
s
s
c
c
o
o
v
v
e
e
r
r
a
a
b
b
o
o
u
u
t
t
m
m
a
a
g
g
n
n
e
e
t
t
i
i
c
c
f
f
i
i
e
e
l
l
d
d
s
s
?
?
Explore the fascinating world of magnetism with student-led activities to investigate and comprehend magnetic fields. Discover the properties of magnetic poles, observe magnetic field lines, and learn about the history and significance of magnets on Earth. Engage in hands-on experiments and discussions to deepen your understanding of magnetic phenomena. Experience the interactive journey into the realm of magnetism guided by adapted resources from the Stanford Solar Center.

Download Presentation

Please find below an Image/Link to download the presentation.
The content on the website is provided AS IS for your information and personal use only. It may not be sold, licensed, or shared on other websites without obtaining consent from the author.If you encounter any issues during the download, it is possible that the publisher has removed the file from their server.
You are allowed to download the files provided on this website for personal or commercial use, subject to the condition that they are used lawfully. All files are the property of their respective owners.
The content on the website is provided AS IS for your information and personal use only. It may not be sold, licensed, or shared on other websites without obtaining consent from the author.
E N D
Presentation Transcript
SDO Project Suite Module 2 2B Making Sense of Magnetism! student-led activities to investigate and understand magnetic fields Adapted resource courtesy of Deborah Scherrer, Stanford Solar Center 149
SDO Project Suite Module 2 Materials: Each team needs the following activity items: Activity 1: Exploring Magnetic Poles Activity 2: Observing Magnetic Field Lines Activity 3: Magnetic Sunspots 1) magnaprobe 2) 1 bar magnet 3) 1 flat magnet 4) 3-D circle magnet 5) Lodestone 6) pencil 1) 4 pieces of 8.5 x11 paper 2) tape 3) 2 bar magnets 4) compass 5) plastic Wrap 6) iron filings 7) small Box 8) pencil 1) 2 sunspot field papers 2) 1 horseshoe or 2 bar magnets 3) compass 4) pencil 150
SDO Project Suite Module 2 Magnets on Earth Lodestones are naturally occurring magnetic rocks with the mineral magnetite (Fe3O4). Lodestones were discovered by the ancient Chinese and Greeks about 3,000 years ago. The concept of an Earth compass was discovered by the Chinese around 2,000 years ago. Meteorites were recognized as metal and may have been recognized as being magnetic by ancient people, too. 151
SDO Project Suite Module 2 Magnets have at least 2 poles (a dipole): Opposite poles attract: -North & South poles attract Like poles repel: -North & North and South & South poles repel Magnetic dipoles are labeled as +/-, North/South, red/blue, etc. Earth s north magnetic pole is negative and the south pole is positive. (- polarity) and attracts the positive (+ polarity) compass needle. 152
SDO Project Suite Module 2 Magnetic Field Lines Magnetic field lines represent where the magnetic fields are located. Magnetic fields cannot be seen but their effects can be detected and measured. 153
SDO Project Suite Module 2 Activity 1: Exploring Magnetic Poles Locate and identify polarity of magnetic poles Use the Magnaprobe to explore poles in various magnetic objects. Record your observations as a team. 1. Where are the poles in a bar magnet? 2. Where are the poles in a flat magnet? 3. Where are the poles in a sphere (3-D circle) magnet? 4. What determines where the poles are in a magnet? 5. What happens to the poles if you break a magnet in half? 6. Can a magnet have more than 2 poles? Try to find out! 7. How many poles does a lodestone have? 154
SDO Project Suite Module 2 Activity 2: Observing Magnetic Field Lines Locate magnetic field lines with a magnet & compass 1. Wrap one bar magnet with plastic wrap and place it in the box. Using a compass identify which pole of the magnet is North (-) and S (+) and labelan N and S at the correct end of the magnet. Label the correct polarity, + or -, on the N and S poles of the magnet. Evenly sprinkle iron filings around the box without moving the magnet. Observe how the iron filings to arrange themselves around the magnet. Do not touch the filings or magnet! 2. 3. 4. 5. 155
SDO Project Suite Module 2 Activity 2: Observing Magnetic Field Lines Lab Sheet Trace magnetic field lines with a magnet and compass 1. Tape two pieces of 8.5 x11 paper together length-wise, then place the paper under your magnet. Wrap the magnet in plastic wrap and tape the magnet in the middle of the paper, as in the picture to the right. 2. What happens when you put a compass next to a magnet? What happens when you take the compass further away? What happens when you put it close to a different part of the magnet? 3. To trace the magnetic field lines, do the following: Draw a dot somewhere near the magnet and place the center of a compass over the dot. Draw a dot at the location of the arrow head (or tail) of the compass needle. Draw a line to connect the two dots. Move the compass center directly over the second dot, and again draw a dot at the location of the compass needle head or tail. Continue these steps, marking the direction of the needle with dots and connecting them until the line meets the magnet or the edge of the paper. Go back to the first dot and repeat these steps until the other end of the line also meets the magnet or the paper edge. When finished with the first line, pick another spot near the magnet and repeat the process to trace more field lines. 156 activity credit: http://sunearthday.nasa.gov/2007/materials/magnetic_field_lines.pdf
SDO Project Suite Module 2 Sunspots are usually in pairs and have magnetic poles, like a magnet! 2. Observing Magnetic Field Lines Trace magnetic field lines between opposite magnetic poles 1. Correctly label the N (-) and S (+) poles of two bar magnets. Wrap the magnets separately in plastic wrap. 1. Place the two magnets parallel to each other, with their poles in opposite directions, on top of the paper. Tape the magnets is place, as in the picture at the right. 1. Correctly trace the direction of ten magnetic field lines, using directional arrows, between the opposite poles of two bar magnets. 157
SDO Project Suite Module 2 Activity 3: Magnetic Sunspots Lab Sheet Predict the magnetic field of sunspots 1. Predict what the magnetic field of a sunspot pair might look like. 2. Draw your prediction. 158
SDO Project Suite Module 2 Activity 3: Magnetic Sunspots Lab Sheet Model the magnetic field of sunspots 1. Line up a horseshoe magnet or two bar magnets with the north and south pole designations on the sunspot pair image. 2. Use the compass, as you did in Activity 2, to draw the magnetic field lines between the sunspot pair. 159
SDO Project Suite Module 2 Discussion: What did your team discover about magnetic fields? 1. Explain how this activity proves that magnetic fields exist even though we can t see them. 1. At which pole (N or S, + or -) do the magnetic field lines start? Which pole are the magnetic field lines attracted to (N or S, + or -)? Is this direction the same for all magnetic field lines? 1. Describe how magnetic field lines are arranged are they random or in a pattern? What happens to magnetic field lines directly at the poles? Explain with evidence. 1. Summarize the relationship between magnetic fields and sunspots. Explain how sunspots are a source of space weather, such as solar storms . 160