Layout Managers in Java
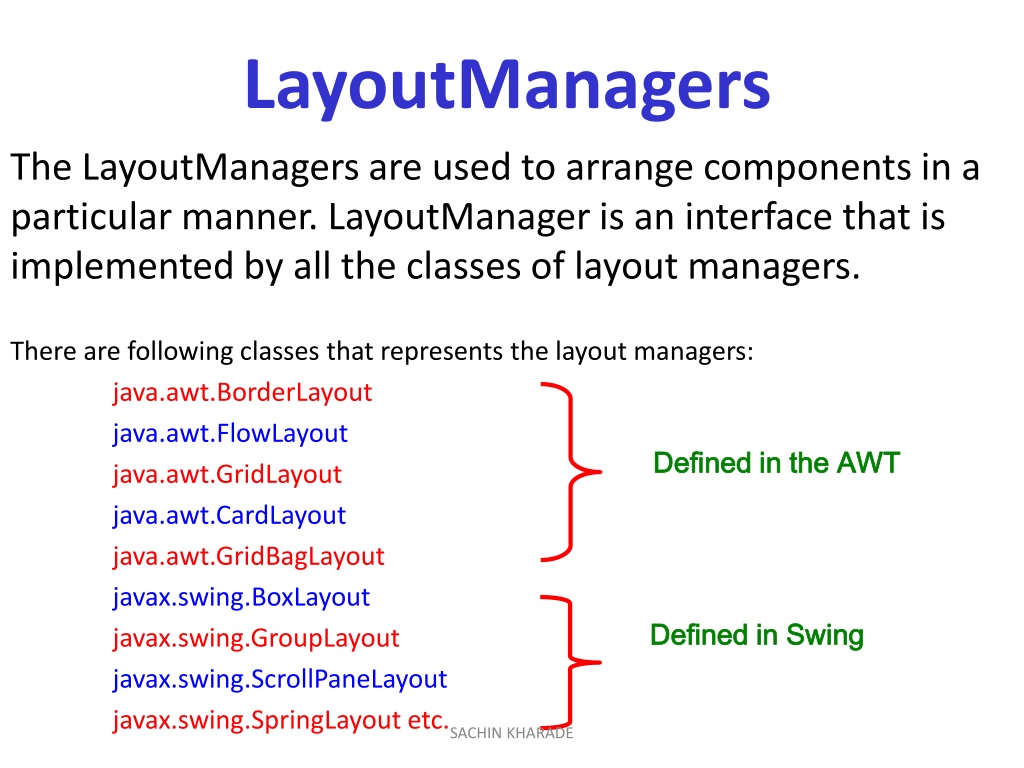

LayoutManagers
The LayoutManagers are used to arrange components in a
particular manner. LayoutManager is an interface that is
implemented by all the classes of layout managers.
There are following classes that represents the layout managers:
java.awt.BorderLayout
java.awt.FlowLayout
java.awt.GridLayout
java.awt.CardLayout
java.awt.GridBagLayout
javax.swing.BoxLayout
javax.swing.GroupLayout
javax.swing.ScrollPaneLayout
javax.swing.SpringLayout etc.


SACHIN KHARADE

Layout of Components
•
BorderLayout
–
north, south, west, east
& center
•
FlowLayout
–
left to right & top down
•
CardLayout
–
stack of panels
•
GridLayout
–
tabular form (rows &
columns)
•
GridBagLayout
–
tabular form(variable
row heights and column
widths)
SACHIN KHARADE
Use Layout Managers
•
Default layout managers
–
Windows (Frames & Dialogs)
•
BorderLayout
–
Panels (Applets)
•
FlowLayout
setLayout(new BorderLayout());
setLayout(new CardLayout(());
setLayout(new FlowLayout());
setLayout(new GridLayout(rows,columns,xgap,ygap));
SACHIN KHARADE
BorderLayout
The BorderLayout is used to arrange the components
in five regions: north, south, east, west and center. Each
region (area) may contain one component only. It is the
default layout of frame or window.
Five constants for each region:
public static final int NORTH
public static final int SOUTH
public static final int EAST
public static final int WEST
public static final int CENTER
SACHIN KHARADE
Constructors of BorderLayout class
BorderLayout()
creates a border layout but with no gaps between
the components.
JBorderLayout(int hgap, int vgap)
creates a border layout with the given horizontal
and vertical gaps between the components.
SACHIN KHARADE
How to Use BorderLayout?
import java.awt.*;
public class TestBorderLayout { public static void main(String[] args){ Frame f = new Frame("TestBorderLayout");f.setSize(200,200);
f.add("North", new Button("North")); f.add("South", new Button("South")); f.add("East", new Button("East")); f.add("West", new Button("West")); f.add("Center", new Button("Center"));f.setVisible(true);
}
}
SACHIN KHARADE
Example of BorderLayout class
import
java.awt.*;
import
javax.swing.*;
public
class
Border {JFrame f;
Border(){f=
new
JFrame();
JButton b1=
new
JButton("NORTH");JButton b2=
new
JButton("SOUTH");JButton b3=
new
JButton("EAST");JButton b4=
new
JButton("WEST");JButton b5=
new
JButton("CENTER");f.add(b1,BorderLayout.NORTH);
f.add(b2,BorderLayout.SOUTH);
f.add(b3,BorderLayout.EAST);
f.add(b4,BorderLayout.WEST);
f.add(b5,BorderLayout.CENTER);
f.setSize(300,300);
f.setVisible(
true
);
}
public
static
void
main(String[] args)
{new
Border();
}
}
SACHIN KHARADE
SACHIN KHARADE
GridLayout
The GridLayout is used to arrange the
components in rectangular grid. One
component is displayed in each rectangle.
SACHIN KHARADE
Constructors of GridLayout class
GridLayout()
creates a grid layout with one column per
component in a row.
GridLayout(int rows, int columns)
creates a grid layout with the given rows and
columns but no gaps between the components.
GridLayout(int rows, int columns, int hgap, int vgap)
creates a grid layout with the given rows and
columns alongwith given horizontal and vertical
gaps.
SACHIN KHARADE
How to Use GridLayout?
import java.awt.*;
public class TestGridLayout { public static void main(String[] args){ Frame f = new Frame("TestGridLayout");f.setSize(200,200);
f.
setLayout(new GridLayout(2,3));
f.add(new Button("Button 1")); f.add(new Button("Button 2")); f.add(new Button("Button 3")); f.add(new Button("Button 4")); f.add(new Button("Button 5"));f.setVisible(true);
}
}
SACHIN KHARADE
import
java.awt.*;
import
javax.swing.*;
public
class
MyGridLayout{JFrame f;
MyGridLayout(){f=
new
JFrame();
JButton b1=
new
JButton("1");JButton b2=
new
JButton("2");JButton b3=
new
JButton("3");JButton b4=
new
JButton("4");JButton b5=
new
JButton("5");JButton b6=
new
JButton("6");JButton b7=
new
JButton("7");JButton b8=
new
JButton("8");JButton b9=
new
JButton("9");f.add(b1);
f.add(b2);
f.add(b3);
f.add(b4);
f.add(b5);
f.add(b6);
f.add(b7);
f.add(b8);
f.add(b9);
f.setLayout(
new
GridLayout(3,3));
f.setSize(300,300);
f.setVisible(
true
);
}
public
static
void
main(String[] args) {new
MyGridLayout();
}
}
Example of GridLayout class
SACHIN KHARADE
SACHIN KHARADE
FlowLayout
The FlowLayout is used to arrange the components
in a line, one after another (in a flow). It is the
default layout of applet or panel.
Fields of FlowLayout class:
public static final int LEFT
public static final int RIGHT
public static final int CENTER
public static final int LEADING
public static final int TRAILING
SACHIN KHARADE
Constructors of FlowLayout class
FlowLayout()
creates a flow layout with centered alignment and a
default 5 unit horizontal and vertical gap.
FlowLayout(int align)
creates a flow layout with the given alignment and a
default 5 unit horizontal and vertical gap.
FlowLayout(int align, int hgap, int vgap)
creates a flow layout with the given alignment and
the given horizontal and vertical gap.
SACHIN KHARADE
How to Use FlowLayout?
import java.awt.*;
public class TestFlowLayout { public static void main(String[] args){ Frame f = new Frame("TestFlowLayout");f.setSize(200,200);
f.
setLayout(new FlowLayout());
f.add(new Button("Button 1")); f.add(new Button("Button 2")); f.add(new Button("Button 3")); f.add(new Button("Button 4")); f.add(new Button("Button 5"));f.setVisible(true);
}
}
SACHIN KHARADE
Example of FlowLayout class
import
java.awt.*;
import
javax.swing.*;
public
class
MyFlowLayout{JFrame f;
MyFlowLayout(){f=
new
JFrame();
JButton b1=
new
JButton("1");JButton b2=
new
JButton("2");JButton b3=
new
JButton("3");JButton b4=
new
JButton("4");JButton b5=
new
JButton("5");f.add(b1);
f .add(b2);
f.add(b3);
f.add(b4);
f.add(b5);
f.setLayout(
new
FlowLayout(FlowLayout.
RIGHT));
//setting flow layout of right alignment
f.setSize(300,300);
f.setVisible(
true
);
}
public
static
void
main(String[] args) {new
MyFlowLayout();
}
}
SACHIN KHARADE
SACHIN KHARADE
CardLayout class
The CardLayout class manages the components in such
a manner that only one component is visible at a time.
It treats each component as a card that is why it is
known as CardLayout.
Constructors of CardLayout class
CardLayout()
creates a card layout with zero horizontal and vertical
gap.
CardLayout(int hgap, int vgap)
creates a card layout with the given horizontal and
vertical gap.
SACHIN KHARADE
Commonly used methods CardLayout
public void next(
Container
parent
)
It is used to flip to the next card of the given container.
public void previous(
Container
parent
)
It is used to flip to the previous card of the given container.
public void first(
Container
parent
)
It is used to flip to the first card of the given container.
public void last(
Container
parent
)
It is used to flip to the last card of the given container.
public void show(
Container
parent
,
String
name
)
It is used to flip to the specified card with the given name.
SACHIN KHARADE
How to Use CardLayout?
import java.awt.*;
public class TestCardLayout { public static void main(String[] args){ Frame f = new Frame("TestCard Layout");f.setSize(200,200);
f.
setLayout(new CardLayout())
;
f.
add("GraphicsPanel",new GraphicsPanel()); f.add("LabelPanel",new LabelPanel()); f.add("ButtonPanel",new ButtonPanel());f.setVisible(true);
}
}
SACHIN KHARADE
Example of CardLayout class
import
java.awt.*;
import
java.awt.event.*;
import
javax.swing.*;
public
class
CardLayoutExample
extends
JFrame
implements
ActionListener{CardLayout card;
JButton b1,b2,b3;
Container c;
CardLayoutExample(){c=getContentPane();
card=
new
CardLayout(40,30);
c.setLayout(card);
b1=
new
JButton("Apple");b2=
new
JButton("Boy");b3=
new
JButton("Cat");b1.addActionListener(
this
);
b2.addActionListener(
this
);
b3.addActionListener(
this
);
c.add("a",b1); c.add("b",b2); c.add("c",b3);}
public
void
actionPerformed(ActionEvent e)
{card.next(c);
}
public
static
void
main(String[] args)
{CardLayoutExample cl=
new
CardLayoutExample();
cl.setSize(400,400);
cl.setVisible(
true
);
cl.setDefaultCloseOperation(EXIT_ON_CLOSE);
}
}
SACHIN KHARADE
SACHIN KHARADE
GridBagLayout class
The GridBagLayout class is a flexible layout
manager that aligns components vertically and
horizontally, without requiring that the
components be of the same size.
Each GridBagLayout object maintains a dynamic
rectangular grid of cells, with each component
occupying one or more cells, called its
display
area
.
SACHIN KHARADE
Constructor of GridBagLayout class
GridBagLayout()
Creates a grid bag layout manager.
SACHIN KHARADE
Some of the information that the GridBagLayout needs
to know about an object are:
–
row and column
–
number of cells spanned
–
placement within its space
–
stretch and shrink values
This information is stored in an object of
type GridBagContstraints and is associated with a
component using
setContraints(Component, GridBagContraints)
This causes the layout manager to make a copy of
the constraints and associate them with the object.
Therefore you only need one of
these GridBagContraints objects.
SACHIN KHARADE
GridBagConstraints
The following is a complete list of all of the constraints:
anchor
determines position in the display area
fill
determines if a component is stretched to fill the area
gridheight
and
gridwidth
determine the number of rows
and columns in the component's area
gridx
and
gridy
determine the position of the
component's area.
insets
determine a border around a component's area.
ipadx
and
ipady
allows the minimum or preferred size of
a component to be adjusted.
weightx
and
weighty
determine the sizes of the rows
and columns of the grids.
SACHIN KHARADE
Example of GridBagLayout class
import
java.awt.*;
import
java.awt.event.*;
import
java.applet.*;
public class
GB01
extends
Applet
implements
ActionListener {Button B1 =
new
Button("Button 1");Button B2 =
new
Button("Button 2");GridBagLayout gridbag;
public void
init() {setBackground(Color.yellow);
gridbag =
new
GridBagLayout();
GridBagConstraints c =
new
GridBagConstraints();
setLayout(gridbag);
c.weightx = 1;
c.weighty = 1;
c.gridx = 0;
c.gridy = 0;
c.anchor = GridBagConstraints.SOUTHWEST;
gridbag.setConstraints(B1,c);
add(B1);
c.weightx = 0;
c.gridx = 1;
c.anchor = GridBagConstraints.NORTH;
c.fill = GridBagConstraints.BOTH;
gridbag.setConstraints(B2,c);
add(B2);
B1.addActionListener(
this
);
B2.addActionListener(
this
);
}
public void
actionPerformed(ActionEvent e)
{repaint();
}
}
/*<applet code=GB01.class width=200
height=200> </applet>*/
SACHIN KHARADE
SACHIN KHARADE
Layout Manager Heuristics
Left to right,
Top to bottom
c
n
s
e
w
FlowLayout
GridLayout
BorderLayout
none,
programmer
sets x,y,w,h
null
One at a time
CardLayout
GridBagLayout
JButton
SACHIN KHARADE
Layout Managers in Java provide a way to organize components within a graphical user interface. They include classes like BorderLayout, FlowLayout, GridLayout, CardLayout, and more. Each layout manager offers a unique way to arrange components based on specific requirements. This guide covers the basics of layout managers, their implementation, and examples of how to use them effectively in Java GUI applications.

Download Presentation

Please find below an Image/Link to download the presentation.
The content on the website is provided AS IS for your information and personal use only. It may not be sold, licensed, or shared on other websites without obtaining consent from the author. Download presentation by click this link. If you encounter any issues during the download, it is possible that the publisher has removed the file from their server.
E N D
Presentation Transcript
LayoutManagers The LayoutManagers are used to arrange components in a particular manner. LayoutManager is an interface that is implemented by all the classes of layout managers. There are following classes that represents the layout managers: java.awt.BorderLayout java.awt.FlowLayout java.awt.GridLayout java.awt.CardLayout java.awt.GridBagLayout javax.swing.BoxLayout javax.swing.GroupLayout javax.swing.ScrollPaneLayout javax.swing.SpringLayout etc. Defined in the AWT Defined in the AWT Defined in Swing Defined in Swing SACHIN KHARADE
Layout of Components BorderLayout north, south, west, east & center FlowLayout left to right & top down CardLayout stack of panels GridLayout tabular form (rows & columns) GridBagLayout tabular form(variable row heights and column widths) SACHIN KHARADE
Use Layout Managers setLayout(new BorderLayout()); setLayout(new CardLayout(()); setLayout(new FlowLayout()); setLayout(new GridLayout(rows,columns,xgap,ygap)); Default layout managers Windows (Frames & Dialogs) BorderLayout Panels (Applets) FlowLayout SACHIN KHARADE
BorderLayout The BorderLayout is used to arrange the components in five regions: north, south, east, west and center. Each region (area) may contain one component only. It is the default layout of frame or window. Five constants for each region: public static final int NORTH public static final int SOUTH public static final int EAST public static final int WEST public static final int CENTER SACHIN KHARADE
Constructors of BorderLayout class BorderLayout() creates a border layout but with no gaps between the components. JBorderLayout(int hgap, int vgap) creates a border layout with the given horizontal and vertical gaps between the components. SACHIN KHARADE
How to Use BorderLayout? import java.awt.*; public class TestBorderLayout { public static void main(String[] args){ Frame f = new Frame("TestBorderLayout"); f.setSize(200,200); f.add("North", new Button("North")); f.add("South", new Button("South")); f.add("East", new Button("East")); f.add("West", new Button("West")); f.add("Center", new Button("Center")); f.setVisible(true); } } SACHIN KHARADE
Example of BorderLayout class import java.awt.*; import javax.swing.*; f.add(b1,BorderLayout.NORTH); f.add(b2,BorderLayout.SOUTH); f.add(b3,BorderLayout.EAST); f.add(b4,BorderLayout.WEST); f.add(b5,BorderLayout.CENTER); public class Border { JFrame f; Border(){ f=new JFrame(); f.setSize(300,300); f.setVisible(true); } public static void main(String[] args) { new Border(); } } JButton b1=new JButton("NORTH"); JButton b2=new JButton("SOUTH"); JButton b3=new JButton("EAST"); JButton b4=new JButton("WEST"); JButton b5=new JButton("CENTER"); SACHIN KHARADE
GridLayout The GridLayout is used to arrange the components in rectangular grid. One component is displayed in each rectangle. SACHIN KHARADE
Constructors of GridLayout class GridLayout() creates a grid layout with one column per component in a row. GridLayout(int rows, int columns) creates a grid layout with the given rows and columns but no gaps between the components. GridLayout(int rows, int columns, int hgap, int vgap) creates a grid layout with the given rows and columns alongwith given horizontal and vertical gaps. SACHIN KHARADE
How to Use GridLayout? import java.awt.*; public class TestGridLayout { public static void main(String[] args){ Frame f = new Frame("TestGridLayout"); f.setSize(200,200); f.setLayout(new GridLayout(2,3)); f.add(new Button("Button 1")); f.add(new Button("Button 2")); f.add(new Button("Button 3")); f.add(new Button("Button 4")); f.add(new Button("Button 5")); f.setVisible(true); } } SACHIN KHARADE
Example of GridLayout class import java.awt.*; import javax.swing.*; public class MyGridLayout{ JFrame f; MyGridLayout(){ f=new JFrame(); JButton b1=new JButton("1"); JButton b2=new JButton("2"); JButton b3=new JButton("3"); JButton b4=new JButton("4"); JButton b5=new JButton("5"); JButton b6=new JButton("6"); JButton b7=new JButton("7"); JButton b8=new JButton("8"); JButton b9=new JButton("9"); f.add(b1); f.add(b2); f.add(b3); f.add(b4); f.add(b5); f.add(b6); f.add(b7); f.add(b8); f.add(b9); f.setLayout(new GridLayout(3,3)); f.setSize(300,300); f.setVisible(true); } public static void main(String[] args) { new MyGridLayout(); } } SACHIN KHARADE
FlowLayout The FlowLayout is used to arrange the components in a line, one after another (in a flow). It is the default layout of applet or panel. Fields of FlowLayout class: public static final int LEFT public static final int RIGHT public static final int CENTER public static final int LEADING public static final int TRAILING SACHIN KHARADE
Constructors of FlowLayout class FlowLayout() creates a flow layout with centered alignment and a default 5 unit horizontal and vertical gap. FlowLayout(int align) creates a flow layout with the given alignment and a default 5 unit horizontal and vertical gap. FlowLayout(int align, int hgap, int vgap) creates a flow layout with the given alignment and the given horizontal and vertical gap. SACHIN KHARADE
How to Use FlowLayout? import java.awt.*; public class TestFlowLayout { public static void main(String[] args){ Frame f = new Frame("TestFlowLayout"); f.setSize(200,200); f.setLayout(new FlowLayout()); f.add(new Button("Button 1")); f.add(new Button("Button 2")); f.add(new Button("Button 3")); f.add(new Button("Button 4")); f.add(new Button("Button 5")); SACHIN KHARADE f.setVisible(true);
Example of FlowLayout class import java.awt.*; import javax.swing.*; f.add(b3); f.add(b4); f.add(b5); public class MyFlowLayout{ JFrame f; MyFlowLayout(){ f=new JFrame(); JButton b1=new JButton("1"); JButton b2=new JButton("2"); JButton b3=new JButton("3"); JButton b4=new JButton("4"); JButton b5=new JButton("5"); f.setLayout(new FlowLayout(FlowLayout. RIGHT)); //setting flow layout of right alignment f.setSize(300,300); f.setVisible(true); } public static void main(String[] args) { new MyFlowLayout(); } } f.add(b1); f .add(b2); SACHIN KHARADE
CardLayout class The CardLayout class manages the components in such a manner that only one component is visible at a time. It treats each component as a card that is why it is known as CardLayout. Constructors of CardLayout class CardLayout() creates a card layout with zero horizontal and vertical gap. CardLayout(int hgap, int vgap) creates a card layout with the given horizontal and vertical gap. SACHIN KHARADE
Commonly used methods CardLayout public void next(Container parent) It is used to flip to the next card of the given container. public void previous(Container parent) It is used to flip to the previous card of the given container. public void first(Container parent) It is used to flip to the first card of the given container. public void last(Container parent) It is used to flip to the last card of the given container. public void show(Container parent, String name) It is used to flip to the specified card with the given name. SACHIN KHARADE
How to Use CardLayout? import java.awt.*; public class TestCardLayout { public static void main(String[] args){ Frame f = new Frame("TestCard Layout"); f.setSize(200,200); f.setLayout(new CardLayout()); f.add("GraphicsPanel",new GraphicsPanel()); f.add("LabelPanel",new LabelPanel()); f.add("ButtonPanel",new ButtonPanel()); f.setVisible(true); } } SACHIN KHARADE
Example of CardLayout class import java.awt.*; import java.awt.event.*; import javax.swing.*; public class CardLayoutExample extends JFrame implements ActionListener{ CardLayout card; JButton b1,b2,b3; Container c; CardLayoutExample(){ c=getContentPane(); card=new CardLayout(40,30); c.setLayout(card); b1=new JButton("Apple"); b2=new JButton("Boy"); b3=new JButton("Cat"); b1.addActionListener(this); b2.addActionListener(this); b3.addActionListener(this); c.add("a",b1); c.add("b",b2); c.add("c",b3); } public void actionPerformed(ActionEvent e) { card.next(c); } public static void main(String[] args) { CardLayoutExample cl=new CardLayoutExample(); cl.setSize(400,400); cl.setVisible(true); cl.setDefaultCloseOperation(EXIT_ON_CLOSE); } } SACHIN KHARADE
GridBagLayout class The GridBagLayout class is a flexible layout manager that aligns components vertically and horizontally, without components be of Each GridBagLayout object maintains a dynamic rectangular grid of cells, with each component occupying one or more cells, called its display area. requiring the that the size. same SACHIN KHARADE
Constructor of GridBagLayout class GridBagLayout() Creates a grid bag layout manager. SACHIN KHARADE
Some of the information that the GridBagLayout needs to know about an object are: row and column number of cells spanned placement within its space stretch and shrink values This information is stored in an object of type GridBagContstraints and is associated with a component using setContraints(Component, GridBagContraints) This causes the layout manager to make a copy of the constraints and associate them with the object. Therefore you only need one of these GridBagContraints objects. SACHIN KHARADE
GridBagConstraints The following is a complete list of all of the constraints: anchor determines position in the display area fill determines if a component is stretched to fill the area gridheight and gridwidth determine the number of rows and columns in the component's area gridx and gridy determine the position of the component's area. insets determine a border around a component's area. ipadx and ipady allows the minimum or preferred size of a component to be adjusted. weightx and weighty determine the sizes of the rows and columns of the grids. SACHIN KHARADE
Example of GridBagLayout class import java.awt.*; import java.awt.event.*; import java.applet.*; public class GB01 extends Applet implements ActionListener { Button B1 = new Button("Button 1"); Button B2 = new Button("Button 2"); GridBagLayout gridbag; c.anchor = GridBagConstraints.SOUTHWEST; gridbag.setConstraints(B1,c); add(B1); c.weightx = 0; c.gridx = 1; c.anchor = GridBagConstraints.NORTH; c.fill = GridBagConstraints.BOTH; gridbag.setConstraints(B2,c); add(B2); B1.addActionListener(this); B2.addActionListener(this); } public void init() { setBackground(Color.yellow); gridbag = new GridBagLayout(); GridBagConstraints c = new GridBagConstraints(); setLayout(gridbag); c.weightx = 1; c.weighty = 1; c.gridx = 0; c.gridy = 0; public void actionPerformed(ActionEvent e) { repaint(); } } /*<applet code=GB01.class width=200 height=200> </applet>*/ SACHIN KHARADE
Layout Manager Heuristics FlowLayout GridLayout null none, Left to right, Top to bottom programmer sets x,y,w,h GridBagLayout BorderLayout CardLayout n w e JButton c One at a time s SACHIN KHARADE