Lacrosse Offensive and Defensive Strategies for Youth Playbook 2021" (70 characters)
Explore various offensive and defensive strategies in lacrosse, including crease positioning, motion plays, and offensive sets such as 2-3-1 and 2-2-2. Learn how to navigate the field effectively and make strategic plays to outmaneuver opponents in youth lacrosse. (237 characters)
Download Presentation

Please find below an Image/Link to download the presentation.
The content on the website is provided AS IS for your information and personal use only. It may not be sold, licensed, or shared on other websites without obtaining consent from the author.If you encounter any issues during the download, it is possible that the publisher has removed the file from their server.
You are allowed to download the files provided on this website for personal or commercial use, subject to the condition that they are used lawfully. All files are the property of their respective owners.
The content on the website is provided AS IS for your information and personal use only. It may not be sold, licensed, or shared on other websites without obtaining consent from the author.
E N D
Presentation Transcript
DEFENSIVE ZONE DEFINITIONS TOP LEFT TOP CENTER TOP RIGHT THE HOLE AKA CREASE AREA see below WING LEFT WING RIGHT Pipe R Pipe L GLE GOALINE EXTENDED X BEHIND 2
CREASE ZONE DEFINITIONS HIGH POST LEFT HIGH POST RIGHT 5 YARDS 5 YARDS LOW POST LEFT LOW POST RIGHT Pipe R Pipe L 3
OFFENSE HOW TO PLAY THE CREASE POSITION TOP LEFT - 1 TOP CENTER - 2 TOP RIGHT - 3 5 6 7 WING RIGHT - 4 WING LEFT - 8 4 8 3 1 2 CORNER LEFT - 7 CORNER RIGHT -5 X BEHIND -6 PLAY THE CREASE BOX OPPOSITE THE BALL 5
HAT 2-3-1 OFFENSIVE SETS 6
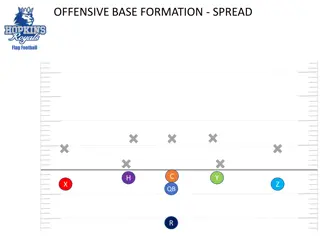
M1 M2 M3 A1 v A2 A3 Hat FORMATION (2-3-1) Move the ball around the perimeter Middies and Attack cut as opportunity arises, especially back cutting opponent after passing the ball looking for a give and go. See motion offense calls on following pages 7
M1 M2 M3 v A3 A1 A2 2-3-1 BASIC MOTION PLAY (A/M SAME ROTATION) M1 CUTS TO CREASE, M2 SWEEPS TOP RIGHT TO TOP LEFT AND M3 POPS UP TO REPLACE M2 A1 DROPS TO X , A2 POPS UP TO WING RIGHT AND A3 CUTS ACROSS CREASE TO OPPOSITE WING MIDFIELD AND ATTACK CONTINUE TO MAINTAIN COUNTER CLOCKWISE MOTION CAN BE DONE IN EITHER DIRECTION 8
M1 M2 v A3 A1 M3 A2 BASIC MOTION OUT OF HAT. IN THIS CASE, A DRIVE FROM BEHIND WITH ALL OTHER POSITIONS SPREAD SO AS NOT TO BE IN WAY CREASE MOVE NEAR LOW PIPE DODGE MAN LOOK FOR DUMP OR SCREEN 9
RIO 2-2-2 OFFENSIVE SETS 10
M1 M2 A1 v M3 A2 A3 RIO CIRCLE FORMATION (2-2-2) Work ball around and see how they play ball behind then make the call or Be silent and read it Use it to isolate the match up guy also BY switching to 1-4-1 when you get the matchup with the weak defender 2 MIDFIELDERS UP TOP 1 ATTACK AND 1 MIDFIELDER ON THE WINGS 2 ATTACKMEN AT X 11
M1 M2 X X v M3 A1 X X X X A3 A2 PAIRS OFFENSE 2-2-2 PICK PLAY Power Dodge from top of box IF DEFENDERS PLAY ZONE AT GLE OR DON T GUARD BALL BEHIND M1 dodges, if D stops M1 he passes to A1 for shot, A2 to dodge from X or pass to M2 to start the dodge from the top again M3 sets pick for A1, M3 continues out of crease to replace M2 at top of box 12
M1 M2 X X v A1 M3 X X X X A3 A2 2-2-2 PICK PLAY PRINCETON ; Feed from behind the goal IF DEFENDERS GUARD BALL BEHIND BALL WORKS BACK AND FORTH BETWEEN A2 AND A3 UNTIL THE TIMING IS RIGHT FOR AN OPEN FEED FROM BEHIND TO A CUTTING TEAM MATE A2 and A3 MUSTDRAW DEFENDERS IN BY FAKING SNEAK (offball) AND ATTACKING GLE (with the ball) Cut and replace up top TIME CUTS AND DON T CLUTTER THE CREASE WINGS MUST SELL CROSS FIELD CUT THEN PULL UP AND SET PICK MIDS UP TOP MUST WAIT FOR PICK TO BE SET SELL BALL WATCHING (EASY) 13
Defense 14
TOP LEFT TOP CENTER TOP RIGHT M M = Ball M D D D WING LEFT WING RIGHT THE HOUSE GLE GOALINE EXTENDED X BEHIND Ball is top right and off ball defenders are in line with opposite pipe TOP LEFT TOP CENTER TOP RIGHT M M M D D D WING LEFT WING RIGHT THE HOUSE GLE GOALINE EXTENDED X BEHIND 15
M3 When heads up overplay to force opponent to weak hand MD3 overplaying opponents right hand to force him left M1 M2 Force ball outside up top By overplaying inside MD 1 & MD2 in proper position to force player out and away from the (center) inside and usually down the alley to dump D 1 & D3 in proper position to force player down and away from the alley and usually to X for dump They can not get beat topside D1 A1 v A3 D2 A2 D2 in proper position to force player to his weakhand (left) he has help from the crease if beaten D2 has to anticipate the ball moving to X behind ahead of time so that he does not get caught in front of the goal HOW TO COVER THE BALL FROM EACH POSITION IN THE OFFENSIVE ZONE We will slide early from the crease and the man guarding the ball will always have help from the crease inside..when the defender covering the ball gets help from the slide man he will recover to the crease or switch and rotate into the crease and find the unguarded player who should be backside or right on the crease guys have to talk it out to make it work the goalie runs the show Anytime the ball enters the gray area above the slide will come automatically and early from the inside crease defender (middie or longpole). Backside defenders will have to assist by covering the crease until the recover man retreats to help the crease. 16
Face-offs 17
O Side M Box Side FOGO LSM D Side 18
Clears 19
D M A M A D M A D 20
BREAKOUT CLEAR AFTER SHOT 1- Middies always look for quick breakout pass on shot cut out and up for catch over the shoulder 2- Get ball to goalie or upfield quickly on turnovers 3- Defense form L with two poles breaking for corners safety outlet pass A2 4- Midfielders break out to sides then turn up 5- NEVER MAKE PASS IN FRONT OF GOAL! A1 A3 6- GOALIE is extra man for clear 7 on 6 keep away if you pass and catch you clear easily 7- Spread out draw and dump! M3 M2 M1 D2 D3 D1 G 21
VV A 2 Rutgers A3 A1 M3 M2 LSM M1 D3 D1 G D2 22
VV A2 Middie /sideline clear A3 A1 M3 LSM M2 D1 D3 G D2 M1 23
Rides 24
Basic ride Press 1 Middies matched up with midfielders man to man attack zoned up with one attacker on ball other two floating attackmen on highest defensemen/goalie and closest G/D to the ball leave furthest from the ball open (almost always cross field low) this is our base ride unless instructed otherwise Pressure ride Press 2 It works against teams that cant throw and catch and are weak ball handlers Used when called by coaches 1-Midfielders shut off their men from receiving a pass at the midline play slightly to the hole don t let him get behind you. Only responsibility is to prevent pass to open man or prevent fast break from clearing pass. 2-Attack double the ball if all 4 defenders (goalie included) stay back. Floating attackman covers highest longpole if one of the 4 move upfield Attack is responsible for pressuring the clearing team. Middies should concede when the ride is broken and run to the hole ahead of their man. They should only jump low when it is obvious the clearing team is in trouble..ball on the ground Other rides (not diagrammed) Drop back ride Zone with attack ride 3 attack vs. 4 between midline and restraining box Middies in MAN to Man at midline 10 man ride involves the Goalie and covers everyman on field leaves goal open and vulnerable 25
RIDE FORMATION (press 1) Ball-sideCrossfield LOW HIGH VV X X X A1 A2 X A3 X X X M1 M2 M3 X X D1 X D3 D2 G 26
RIDE FORMATION (press 2) Ball-side Crossfield LOW HIGH VV X X X A2 A1 X A3 X X M3 X M2 M1 X D3 X D1 X D2 G 27
