Introduction to Arduino for Harpeth Hall Winterim January 2016
The Introduction to Arduino for Harpeth Hall Winterim January 2016 covered the basics of Arduino Uno, a user-friendly microcontroller that can be used for various projects. The workshop included information on what Arduino can do, its applications like building robots and automated systems, and other microcontroller options like Teensy and Raspberry Pi. Participants learned about digital vs. analog concepts and got hands-on experience with simple projects like blinking an LED using Arduino Uno.

Download Presentation

Please find below an Image/Link to download the presentation.
The content on the website is provided AS IS for your information and personal use only. It may not be sold, licensed, or shared on other websites without obtaining consent from the author.If you encounter any issues during the download, it is possible that the publisher has removed the file from their server.
You are allowed to download the files provided on this website for personal or commercial use, subject to the condition that they are used lawfully. All files are the property of their respective owners.
The content on the website is provided AS IS for your information and personal use only. It may not be sold, licensed, or shared on other websites without obtaining consent from the author.
E N D
Presentation Transcript
Introduction to Arduino Prepared for Harpeth Hall Winterim January 2016 Harpeth Hall Jan 2016
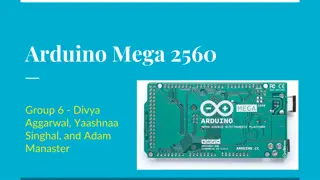
The Arduino Uno Basic, easy-to-use micro-controller Basically a simple computer In addition to a processor has a variety of inputs/outputs USB connection to computer Analog input and digital input/output extras reset button, led s, power management Has a specific programming language used to create programs with the board You will use this on your laptops https://www.arduino.cc/en/uploads/ Main/ArduinoUno_R3_Front_450px. jpg Harpeth Hall Jan 2016
What can you do with Arduino A computer with inputs and outputs that does simple operations Many kinds of sensors can be used as inputs Usually motors are outputs, can also talk to a computer or another microcontroller Make a wheeled robot that follows a line Make an automatic light switch https://atmelcorporation.files.wordpress.com/2014/10/839x40 0xposterimageresized2-pagespeed-ic-u1fkcea2d1.jpg http://g01.a.alicdn.com/kf/HTB1PL3dJVXXXXaRXXXXq6xXFXXXw/Makebl ock-mBot-Educational-font-b-Robot-b-font-font-b-Kit-b-font-for-font-b.jpg Harpeth Hall Jan 2016
Other options Arduino is very well-known and widely used, but not only option Teensy microcontroller PIC microcontrollers Raspberry pi is basically a full computer in a mini package We are using Arduino UNO, there are other designs Have to match your board with your background and project Harpeth Hall Jan 2016
Digital vs. Analog Digital clock Analog clock http://sapling-inc.com/wp-content/gallery/analog/round-analog-clock-single_v02_large.jpg http://sapling-inc.com/wp-content/gallery/sbp-series/Red-6-Digit-Digital-Clock-With-Logo.png Harpeth Hall Jan 2016
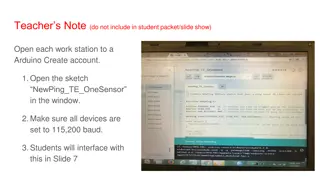
Arduino Tutorial I Blink Our goal is to blink an LED Materials: Arduino UNO LED 1K resistor Breadboard Computer Power/USB connections Before running the code, must set up the physical connections https://www.arduino.cc/en/Tutorial/Blink Harpeth Hall Jan 2016
Blink Code Located in: File->Examples->01. Basics ->Blink Read through the code, start understanding how it works Run! Verify and upload Harpeth Hall Jan 2016
Blink Code What is the meaning? Line 1 Line 18 Line 20 Line 24 Line 25 Line 26 /* . */ void setup() pinMode( ) void loop() digitalWrite( ) delay( ) https://www.arduino.cc/ is your friend! Harpeth Hall Jan 2016
Programming basics Variables store information Have a certain data type integer you should know what an integer is double or float has a decimal boolean true or false Data types can be complicated, but we will deal with that later, for now think of these 3 types Harpeth Hall Jan 2016
Altering Blink We want to use variables so that we can edit the code more easily Initialize variables before setup() Would like to change the output pin easily as well as how long the LED is on and off (using variables) Let s alter the code to make these changes Harpeth Hall Jan 2016
Code Structure Initialization setup() loop() Harpeth Hall Jan 2016
Serial communication There is a specific way the Arduino talks to the PC uses a serial protocol We can send messages back and forth the how isn t needed now In setup() routine Serial.begin(9600) Within the loop() routine Serial.println( ) Serial.print( ) Serial.read( ) https://www.arduino.cc/en/Reference/Serial has more documentation Harpeth Hall Jan 2016
Arduino Tutorial II DigitalReadSerial Our goal is to read a pushbutton and display its status to the PC Materials: Same Arduino things Pushbutton Resistor Breadboard https://www.arduino.cc/en/Tutorial/Di gitalReadSerial Will need the serial monitor Test what happens adding a println in both setup() and loop() Harpeth Hall Jan 2016
Arduino Tutorial III ReadAnalogVoltage Our goal is to read an analog voltage from a potentiometer https://www.arduino.cc/en/Tutorial/Re adAnalogVoltage You will learn more about pots later, for now it s a way to get a varying signal between 0 and 5 volts Harpeth Hall Jan 2016
Binary In the ReadAnalogVoltage code, look at line 21: float voltage = sensorValue * (5.0 / 1023.0); Analog to digital conversion on Arduino uses a 10-big converter Where does that come from? Binary! Harpeth Hall Jan 2016
Arduino Tutorial IV Your own project In this project, we want to use the sensor input to blink the LED from the first tutorial at different speeds according to how the pot is turned You have all the tools to make this happen Up to you how to do this Go! Harpeth Hall Jan 2016
Other Programming Structures Constants Logic If else if else Loops For While Harpeth Hall Jan 2016 17
Constants Syntax: Example Used for things that don t change Some built-in keywords are also constants true, false HIGH, LOW, INPUT, OUTPUT Used for input/output pins #define someName value #define pi 3.1416 Harpeth Hall Jan 2016 18
Logic Sometime you want to only sometimes do something Example from Blink code Maybe if the pot is at one end or another, we want to keep the LED completely on or completely off Syntax: if (logicCondition) { //lots of code } else if () { } else { } Harpeth Hall Jan 2016 19
Logic Syntax Main logic operators are > < or == if (myStomach < full) { eatMore(); } else { sleep(); } Harpeth Hall Jan 2016 20
Logic Syntax For a more practical example: if (robotPosition >= maxPosition) { stopRobot(); } else { //do whatever else you wanted to do } Harpeth Hall Jan 2016 21
Logic Syntax For a more robust example: if (robotPosition >= maxPosition || robotPosition <= minPosition) { stopRobot(); } else { //do whatever else you wanted to do } Harpeth Hall Jan 2016 22
Logical AND and Logical OR Simple overview: If I want to see if either of two conditions is met and possibly both of them, use OR If I want to see if exactly both of two conditions are met, use AND In Arduino AND is written as && OR is written as || For programming almost anything, this is extremely useful Harpeth Hall Jan 2016 23
For Loop When you want to do something a fixed number of times Syntax: for (int i=0;i<5;i++) { many lines of code } Create an integer called i and assign it the value zero Execute the following code When finished increment i by 1 If i<5 repeat execution Else continue Harpeth Hall Jan 2016 24
Practice using if and for structures Try to make these examples work using if and for structures Both of these are based on the blink code If the pot is near one end of its travel, turn the LED all the way on or off otherwise, blink it as in the example In the setup portion of the code, use a for loop to create an opening sequence of blinks so that you know the program has turned on Harpeth Hall Jan 2016 25
Super-Challenge Create a code that reads in button presses and counts every time you press a button You can use digitalReadSerial as a base Display the counter on the serial monitor Once you have done that, get a second button and make it decrement the counter every time you press the button If you press both buttons, clear the counter You don t have time to do all this, but it s very possible! Harpeth Hall Jan 2016 26
References http://www.instructables.com/id/Intro-to-Arduino/ https://www.arduino.cc/ Harpeth Hall Jan 2016