ImmPort Study Registration Wizard Overview
ImmPort Study Registration Wizard (SRW) is a tool designed to assist users in uploading study metadata, protocols, and files to the ImmPort platform. It provides step-by-step guidance for registering a study and offers features like workspace selection, help buttons, and managing existing registrations.

Download Presentation

Please find below an Image/Link to download the presentation.
The content on the website is provided AS IS for your information and personal use only. It may not be sold, licensed, or shared on other websites without obtaining consent from the author.If you encounter any issues during the download, it is possible that the publisher has removed the file from their server.
You are allowed to download the files provided on this website for personal or commercial use, subject to the condition that they are used lawfully. All files are the property of their respective owners.
The content on the website is provided AS IS for your information and personal use only. It may not be sold, licensed, or shared on other websites without obtaining consent from the author.
E N D
Presentation Transcript
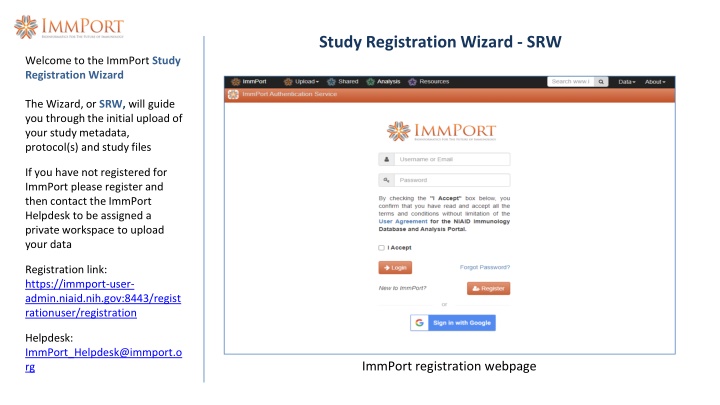
Study Registration Wizard - SRW Welcome to the ImmPort Study Registration Wizard The Wizard, or SRW, will guide you through the initial upload of your study metadata, protocol(s) and study files If you have not registered for ImmPort please register and then contact the ImmPort Helpdesk to be assigned a private workspace to upload your data Registration link: https://immport-user- admin.niaid.nih.gov:8443/regist rationuser/registration Helpdesk: ImmPort_Helpdesk@immport.o rg ImmPort registration webpage
Study Registration Wizard - SRW SRW Navigation #1 Mouse-over gray fields for more information #1 #2 Steps, or breadcrumb trail, indicates where you are in the SRW process #2 #3 Question marks indicate additional information is available with a mouse-over or click #3 #4 Light blue boxes provide guidance throughout the SRW #4 #5 Red asterisk indicates required fields #5 #6 Buttons will be active (blue) when all required fields have data entered #6 Gray Next button indicates data is missing Exit asks whether to save and returns to initial SRW webpage Save saves all data Back navigate to previous webpage Next navigate forward Helpdesk: ImmPort_Helpdesk@immport.o rg
Study Registration Wizard - SRW Study Registration Wizard (SRW) home page #1 Click the field to select the workspace you will be uploading data #4 #2 #2 Help buttons appear on each webpage and provide useful information and links to assist users with uploading data #1 #3 Mouse-over fields to see more information or helpful instruction #4 Your account information #3 Mouse-over text
Study Registration Wizard - SRW #1 Select a Workspace If no option is presented please contact the ImmPort helpdesk to be assigned a workspace #1 #2 #2 Click Register Study to begin the registration and upload process A pop-up displays information that will be needed to complete the study registration and upload #3 #3 Studies previously registered via the SRW will appear in the Manage Existing Study Registrations table #4 #4 Register Study pop-up #5 Select Proceed if you are ready to begin the registration process #5
Study Registration Wizard - SRW Basic info #1 The 11 steps to register a study are displayed at the top of the SRW webpages. Blue indicates where you are in the registration process #1 #3 #2 Basic study information is entered in Step 1 A red asterisk indicates required information #2 #3 Hover your mouse over the for additional guidance #4 The Exit, Save and Next buttons at the bottom of each webpage offer the opportunity to return to the initial SRW webpage, save the work or advance to the next page. Exit pop-up will ask if you want to save the data #4
Study Registration Wizard - SRW Categorization #1 Step 2 is a single selection choose a Research Focus that best aligns with the study being registered #1 Select No Research Focus Specified if none apply #2 Selection of a Research Focus/Categorization is required to advance to the next step. When a selection has been made the Next button will be active #2
Study Registration Wizard - SRW Condition or Disease #1 Step 3 is required. Choose one or more options from the Condition or Disease dropdown Select Add New Condition or Disease from the dropdown menu if you do not find the appropriate entry #1 #2 Selection of at least one Condition or Disease is required to advance to the next step. The Next button will be active when Condition or Disease has been selected #2
Study Registration Wizard - SRW Arm or Cohort #1 Step 4 is required #2 Click Add Arm or Cohort #3 In the Add Arm or Cohort pop-up complete the required fields. All studies will have at least one Arm or Cohort #1 #4 Hover over the for helpful information about study Arms and which Arm would be appropriate for the Select Type field #2 #3 #4 #5 Select Add a new Type if available types are not appropriate #6 When information has been entered in each required field the Add button will be active. Select Add to advance to the next step. #5 #6
Study Registration Wizard - SRW Editing Arm or Cohort #1 The SRW provides opportunities to Edit and Delete information through separate pop-ups (#2, #3) #1 #4 Select Update when edits have been completed #5 Use the buttons at the bottom of the webpage to: #2 Exit asks whether to save and returns user to initial SRW webpage Save saves data Back navigate to previous webpage Next navigate forward #3 #4 #5
Study Registration Wizard - SRW Inclusion/Exclusion #1 Step 5 is required #2 The checkbox can be used to indicate the study has no Inclusion/Exclusion criteria #1 #2 #5 #3 Click Add Inclusion/Exclusion Criteria as appropriate #3 #4 In the Add Inclusion/Exclusion Criteria pop- up complete the required fields. The Add button will be active when all required fields have data entered #4 #5 Select Exit, Save, Back or Next as needed
Study Registration Wizard - SRW Personnel #1 Step 6 is required #1 #2 Select Add Personnel #2 #7 #3 In the Add Personnel pop-up complete the required fields. #4 Hover your mouse over the for additional guidance #3 #4 #5 Scroll down to ensure all required fields are entered #6 The Add button will be active when all required fields have data entered #5 #7 Select Exit, Save, Back or Next as needed #6
Study Registration Wizard - SRW Planned Visit #1 #1 Step 7 is required #2 Click the checkbox if planned visits is not applicable to the study #2 #3 #3 In the Add Planned Visit pop- up complete the required fields. #6 #4 Hover your mouse over the for additional guidance #4 The SRW supports adding more planned visits, editing or deleting existing planned visits via a pop-up following step #5 #5 The Add button will be active when all required fields have data entered #6 Select Exit, Save, Back or Next as needed #5
Study Registration Wizard - SRW Protocol #1 Step 8 is required #1 #2 If a protocol has been previously uploaded via the SRW it will appear as an option to select, as appropriate. Or #2 #3 Select Add New Protocol #3 #7 #4 Enter data in the required fields (*). #4 #5 Select the appropriate protocol file to be included with this study #5 #6 The Add will be active when all required data fields have data entered. Click Add #7 Select Exit, Save, Back or Next #6
Study Registration Wizard - SRW Publication/Study Links #1 Step 9 is optional #1 #2 Select a date when you anticipate sharing your study #3 Select Add Publication. Complete appropriate information in the Publication pop-up. The Add button will be active when all required fields have data entered. Click Add. #2 #3 #5 #4 #4 Select Add Study Link and complete required fields. Click Add. #5 Select Exit, Save, Back or Next as needed The SRW supports editing Publications and Study Links once the data has been entered and prior to submission
Study Registration Wizard - SRW Study Files #1 Step 10 is optional #2 Select Add Study File if you would like to include additional study data for upload. Additional data can be custom-formatted data files, data dictionaries, case report forms (.txt, .xlsx, .pdf ) #1 #2 If you have questions about other types of data please contact the ImmPort helpdesk: ImmPort_Helpdesk@immport.or g #3 #3 Select Exit, Save, Back or Next as needed
Study Registration Wizard - SRW Validate & Upload #1 Step 11 is required to register your study and upload associated files #1 #2 Select Submit to ImmPort to proceed with submission to ImmPort #2 #3 Selecting Validate/Upload will place your study and associated files in the queue for Validation. When successfully validated the study will be submitted to ImmPort #3 Please contact the ImmPort helpdesk if you have questions or feedback you would like to share: ImmPort_Helpdesk@immport.org
Study Registration Wizard - SRW Submission Status #1 The SRW provides information on the Validation and Upload status of the study including: #1 Definition of Pending, Completed, and Rejected How to see the new study in ImmPort How to access the Rejected upload ticket for more details about why the upload was rejected The SRW will send, via email to the email account used in your registration, an upload status message with downloadable reports Please contact the ImmPort helpdesk if you have questions or feedback you would like to share: ImmPort_Helpdesk@immport.org