Exploring Various Relay and Sensor Projects
Rel
ék
Rel
ék
Rel
é
–
1. példa
int relayPin = 3;
void setup() {pinMode(relayPin, OUTPUT);
digitalWrite(relayPin, HIGH); // initial OFF
Serial.begin(9600);
delay(2000);
}
void loop() {digitalWrite(relayPin, LOW);
Serial.println("Relay is ON"); Serial.println("");delay(2000);
digitalWrite(relayPin, HIGH);
Serial.println("Relay is OFF"); Serial.println("");delay(1000);
}
Rel
é
–
2. példa
int relayPin = 3;
int loopDelay = 1000;
int lightSensor = A0;
void setup() {pinMode(relayPin, OUTPUT);
digitalWrite(relayPin, HIGH); // initial OFF
Serial.begin(9600);
delay(2000);
}
void loop() {int lightSensorValue = analogRead(A0);
Serial.println(lightSensorValue);
delay(1000);
if (lightSensorValue<400){digitalWrite(relayPin, LOW);
Serial.println("Relay is ON"); Serial.println("");delay(2000);
} else {digitalWrite(relayPin, HIGH);
Serial.println("Relay is OFF"); Serial.println("");delay(1000);
}
}
Joystick
const int SW_pin = 2; // digital pin connected to SW
const int X_pin = 0; // analog pin connected to VRx
const int Y_pin = 1; // analog pin connected to VRy
void setup() {pinMode(8, OUTPUT);
pinMode(9, OUTPUT);
pinMode(10, OUTPUT);
pinMode(11, OUTPUT);
pinMode(12, OUTPUT);
pinMode(SW_pin, INPUT);
digitalWrite(SW_pin, HIGH);
Serial.begin(9600);
}
void loop() { Serial.print("X: ");Serial.print(analogRead(X_pin));
Serial.print(" Y: ");Serial.print(analogRead(Y_pin));
Serial.print(" Z: ");Serial.println(digitalRead(SW_pin));
if (analogRead(X_pin)<100){digitalWrite(10, HIGH);
delay(300);
digitalWrite(10, LOW);
Serial.println("LEFT!");}
if (analogRead(X_pin)>900){digitalWrite(11, HIGH);
delay(300);
digitalWrite(11, LOW);
Serial.println("RIGHT!");}
if (analogRead(Y_pin)<100){digitalWrite(8, HIGH);
delay(300);
digitalWrite(8, LOW);
Serial.println("UP!");}
if (analogRead(Y_pin)>900){digitalWrite(9, HIGH);
delay(300);
digitalWrite(9, LOW);
Serial.println("DOWN!");}
if (digitalRead(SW_pin)==LOW){digitalWrite(12, HIGH);
delay(300);
digitalWrite(12, LOW);
Serial.println("PRESS!");}
delay(250);
}
TM1637
kijelző
TM1637
kijelző
TM1637
kijelző – 1. példa
#include <TM1637Display.h>
#define CLK 2
#define DIO 3
TM1637Display display(CLK, DIO);
#define TEST_DELAY 2000
void setup() {}
void loop() {display.setBrightness(7);
for (int i=0; i<400; i++){display.showNumberDec(i);
delay(20);
}
while(true);
}
TM1637
kijelző – 2. példa
#include <Arduino.h>
#include <TM1637Display.h>
// Module connection pins (Digital Pins)
#define CLK 2
#define DIO 3
// The amount of time (in milliseconds) between tests
#define TEST_DELAY 2000
const uint8_t SEG_DONE[] = {SEG_B | SEG_C | SEG_D | SEG_E | SEG_G, // d
SEG_A | SEG_B | SEG_C | SEG_D | SEG_E | SEG_F, // O
SEG_C | SEG_E | SEG_G, // n
SEG_A | SEG_D | SEG_E | SEG_F | SEG_G // E
};
TM1637Display display(CLK, DIO);
void setup()
{}
void loop()
{int k;
uint8_t data[] = { 0xff, 0xff, 0xff, 0xff }; uint8_t blank[] = { 0x00, 0x00, 0x00, 0x00 };display.setBrightness(0x0f);
// All segments on
display.setSegments(data);
delay(TEST_DELAY);
// Selectively set different digits
data[0] = display.encodeDigit(0);
data[1] = display.encodeDigit(1);
data[2] = display.encodeDigit(2);
data[3] = display.encodeDigit(3);
display.setSegments(data);
delay(TEST_DELAY);
/*
for(k = 3; k >= 0; k--) {display.setSegments(data, 1, k);
delay(TEST_DELAY);
}
*/
TM1637
kijelző – 2. példa
display.clear();
display.setSegments(data+2, 2, 2);
delay(TEST_DELAY);
display.clear();
display.setSegments(data+2, 2, 1);
delay(TEST_DELAY);
display.clear();
display.setSegments(data+1, 3, 1);
delay(TEST_DELAY);
// Show decimal numbers with/without leading zeros
display.showNumberDec(0, false); // Expect: ___0
delay(TEST_DELAY);
display.showNumberDec(0, true); // Expect: 0000
delay(TEST_DELAY);
display.showNumberDec(1, false); // Expect: ___1
delay(TEST_DELAY);
display.showNumberDec(1, true); // Expect: 0001
delay(TEST_DELAY);
display.showNumberDec(301, false); // Expect: _301
delay(TEST_DELAY);
display.showNumberDec(301, true); // Expect: 0301
delay(TEST_DELAY);
display.clear();
display.showNumberDec(14, false, 2, 1); // Expect: _14_
delay(TEST_DELAY);
display.clear();
display.showNumberDec(4, true, 2, 2); // Expect: __04
delay(TEST_DELAY);
display.showNumberDec(-1, false); // Expect: __-1
delay(TEST_DELAY);
display.showNumberDec(-12); // Expect: _-12
delay(TEST_DELAY);
display.showNumberDec(-999); // Expect: -999
delay(TEST_DELAY);
display.clear();
display.showNumberDec(-5, false, 3, 0); // Expect: _-5_
delay(TEST_DELAY);
display.showNumberHexEx(0xf1af); // Expect: f1Af
delay(TEST_DELAY);
display.showNumberHexEx(0x2c); // Expect: __2C
delay(TEST_DELAY);
display.showNumberHexEx(0xd1, 0, true); // Expect: 00d1
delay(TEST_DELAY);
display.clear();
display.showNumberHexEx(0xd1, 0, true, 2); // Expect: d1__
delay(TEST_DELAY);
TM1637
kijelző – 2. példa
// Run through all the dots
for(k=0; k <= 4; k++) {display.showNumberDecEx(0, (0x80 >> k), true);
delay(TEST_DELAY);
}
// Brightness Test
for(k = 0; k < 4; k++)
data[k] = 0xff;
for(k = 0; k < 7; k++) {display.setBrightness(k);
display.setSegments(data);
delay(TEST_DELAY);
}
// On/Off test
for(k = 0; k < 4; k++) {display.setBrightness(7, false); // Turn off
display.setSegments(data);
delay(TEST_DELAY);
display.setBrightness(7, true); // Turn on
display.setSegments(data);
delay(TEST_DELAY);
}
// Done!
display.setSegments(SEG_DONE);
while(1);
}
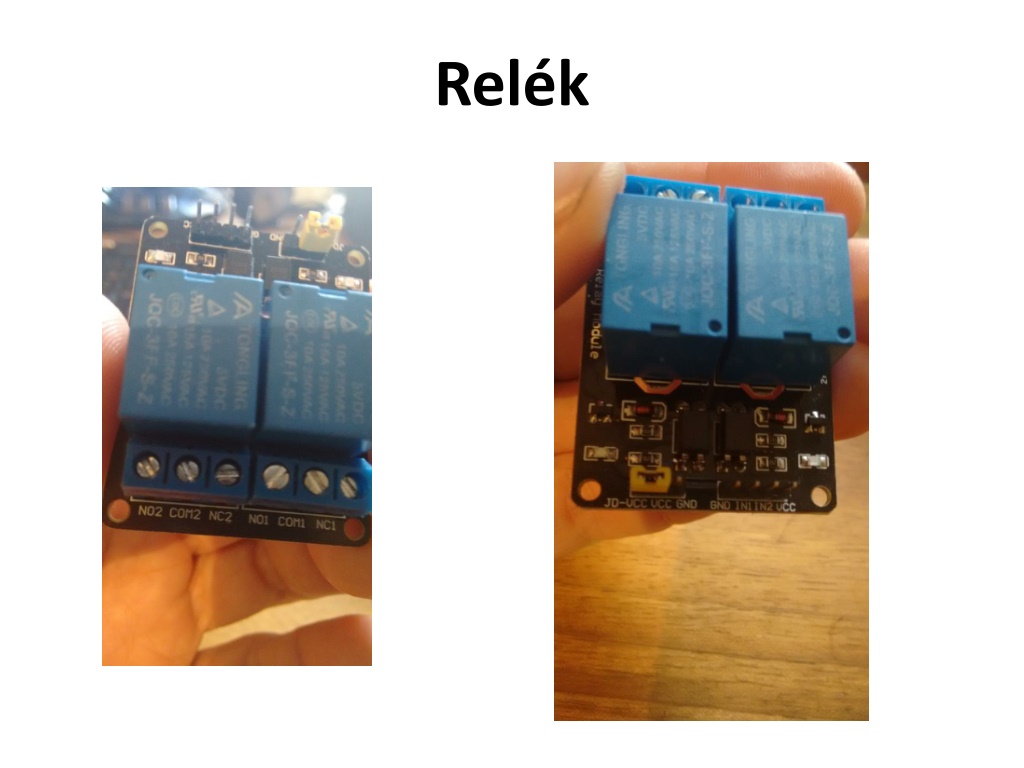
In this content, we dive into different projects involving relays and sensors. From controlling a relay with Arduino to using light sensors and joysticks for interactive applications, these projects offer a hands-on approach to understanding and experimenting with electronic components. Additionally, we explore the TM1637 display for visual output in Arduino projects.

Download Presentation

Please find below an Image/Link to download the presentation.
The content on the website is provided AS IS for your information and personal use only. It may not be sold, licensed, or shared on other websites without obtaining consent from the author.If you encounter any issues during the download, it is possible that the publisher has removed the file from their server.
You are allowed to download the files provided on this website for personal or commercial use, subject to the condition that they are used lawfully. All files are the property of their respective owners.
The content on the website is provided AS IS for your information and personal use only. It may not be sold, licensed, or shared on other websites without obtaining consent from the author.
E N D
Presentation Transcript
Rel 1. plda int relayPin = 3; void setup() { pinMode(relayPin, OUTPUT); digitalWrite(relayPin, HIGH); // initial OFF Serial.begin(9600); delay(2000); } void loop() { digitalWrite(relayPin, LOW); Serial.println("Relay is ON"); Serial.println(""); delay(2000); digitalWrite(relayPin, HIGH); Serial.println("Relay is OFF"); Serial.println(""); delay(1000); }
Rel 2. plda void loop() { int relayPin = 3; int loopDelay = 1000; int lightSensor = A0; int lightSensorValue = analogRead(A0); Serial.println(lightSensorValue); delay(1000); if (lightSensorValue<400){ digitalWrite(relayPin, LOW); Serial.println("Relay is ON"); Serial.println(""); delay(2000); } else { digitalWrite(relayPin, HIGH); Serial.println("Relay is OFF"); Serial.println(""); delay(1000); } } void setup() { pinMode(relayPin, OUTPUT); digitalWrite(relayPin, HIGH); // initial OFF Serial.begin(9600); delay(2000); }
Joystick const int SW_pin = 2; // digital pin connected to SW const int X_pin = 0; // analog pin connected to VRx const int Y_pin = 1; // analog pin connected to VRy if (analogRead(X_pin)>900){ digitalWrite(11, HIGH); delay(300); digitalWrite(11, LOW); Serial.println("RIGHT!"); } if (analogRead(Y_pin)<100){ digitalWrite(8, HIGH); delay(300); digitalWrite(8, LOW); Serial.println("UP!"); } if (analogRead(Y_pin)>900){ digitalWrite(9, HIGH); delay(300); digitalWrite(9, LOW); Serial.println("DOWN!"); } if (digitalRead(SW_pin)==LOW){ digitalWrite(12, HIGH); delay(300); digitalWrite(12, LOW); Serial.println("PRESS!"); } delay(250); } void setup() { pinMode(8, OUTPUT); pinMode(9, OUTPUT); pinMode(10, OUTPUT); pinMode(11, OUTPUT); pinMode(12, OUTPUT); pinMode(SW_pin, INPUT); digitalWrite(SW_pin, HIGH); Serial.begin(9600); } void loop() { Serial.print("X: "); Serial.print(analogRead(X_pin)); Serial.print(" Y: "); Serial.print(analogRead(Y_pin)); Serial.print(" Z: "); Serial.println(digitalRead(SW_pin)); if (analogRead(X_pin)<100){ digitalWrite(10, HIGH); delay(300); digitalWrite(10, LOW); Serial.println("LEFT!"); }
TM1637 kijelz 1. plda #include <TM1637Display.h> #define CLK 2 #define DIO 3 TM1637Display display(CLK, DIO); #define TEST_DELAY 2000 void setup() { } void loop() { display.setBrightness(7); for (int i=0; i<400; i++){ display.showNumberDec(i); delay(20); } while(true); }
TM1637 kijelz 2. plda #include <Arduino.h> #include <TM1637Display.h> void loop() { int k; uint8_t data[] = { 0xff, 0xff, 0xff, 0xff }; uint8_t blank[] = { 0x00, 0x00, 0x00, 0x00 }; display.setBrightness(0x0f); // Module connection pins (Digital Pins) #define CLK 2 #define DIO 3 // All segments on display.setSegments(data); delay(TEST_DELAY); // The amount of time (in milliseconds) between tests #define TEST_DELAY 2000 const uint8_t SEG_DONE[] = { SEG_B | SEG_C | SEG_D | SEG_E | SEG_G, // d SEG_A | SEG_B | SEG_C | SEG_D | SEG_E | SEG_F, // O SEG_C | SEG_E | SEG_G, // n SEG_A | SEG_D | SEG_E | SEG_F | SEG_G // E }; // Selectively set different digits data[0] = display.encodeDigit(0); data[1] = display.encodeDigit(1); data[2] = display.encodeDigit(2); data[3] = display.encodeDigit(3); display.setSegments(data); delay(TEST_DELAY); TM1637Display display(CLK, DIO); /* for(k = 3; k >= 0; k--) { display.setSegments(data, 1, k); delay(TEST_DELAY); } */ void setup() { }
TM1637 kijelz 2. plda display.showNumberDec(301, true); // Expect: 0301 delay(TEST_DELAY); display.clear(); display.showNumberDec(14, false, 2, 1); // Expect: _14_ delay(TEST_DELAY); display.clear(); display.showNumberDec(4, true, 2, 2); // Expect: __04 delay(TEST_DELAY); display.showNumberDec(-1, false); // Expect: __-1 delay(TEST_DELAY); display.showNumberDec(-12); // Expect: _-12 delay(TEST_DELAY); display.showNumberDec(-999); // Expect: -999 delay(TEST_DELAY); display.clear(); display.showNumberDec(-5, false, 3, 0); // Expect: _-5_ delay(TEST_DELAY); display.showNumberHexEx(0xf1af); // Expect: f1Af delay(TEST_DELAY); display.showNumberHexEx(0x2c); // Expect: __2C delay(TEST_DELAY); display.showNumberHexEx(0xd1, 0, true); // Expect: 00d1 delay(TEST_DELAY); display.clear(); display.showNumberHexEx(0xd1, 0, true, 2); // Expect: d1__ delay(TEST_DELAY); display.clear(); display.setSegments(data+2, 2, 2); delay(TEST_DELAY); display.clear(); display.setSegments(data+2, 2, 1); delay(TEST_DELAY); display.clear(); display.setSegments(data+1, 3, 1); delay(TEST_DELAY); // Show decimal numbers with/without leading zeros display.showNumberDec(0, false); // Expect: ___0 delay(TEST_DELAY); display.showNumberDec(0, true); // Expect: 0000 delay(TEST_DELAY); display.showNumberDec(1, false); // Expect: ___1 delay(TEST_DELAY); display.showNumberDec(1, true); // Expect: 0001 delay(TEST_DELAY); display.showNumberDec(301, false); // Expect: _301 delay(TEST_DELAY);
TM1637 kijelz 2. plda // Run through all the dots for(k=0; k <= 4; k++) { display.showNumberDecEx(0, (0x80 >> k), true); delay(TEST_DELAY); } // On/Off test for(k = 0; k < 4; k++) { display.setBrightness(7, false); // Turn off display.setSegments(data); delay(TEST_DELAY); display.setBrightness(7, true); // Turn on display.setSegments(data); delay(TEST_DELAY); } // Brightness Test for(k = 0; k < 4; k++) data[k] = 0xff; for(k = 0; k < 7; k++) { display.setBrightness(k); display.setSegments(data); delay(TEST_DELAY); } // Done! display.setSegments(SEG_DONE); while(1); }