Evacuation Chair Guidelines and Operating Instructions
Detailed guidelines and operating instructions for the Garaventa Evac-Trac CD7 evacuation chair, presented by Risk Management at Mt. SAC. The content covers training resources, terminology, considerations for assisting individuals with disabilities, safe operation practices, setup, loading procedures, and more.
Uploaded on Sep 20, 2024 | 0 Views
Download Presentation

Please find below an Image/Link to download the presentation.
The content on the website is provided AS IS for your information and personal use only. It may not be sold, licensed, or shared on other websites without obtaining consent from the author.If you encounter any issues during the download, it is possible that the publisher has removed the file from their server.
You are allowed to download the files provided on this website for personal or commercial use, subject to the condition that they are used lawfully. All files are the property of their respective owners.
The content on the website is provided AS IS for your information and personal use only. It may not be sold, licensed, or shared on other websites without obtaining consent from the author.
E N D
Presentation Transcript
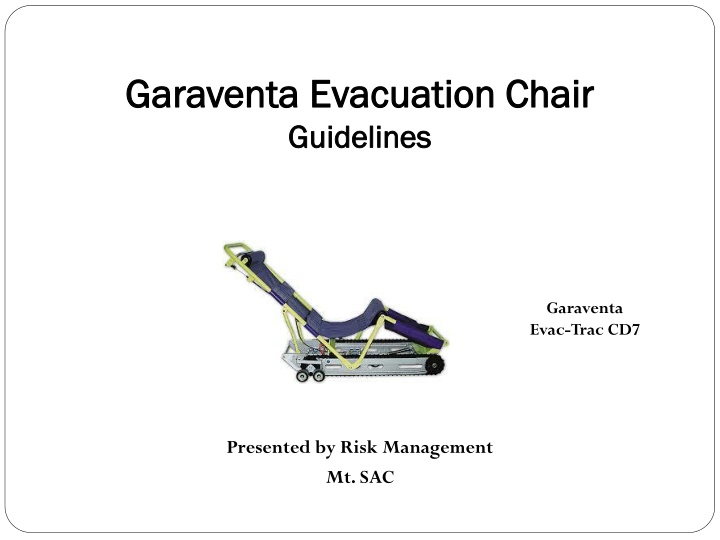
Garaventa Garaventa Evacuation Chair Evacuation Chair Guidelines Guidelines Garaventa Evac-Trac CD7 Presented by Risk Management Mt. SAC
Agenda 1. Training DVD Youtube demo. 2. Terminology 3. Evacuation Chair Operating Instructions 4. Things to Consider 5. Hands-on Training
YoutubeTraining Demonstration https://encrypted-tbn1.gstatic.com/images?q=tbn:ANd9GcT9S8Z2VM4LfbVSzEtGzkvYxFkJq8Kqig9g-YinN16fnEixYM8Niw https://www.youtube.com/watch?v=zM6LHHKASxY
https://encrypted-tbn0.gstatic.com/images?q=tbn:ANd9GcRve78vT2Oppxk2x5aLJiwc41PHzaUzwRaYT9vHdQdUTtIFXbCthttps://encrypted-tbn0.gstatic.com/images?q=tbn:ANd9GcRve78vT2Oppxk2x5aLJiwc41PHzaUzwRaYT9vHdQdUTtIFXbCt Things to Consider Things to Consider Communication Always ASK someone with a disability how you can help BEFORE attempting any rescue technique or giving assistance. Ask how he or she can best be assisted or moved, and whether there are any special considerations or items that need to come with the person. Varying Abilities Persons with disabilities have varying mobility ranges and limitations. Verbal cues - State the following: Tell me how to move you. Are you able to move Can you support yourself
Safe Operation of Safe Operation of Evacu Evacu- -Trac: Trac: CHECK THE STAIRWAY- Do not use on spiral, damaged or stairs with loose carpeting. Use caution on wet or slippery stairs. DO NOT OVERLOAD - Do not use with a passenger heavier than (350 lbs). ENSURE SEAT LATCH IS LOCKED - Do not place a passenger in the chair unless the seat frame is fully opened and locked. Check the indicator window. If it is blue, the seat is properly locked. SECURE THE PASSENGER - Do not use Evacu-Trac without securely restraining the passenger using the safety straps provided. WEAR APPROPRIATE FOOTWEAR - Do not wear high-heeled or slippery shoes when operating Evacu-Trac.
Instructions for Set- -up and Loading up and Loading The Handle Place on a flat surface. Grasp the end of the Handle. Pull it out and up in a quick motion. The seat will latch into its locked, open position. Locked Position Ensure chair is properly locked in open position. Check the Indicator Window on the side of the frame. If it is blue the seat is properly locked. Transfer Move the passenger into Evacu-Trac. Fasten Safety Straps. If you cannot be certain that the passenger s arms will remain in his or her lap, the arms should be wrapped inside the torso safety straps.
Rolling the chair: The handle & Break Release Rolling the chair: The handle & Break Release 1. To roll on a flat surface push down on the handle. 2. Then squeeze the Brake Release Bar with both hands. This will deploy the Front Auxiliary Wheels, making the chair easier to push. Do not try to lower the Front Auxiliary Wheels by pulling the Brake Release Bar without first pushing down on the Handle. This may stretch the Brake Cable. Caution: When operating Evacu-Trac on stairs always wear footwear with flat soles.
Turning the Chair Turning the Chair 3. To turn on a flat surface, press down on the Handle and pivot the chair on the Rear Auxiliary Wheels. 4. Position the chair at the top of the stairs, at a right angle (90 ) to the stairway, with the passenger facing towards the stairs. Operating the chair near the inner core of a stairway will facilitate turning corners at landings. Rear Auxiliary Wheels.
Descending the Stairs Descending the Stairs 5. Approaching the first nose of the Stairs Push the chair forward until the Front Auxiliary Wheels drop off the top step. At this point the chair will stop. To prevent chair from immediately descending, release your grip on the Brake Release Bar. This will engage the Track Parking Brake until you are ready to descend. Lift the handle and tilt chair to the angle of the stairs. 6. Descending the Stairs To descend the stairs, squeeze the Brake Release Bar. To slow the descent speed, if desired, simply loosen your grip on the Release Bar. This will partially engage the Brake.
OPERATING ON STAIRS OPERATING ON STAIRS 7. Stopping the Chair To stop Evacu-Trac on the stairs, slowly release the Brake Release Bar. 8. At the Landings Push down on the Handle and turn Evacu- Trac with all the weight on the Rear Auxiliary Wheels. Keep to the inside of the corner for maximum turning clearance. Align the machine at a right angle to the stairs and proceed down the next flight.
OPERATING ON STAIRS OPERATING ON STAIRS 9. Applying the Breaks Find a flat surface to park Evacu-Trac. Let go of the Brake Release Bar. This will lower the front section of the Tracks to the floor, preventing the unit from rolling. Remove the passenger. 10. Closing the Chair Unlock the Seat Latch by pushing down on the red Seat Latch Release Bar. Push down and forward on the Handle to fold Evacu-Trac closed.
Thank you for assisting the College in with our Emergency Response Plan! For additional information please refer to the Owner s Manual
Hands Hands- -on Training at the on Training at the Stairwell Stairwell
