Developing and Managing Signal Chains for Future Support
Create a system to assign a responsible person for signal chains, initiate the chain creation process, review and finalize the signal chain, and move it to the live product page. Guidelines include color codes for blocks, assigning part numbers to each block, and adding images to the signal chain.
Download Presentation

Please find below an Image/Link to download the presentation.
The content on the website is provided AS IS for your information and personal use only. It may not be sold, licensed, or shared on other websites without obtaining consent from the author.If you encounter any issues during the download, it is possible that the publisher has removed the file from their server.
You are allowed to download the files provided on this website for personal or commercial use, subject to the condition that they are used lawfully. All files are the property of their respective owners.
The content on the website is provided AS IS for your information and personal use only. It may not be sold, licensed, or shared on other websites without obtaining consent from the author.
E N D
Presentation Transcript
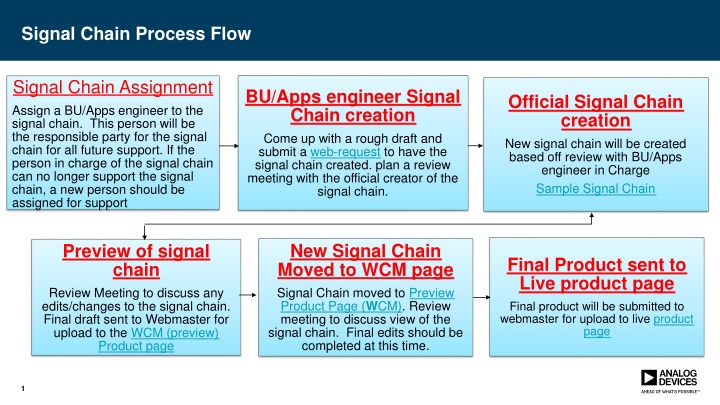
Signal Chain Process Flow Signal Chain Assignment Assign a BU/Apps engineer to the signal chain. This person will be the responsible party for the signal chain for all future support. If the person in charge of the signal chain can no longer support the signal chain, a new person should be assigned for support BU/Apps engineer Signal Chain creation Come up with a rough draft and submit a web-request to have the signal chain created. plan a review meeting with the official creator of the signal chain. Official Signal Chain creation New signal chain will be created based off review with BU/Apps engineer in Charge web-request Sample Signal Chain Sample Signal Chain New Signal Chain Moved to WCM page Preview of signal chain Review Meeting to discuss any edits/changes to the signal chain. Final draft sent to Webmaster for upload to the WCM (preview) Final Product sent to Live product page Final product will be submitted to webmaster for upload to live product Preview Product Page (WCM) Signal Chain moved to Preview Product Page (WCM). Review meeting to discuss view of the signal chain. Final edits should be completed at this time. Preview Product Page (WCM) product page product page page WCM (preview) Product page WCM (preview) Product page Product page 1
External Web Request form. How do I use the web master request form? Open External Web request Click on New Item Enter in your Title (signal chain name) Requested by (you) or whomever you would like to be responsible for support for the signal chain Assign to signal chain creator (Greg Linda) or External webmaster. Use the browse button for exact name Type of request: signal Chain Skip next two fill in options Click on No for is there a press release associated with this request Description: Put what ever you want in this block. It probably won t matter as you will be meeting with the assignee before the Signal chain is started Attach your Signal chain. Use the attach button in upper left corner of request form. Save You are now done and your signal chain will be worked on shortly. 2
Signal Chain Expectations When creating signal chains, there are some guidelines that must be followed Analog color code. Analog Devices is using a color code These colors must be followed for all blocks. 1) MEMS Sensor Other ADI Parts Non-ADI Part Vref Processor RF ISOLATION Switch ADC Filter AMP Signal Chain Helper Plugin: There is an easy way to ensure that you are using the correct color for your blocks. Use Power Point and install the signal chain helper plugin. This tool allows you to select a block and it will appear on the screen as the correct color. If you decide to use a different tool, try to keep the block colors as close as possible. Regardless, when your signal chain is being created, the creator will be using the correct colors. This may slightly change the look of your signal chain Part number assignments: Each block should have part number(s) assigned to it. People do this different ways. These easiest way is to create a spread sheet. Add in all of your blocks that appear in your signal chain and add in the part numbers that you would like to see appear on the web. There are a few rules when assigning parts. 1) All assigned parts will appear on the live site under the signal chain in a PST (product selection table) Since these parts are listed by generic part numbers only, then you should only be using generic part numbers when assigning them to a block. (do not use full models numbers, they will just be changed back to its original generic part number) 2) If the part you assign is not found on any PST, then a red block button will appear under the signal chain with those parts numbers in the block. These button will send you directly to the product page for that part. 3) Assign each part you select a filter parameter. Doing this will allow us to have the most up-to-date parts displayed on your PST for that block. We will ensure that your featured products is displaced first. Images: When adding an image into your signal chain, please try to use ADI approved images. You can use any picture that you want, just know that any images that are not ADI approved will be changed to a similar image that is approved.. 2) 3) 4) 3
Sample Signal chain Transformed live on site Original signal chain presentation 4
