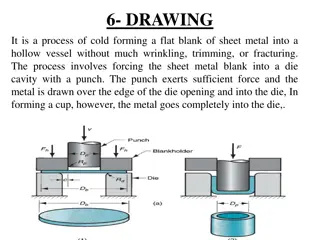
Creating Interactive Drawing App in Flutter
Learn how to create an interactive drawing app in Flutter using GestureDetector for touch input, CustomPaint for rendering, and storing drawing information dynamically. Implement features like color selection, line width adjustment, and gesture detection to enable users to draw on the screen efficiently.

Download Presentation

Please find below an Image/Link to download the presentation.
The content on the website is provided AS IS for your information and personal use only. It may not be sold, licensed, or shared on other websites without obtaining consent from the author.If you encounter any issues during the download, it is possible that the publisher has removed the file from their server.
You are allowed to download the files provided on this website for personal or commercial use, subject to the condition that they are used lawfully. All files are the property of their respective owners.
The content on the website is provided AS IS for your information and personal use only. It may not be sold, licensed, or shared on other websites without obtaining consent from the author.
E N D
Presentation Transcript
Cosc 4735 Flutter Drawing, plus more.
Draw Demo example. So to get this to work we need gesture detector for where the use touches drawing, of course. paint objects, color, width, etc. Also used Bottom Navigation bar for the pictures alert dialogs in the bar and a color picker code from a library.
Gesture Detector before we draw, where need to know how to get touch points.
GuestureDetector A detector will let you capture all kinds of "gestures" from a tap, long press, down, move, up, etc. We are only going to focus on the 3 we need today, where the use touchs the screen, moves their finger, and the lifts their finger. onPanStart, onPanUpdate, onPanEnd https://api.flutter.dev/flutter/widgets/GestureDetector-class.html You wrap a GestureDetector around a widget that you want to detect. in our case, a customPaint widget (explained next section). https://www.youtube.com/watch?v=WhVXkCFPmK4 GestureDetector (Widget of the Week)
GuestureDetector (2) body: GestureDetector( onPanUpdate: (details) { //moved }, onPanStart: (details) { // touch down }, onPanEnd: (details) { //touch up. }, child: CustomPaint( size: Size.infinite, ))); so for each of the three methods we get a "details" object. void Function(DragStartDetails details); void Function(DragEndDetails details); void Function(DragUpdateDetails details); it provides information globalPosition offset object, which has x and y for the whole screen localPosotion offset object, which has x and y for inside the widget we are looking at. a timestamp duration if you need Update also includes a delta offset how move it moved.
Offset information. with the Offset information for the localposition start those points in a list. Flutter doesn't have a simple to draw on a image and then display it, like the android draw demo (that I could find). so we have to draw everything every time the screen is redawn So we have a list of drawingPoints List<DrawingPoints> points = []; DrawingPoints will hold a offset and a paint object.
GuestureDetector (3) For each one, we need to store information the position (ie offset) paint object to draw with onPanStart: (details) { setState(() { points.add(DrawingPoints( points: details.localPosition, paint: Paint() ..strokeCap = strokeCap ..color = selectedColor.withOpacity(opacity) ..strokeWidth = strokeWidth)); }); }, It's wrapped in a setState, so it so the CustomPainter will get called and draw the new points.
CustomPaint class and Paint objects too.
CustomPaint widget A widget that provides a canvas on which to draw during the paint phase. It takes a painter: CustomPainter method you likely need a size: You could even include a child: where the widgets would be the forground and the CustomPainter draws a background. child: CustomPaint( size: Size.infinite, painter: DrawingPainter(pointsList: points), ) https://www.youtube.com/watch?v=kp14Y4uHpHs CustomPaint Widget of the week
CustomPainter class. We need to extend the CustomPainter for our DrawingPainter class DrawingPainter extends CustomPainter { DrawingPainter({required this.pointsList}); //parameter we need. @override void paint(Canvas canvas, Size size) { //called when drawing the widget. } @override bool shouldRepaint(covariant CustomPainter oldDelegate) { //should repaint return true; //in my code, I just return true. } https://youtu.be/vvI_NUXK00s Advanced UI with CustomPainter (also talked about mlkit face recognition).
Canvas object The canvas object is very similar to android's canvas object drawArc, drawCircle, drawColor, DrawDRRect, drawImage, drawLine, drawOval, DrawPaint, drawParagraph, drawPath, drawPicture, drawPoints, drawVertices, etc each one takes the required parameters and a paint object. we will use drawLine and drawPoints for our code.
Paint object Paint object as with android color, which is the color to used to draw isAntiAlias bool, Whether to apply anti-aliasing to lines and images drawn on the canvas. strokeCap, The kind of finish to place on the end of lines drawn I chose round, since web didn't support a lot of them. stokeWidth, how wide in pixels. There are more, like android, https://api.flutter.dev/flutter/dart-ui/Paint-class.html
Now we can draw In the paint method, we go through each set of points and draw them. OnPanEnd actually adds a offset position of -1,-1, that way we just draw a point for when the lift their finger. and start again with the next one. @override void paint(Canvas canvas, Size size) { for (int i = 0; i < (pointsList.length - 1); i++) { if (pointsList[i].points.dx != -1 && pointsList[i + 1].points.dx != - 1) { canvas.drawLine(pointsList[i].points, pointsList[i + 1].points, pointsList[i].paint); } else if (pointsList[i].points.dx != -1 && pointsList[i + 1].points.dx == -1) {
The rest BottomNavagtionBar, plus some dialog boxes
Bottom Navigation like android's The "main" code is in the body: section like normal the scaffold has a bottomNavigationBar: entry you provide an array of BottomNavigationBarItem each has an label: and icon: and onTap: and a currentIdex: (for highlighting) You are responsible for keeping track of everything, just like everything in flutter. From the bottomNaviagationBar Demo
Bottom Navigation (2) in the class you also need int _selectedIndex = 0; and the method for onTap: void _onItemTapped(int index) { setState(() { _selectedIndex = index; }); } you need at least the setState() to redraw the highlight, plus the body content. this could be a new screen too. return Scaffold( body: Your content bottomNavigationBar: BottomNavigationBar( items: [ BottomNavigationBarItem( icon: new Icon(Icons.home),label: 'Home',), BottomNavigationBarItem( icon: new Icon(Icons.mail), label: 'Messages', ), BottomNavigationBarItem(icon: Icon(Icons.person), label: 'Profile'), ], currentIndex: _selectedIndex, onTap: _onItemTapped, ),
draw demo code the navigation bar is more complex, since we need include dialogs inside the bar itself. It easier to explain the code while looking at the code and running the program at the same time since in places is changing how the bottomNavigationbar works. If I had written this from scratch, it would be 3 separate dialogs that popped up over the canvas itself. but this code is fancier. https://api.flutter.dev/flutter/material/BottomNavigationBar-class.html
References https://flutter.dev/docs/codelabs https://api.flutter.dev/flutter/material/BottomNavigationBar-class.html https://willowtreeapps.com/ideas/how-to-use-flutter-to-build-an-app-with-bottom-navigation https://flutter.dev/docs/cookbook/lists/long-lists https://api.flutter.dev/flutter/material/AlertDialog-class.html https://www.appsdeveloperblog.com/alert-dialog-with-a-text-field-in-flutter/ https://coflutter.com/flutter-how-to-show-dialog/ https://www.kindacode.com/article/flutter-get-the-position-of-a-tap-x-y-coordinates/ https://api.flutter.dev/flutter/widgets/CustomPaint-class.html https://medium.com/flutter-community/drawing-in-flutter-using-custompainter-307a9f1c21f8 the code used, but badly out of date, it's for flutter 1.0, and many things simply don't work anymore. but it does give a good idea how to draw https://youtu.be/kp14Y4uHpHs CustomPaint (flutter widget of the week)
QA &


")

")


")