Conducting a Test Beam Experiment - Step-by-Step Guide
In this step-by-step guide, you will learn how to set up and conduct a test beam experiment. The experiment involves connecting detectors such as Cerenkov Detectors, Scintillator Counters, Bubble Chambers, and more. The process includes handling signal cables, high voltage connections, and checking background signals with radioactive sources. Safety measures and procedures for working with HV supplies and detectors are emphasized. The guide also covers requesting and working with the MTest beamline, monitoring signals with an oscilloscope during beam tests, and ensuring proper shutdown procedures.

Download Presentation

Please find below an Image/Link to download the presentation.
The content on the website is provided AS IS for your information and personal use only. It may not be sold, licensed, or shared on other websites without obtaining consent from the author.If you encounter any issues during the download, it is possible that the publisher has removed the file from their server.
You are allowed to download the files provided on this website for personal or commercial use, subject to the condition that they are used lawfully. All files are the property of their respective owners.
The content on the website is provided AS IS for your information and personal use only. It may not be sold, licensed, or shared on other websites without obtaining consent from the author.
E N D
Presentation Transcript
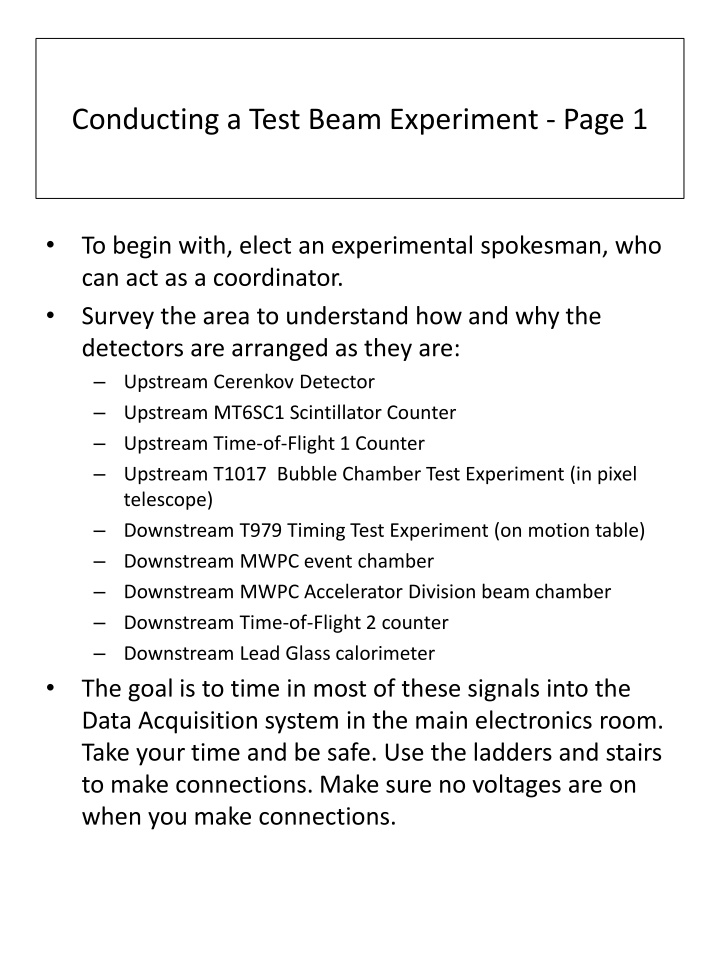
Conducting a Test Beam Experiment - Page 1 To begin with, elect an experimental spokesman, who can act as a coordinator. Survey the area to understand how and why the detectors are arranged as they are: Upstream Cerenkov Detector Upstream MT6SC1 Scintillator Counter Upstream Time-of-Flight 1 Counter Upstream T1017 Bubble Chamber Test Experiment (in pixel telescope) Downstream T979 Timing Test Experiment (on motion table) Downstream MWPC event chamber Downstream MWPC Accelerator Division beam chamber Downstream Time-of-Flight 2 counter Downstream Lead Glass calorimeter The goal is to time in most of these signals into the Data Acquisition system in the main electronics room. Take your time and be safe. Use the ladders and stairs to make connections. Make sure no voltages are on when you make connections.
Conducting a Test Beam Experiment Page 2 In the MT6 enclosure, connect signal cables from the four TOF-2 phototubes into one of the cable patch panels. Also connect high voltage cables from TOF-2. (The TOF-1 counter has already been setup for you.) Connect the lead glass calorimeter signal and HV to one of the patch panels. Plug the two ribbon cables into two electronic cards of the MWPC your choice. Note the orientation and position of the cables. Inside the electronics room, find the corresponding HV and signal cables. Connect the HV cables to one (or more) of the Berkeley Zener diode distribution boxes (called a cow ). Before you do this, make sure the supply voltage is off. Set the supply voltage to 2100 V and put the pins into the 600 V subtraction point. Turn on the supply voltage. All HV distribution out the back of the cow will now be at 1500 V.
Conducting a Test Beam Experiment Page 3 Now you will be hooking up the signals and trying to read them out. At any time during this process, if the spokesman feels that the detectors need to be checked with a radioactive source, then you can ask to get one from the lock box. See if you can see background signals from the TOF-2 counters, using an oscilloscope. If not, use the pins to raise the voltage in 100 V steps until you do. See if you can see background signals from the lead glass calorimeter. Raise the voltage if needed. Plug the ribbon cables from the MWPC into a Lecroy 4616 ECL-NIM converter. Look at the NIM signals. Turn on the MWPC high voltage supply. Monitor the voltage and slowly raise the voltage to 2000V. Check to see if there is any current. There should be less than 100 nanoamps. Very slowly raise voltage to 2600V, keeping a close eye on the current. See if you can see any signals on the chamber now.
Conducting a Test Beam Experiment Page 4 At some time during the morning the spokesman should call the Main Control Room (x3721) for a search and secure of the MTest beamline. When the crew comes, everyone must be out of the enclosure. Ask for 12 GeV beam from the MCR. Check the signals again with beam. Go to lunch at the appropriate time. Be sure to call MCR and ask beam to be shut off. Back from lunch. Ask for beam again. With an oscilloscope, look at the signal cables from TOF-2, the Lead Glass Calorimeter and the Cerenkov, and see if you can see the beam. Create a gate using the coincidence of MT6SC1 and the beam spill signal. Check the timing of this gate compared to the TOF-1, TOF-2, Lead Glass and Cerenkov signals. Adjust the delays accordingly with delay cables so that the TOF signals come after the start of the trigger, and that the Cerenkov and Lead Glass signals fit within the gate.
Conducting a Test Beam Experiment Page 5 Plug the Lead Glass and Cerenkov signals into the CAMAC Lecroy 2249a Analog to Digital converter (ADC). Plug the eight TOF signals into the CAMAC Philips 7186 Time to Digital Converter (TDC). Plug the MWPC ribbon cables into the CAMAC Lecroy 4448 coincidence register. Plug copies of the trigger gate into the appropriate gate inputs on the CAMAC DAQ modules. Go to the EDIT user area on the FTBF DAQ computer (~mtbf_user/users/EDIT) Run the DAQ (./daq) Analyze the data